Creating the illusion of aged paper is a captivating endeavor that adds a touch of vintage charm to your artistic projects or historical reproductions.
While traditional methods often involve the use of liquids to age paper, there are alternative techniques that yield remarkable results without the mess.
In this guide, we will explore how to make paper look old without relying on any liquids. By carefully selecting materials and employing creative methods such as creasing, abrasion, embossing, and controlled heat aging, you’ll be able to transform a clean sheet of paper into a convincing relic of the past.
Whether you’re crafting a prop for a historical play, enhancing your artwork, or simply indulging in a creative pastime, these methods will help you achieve the appearance of beautifully aged paper without the need for liquid substances.
How to Make Paper Look Old Without Liquid?
Creating the appearance of aged paper without using liquids can be a fun and creative endeavor, whether you’re working on a craft project, historical document reproduction, or simply adding a vintage touch to your artwork.
Here’s a step-by-step guide on how to make paper look old without the use of liquids:
Select Your Paper
Begin with a clean sheet of paper, preferably in an off-white or cream color. The type of paper you choose can vary depending on your project, but a slightly thicker paper like cardstock or parchment paper often works well for an aged effect.
Prepare Your Workspace
Create a tidy and organized workspace by laying down a protective surface such as a cutting mat or newspaper. This helps prevent any unintended damage to your workspace.
Creasing and Folding
To mimic the effects of handling and storage over time, gently fold and unfold the paper along various lines. These creases and folds will give your paper a more authentic, aged appearance.
Abrasion and Texture
Use sandpaper or an abrasive pad to lightly rub the surface of the paper. Concentrate on the edges, corners, and areas where natural wear and tear would occur.
This abrasion creates a weathered texture without the use of liquids. You can also use the sandpaper to create subtle texture across the paper’s surface.
Embossing for Depth
Take a dull object such as a spoon or bone folder and create indentations or embossed patterns on the paper. This adds depth and the illusion of years of use.
Vary the pressure and placement of these indentations to achieve a more realistic effect.
Apply Pressure Marks
Lay heavy objects on top of the paper for a period of time. This replicates the effect of paper being stacked with other items over the years, creating indentations and pressure marks that enhance the aged appearance.
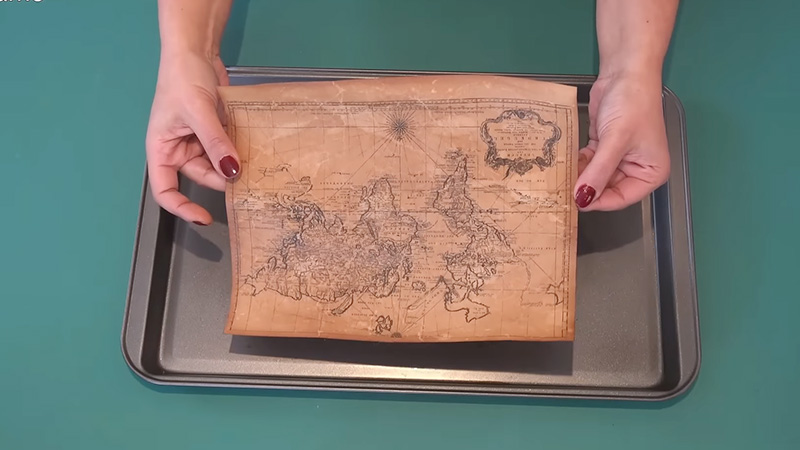
Heat Aging
For controlled heat aging, use an oven or a heat gun. Preheat your oven to a very low temperature, around 200ºF (90ºC). Place the paper on a baking sheet and insert it into the oven for a short period.
Monitor it closely to prevent overheating. Alternatively, use a heat gun to gently apply heat to the paper, causing it to yellow and become more brittle, similar to aging.
Be cautious not to scorch or burn the paper.
Pencil or Charcoal Marks
Lightly rub a pencil or charcoal across the paper’s surface to add subtle smudges and markings. Focus on areas that would naturally accumulate marks over time, such as edges and corners.
This step adds to the paper’s aged and worn appearance.
Final Touches
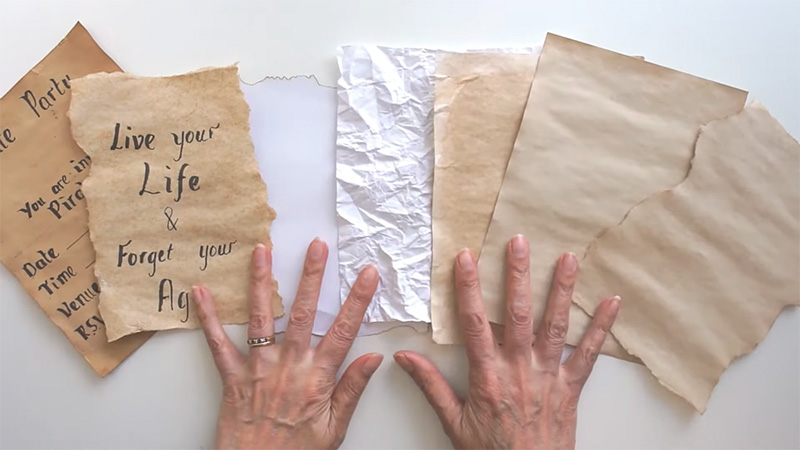
Once you’re satisfied with the aged appearance of your paper, you can use it for various creative projects, such as writing, drawing, or crafting. The combination of these techniques should give your paper a convincing vintage look without the use of liquids.
What Types of Paper Are Ideal for Achieving an Aged Look Without Liquids?
To achieve an aged look without using liquids, selecting the right type of paper is crucial. The choice of paper can significantly impact the authenticity and effectiveness of the aging process.
Here are some ideal types of paper to consider when aiming for an aged appearance without liquids:
Cardstock Paper
Cardstock is a thicker and sturdier paper, making it an excellent choice for achieving an aged look. Its durability allows you to use abrasive techniques and apply pressure without the risk of tearing.
Parchment Paper
Parchment paper, known for its vintage and antique aesthetic, works exceptionally well for creating an aged appearance. It’s naturally translucent, which can add to the authenticity of your project.
Mulberry Paper
Mulberry paper, often used in traditional Asian art and crafts, has a unique texture and is relatively easy to manipulate for aging techniques. Its natural fibers make it a great choice for achieving a weathered look.
Handmade Paper
Handmade papers come in various textures and thicknesses and can lend an authentic, rustic appearance to your project. They are often well-suited for embossing and abrasion.
Recycled Paper
If you’re looking for an eco-friendly option, consider using recycled paper. Its inherent imperfections can enhance the aged look, and the surface texture allows for effective aging techniques.
Tea-stained Paper
Although not a traditional paper type, you can create aged paper by staining it with tea. While this method introduces a liquid, it’s minimal and can be controlled to achieve the desired effect.
Vintage or Antique Paper
If authenticity is your top priority, using actual vintage or antique paper can be an excellent choice. These papers have naturally aged over time and can be incorporated into your project for added historical accuracy.
Does Paper Turn Yellow With Age?
Yes, paper does turn yellow with age due to a natural process called lignin oxidation. Over time, the lignin in paper, which is a natural component of wood fibers used in papermaking, reacts with light and air.
This reaction causes the paper to gradually change color from its original white or off-white state to a yellowish or brownish hue. The rate of yellowing can vary depending on factors such as paper quality, environmental conditions, and exposure to light.
This yellowing is often associated with the aged and vintage appearance of old documents and books.
How Do You Make Paper Look Old Naturally?
Making paper look old naturally involves simulating the effects of time, exposure to the elements, and environmental factors without using artificial methods or chemicals.
Here’s how to achieve a natural aged look for paper:
Choose the Right Paper
Start with a clean sheet of white paper, preferably a slightly thicker type like cardstock or parchment. The thicker paper provides a better canvas for developing texture and aging effects during the process.
Find an Appropriate Storage Location
Select a suitable location for storing the paper. It should be a cool, dry, and dark place to shield it from excessive light and moisture, which can accelerate the aging process prematurely.
Clean Hands
Always handle the paper with clean hands. The oils, dirt, and sweat from your skin can transfer to the paper, affecting the aging process and potentially leaving unwanted marks.
Frequent Handling
Regularly handle the paper. Gently fold and unfold it along various lines to create creases and wrinkles, mirroring the natural wear and tear that paper undergoes over time.
Crumple and Uncrumple
Crumple the paper gently and then carefully uncrumple it. This process adds an extra layer of texture and authenticity to the aged appearance, replicating the effects of years of use.
Natural Materials (Optional)
If you desire to add character to the aging process, consider placing natural materials like leaves, dirt, or sand on or around the paper. As time passes, these materials can leave subtle marks and discoloration, enhancing the aged look.
Time
Patience is key. Allow time to work its magic. As the paper is exposed to the environment, it will gradually develop a yellowish tint and become more brittle, mimicking the aging process.
This natural aging can take several months to years, depending on conditions.
Observe Progress
Regularly check the paper’s progress. It’s essential to assess how it’s aging and if it’s achieving the desired aged appearance. Adjust your handling and storage conditions as necessary to control the aging process.
Inspiration From Antique Materials
Study old books, documents, or artifacts to understand the natural aging patterns, such as discoloration, spotting, and wear. These patterns serve as a valuable reference for replicating the aged appearance on your paper.
Protect the Aged Paper
Once your paper has aged naturally to your satisfaction, consider placing it in a protective sleeve or frame to preserve the aged look and prevent further deterioration.
Proper preservation ensures that your aged paper remains in its desired state for a more extended period.
FAQs
Is it necessary to use an oven or heat gun for aging paper?
No, using heat is optional. You can achieve an aged appearance through techniques like creasing, abrasion, embossing, and pressure marks without heat.
How do I create depth on aged paper?
Use a dull object like a spoon or bone folder to create indentations or embossed patterns for added depth.
Can I use recycled paper for this technique?
Yes, recycled paper with its inherent imperfections can enhance the aged look.
What’s a quick way to add marks for authenticity?
Lightly rub a pencil or charcoal across the paper’s surface to create smudges and markings.
Can I use this aged paper for writing or drawing?
Absolutely! Once aged, the paper can be used for various creative projects, including writing, drawing, or crafting.
To Recap
The art of making paper look old without the use of liquids is a craft that invites us to bridge the past with the present, infusing our creations with a sense of history and character.
By following these steps, you can transform a plain sheet of paper into a remarkable testament to the passage of time. From gentle folds and abrasions that mimic years of handling to controlled heat aging and delicate pencil or charcoal markings, each technique adds depth and authenticity to your project.
The result is a piece of paper that exudes the nostalgia and elegance of bygone eras, allowing you to breathe life into your artistic endeavors while preserving the charm of vintage aesthetics.
So, embrace this creative journey and bring the magic of aged paper to your work, all without a single drop of liquid.
Leave a Reply