Embroidery has been a cherished craft for centuries, transforming plain fabrics into intricate works of art. Among the myriad of embroidery techniques, the chain stitch stands out for its versatility and timeless elegance.
Whether you’re a beginner eager to explore the world of needlework or an experienced embroiderer seeking to refine your skills, mastering the chain stitch is a rewarding journey.
In this comprehensive guide, we will unravel how to do chain stitch embroidery. From selecting the right materials to creating captivating designs, you’ll gain the knowledge and confidence needed to breathe life into your fabric canvases.
We’ll explore the basic techniques, delve into creative variations, and provide valuable tips to troubleshoot common challenges along the way.
Unlock the potential of this classic stitch, as we embark on a creative adventure that blends tradition with modern flair. Let’s begin our exploration of the enchanting world of chain stitch embroidery.
How to Do Chain Stitch Embroidery?
Among the plethora of embroidery stitches, the chain stitch stands out for its versatility and classic appeal. In this comprehensive guide, we’ll take you through the steps to master the art of chain stitch embroidery.
Materials You’ll Need
Before we dive into the embroidery process, let’s gather the essential materials. Start with a piece of fabric that suits your project. Cotton and linen are popular choices for their ease of stitching.
The embroidery hoop helps to keep your fabric taut while you work. It comes in various sizes; choose one that accommodates your design.
Select a sharp, thin needle with a large eye for ease of threading. Choose your thread colors wisely to match your design.
Embroidery floss is typically made up of six strands; you can use all six or separate them for a finer look. Sharp scissors are crucial for cutting thread cleanly.
If you’re a beginner, consider starting with a simple pattern or drawing your own design on the fabric using an erasable fabric marker.
Prepare Your Fabric
Begin by cutting your fabric to the desired size and placing it in the embroidery hoop. Make sure the fabric is taut but not stretched too tightly. Thread your embroidery needle with a length of embroidery floss.
You can use all six strands or separate them depending on the thickness you desire. Knot the end of the thread.
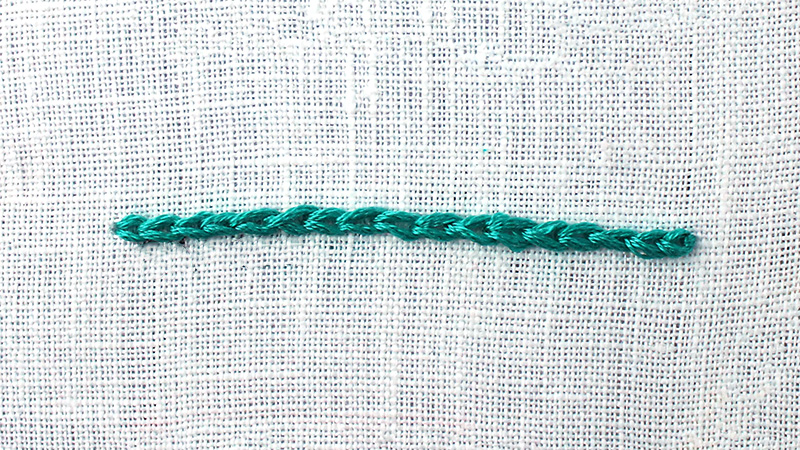
Creating the Chain Stitch
The chain stitch is known for its looped appearance, resembling a chain. Here’s how to create it. Bring your threaded needle up from the backside of the fabric to the point where you want to begin your chain stitch.
Insert the needle back into the fabric very close to where it came out, about a stitch length away. Leave a small loop of thread on the surface.
Securing the Loop
Pass the needle through the loop from the top to the bottom, making sure the loop doesn’t slip off the needle. This step secures the first loop.
Now, bring the needle up again from the back, a short distance from the first stitch, creating another loop. Just like before, pass the needle through the loop from top to bottom. This is your first chain stitch.
Repeat the Process
Continue this process, creating chain stitches in a row. Make sure to maintain even spacing between each stitch for a neat look.
T finish a chain stitch, bring the needle up from the back at the end of your row, and pass it through the last loop, securing it. You can then bring the needle to the backside of the fabric and secure the thread with a knot.
Tips for Successful Chain Stitch Embroidery
Like any skill, practice makes perfect. Start with simple designs and gradually work your way up to more complex patterns. Maintain a consistent tension in your stitches. This ensures that your chain stitches look uniform and neat.
Try different numbers of strands of embroidery floss to achieve various textures and effects in your embroidery. If you’re working on thicker fabrics, using a thimble can protect your fingers from getting sore.
To add creativity to your projects, experiment with the reverse chain stitch. Instead of creating loops on one side, create them on both sides of the fabric for a different look. Always secure the loose ends of your thread by weaving them into the back of your work or knotting them.
What Are the Advanced Chain Stitch Techniques?
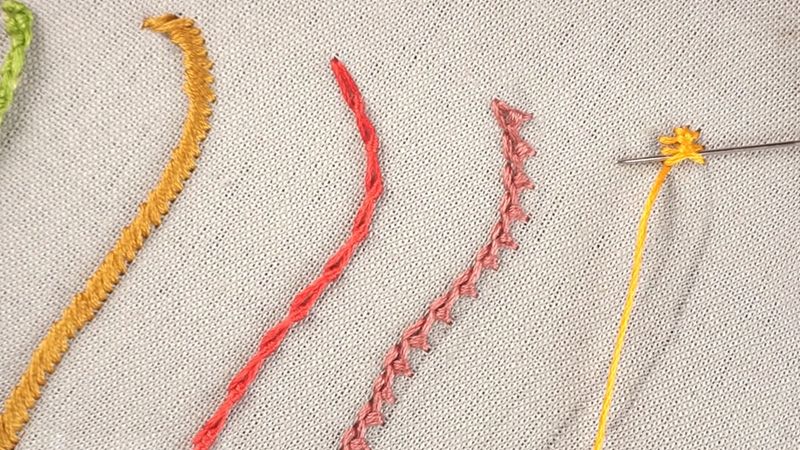
Once you’ve mastered the basic chain stitch in embroidery, you’ll be eager to explore more advanced techniques that allow you to add depth, detail, and creativity to your projects.
In this guide, we’ll delve into some advanced chain stitch techniques that will take your embroidery skills to the next level.
Detached Chain Stitch
The detached chain stitch, also known as the lazy daisy stitch, is a variation of the chain stitch where each chain stands alone, unconnected to others in a row. This technique is often used to create delicate, petal-like shapes, making it perfect for floral and leaf motifs.
How to Create a Detached Chain Stitch?
Start by bringing your threaded needle up from the back of the fabric at the point where you want to create the first chain. Insert the needle back into the fabric very close to where it came out, but don’t pull the thread all the way through.
Leave a small loop of thread on the surface. Pass the needle through the loop from top to bottom, securing the loop and forming a petal shape.
To create additional detached chain stitches, repeat the process, leaving spaces between each petal to achieve the desired effect. While finishing a detached chain, bring the needle to the backside of the fabric and secure the thread with a knot.
Double Chain Stitch
The double chain stitch adds an extra layer of texture and dimension to your embroidery. It involves creating two parallel rows of chain stitches, often used to outline shapes, create borders, or add depth to your designs.
How to Create a Double Chain Stitch?
Start by creating a regular chain stitch. Once you have your first chain, create a second chain row parallel to the first. The distance between the two rows can be adjusted to achieve the desired thickness.
Continue working in this manner, alternating between the two rows to create a double chain stitch pattern. To finish, secure the thread on the backside of the fabric with a knot.
Whipped Chain Stitch
The whipped chain stitch is a decorative variation that involves adding another thread, often of a contrasting color, to your chain stitches. This thread is “whipped” around the chains, giving your embroidery a unique texture and visual interest.
How to Create a Whipped Chain Stitch?
Begin by creating a row of regular chain stitches. Choose a contrasting thread for whipping. Thread your needle with this contrasting thread.
Bring your needle up from the back of the fabric at the starting point of your chain stitches. Pass your needle under the first chain stitch, wrapping the contrasting thread around it. Repeat this process for each chain in the row.
After whipping all the chains, secure the contrasting thread on the backside of the fabric with a knot.
Heavy Chain Stitch
The heavy chain stitch, also known as the braided chain stitch, is a variation that results in a thicker, more pronounced chain. It’s ideal for creating bold outlines, text, or any area where you want to add emphasis.
How to Create a Heavy Chain Stitch?
Begin by bringing your threaded needle up from the back of the fabric at the starting point of your chain.
Insert the needle back into the fabric very close to where it came out, but leave a longer loop of thread on the surface compared to a regular chain stitch. Pass the needle through the loop from top to bottom, securing the loop.
Continue creating heavy chain stitches by repeating this process, ensuring that the loops are larger and more prominent than those in a regular chain stitch. To finish, secure the thread on the backside of the fabric with a knot.
These advanced chain stitch techniques open up a world of possibilities for your embroidery projects. Experiment with them to add depth, texture, and creativity to your designs.
FAQs
What is Chain Stitch Embroidery?
Chain stitch embroidery is a hand-embroidery technique that creates a continuous, linked chain-like pattern with thread. It’s commonly used to outline designs, create text, or fill in shapes with a textured look.
How Do I Start a Chain Stitch?
To start a chain stitch, bring your needle up from the backside of the fabric where you want to begin. Then, insert the needle back into the same hole and bring it up a short distance away. Loop the thread under the needle and pull it through to create the first chain link.
How Do I Make Consistent Chain Stitches?
Consistency in chain stitches comes with practice. Maintain an even tension on the thread as you work. Ensure that the distance between each stitch is uniform, and keep the loops on the same side of your fabric for a neat appearance.
How Do I End a Chain Stitch Line?
To end a chain stitch line, make a small stitch on the backside of your fabric, securing the last chain link in place. Trim any excess thread. This prevents the stitches from unraveling.
What Can I Use Chain Stitch Embroidery For?
Chain stitch embroidery is versatile and can be used for various decorative purposes. You can use it to outline floral designs, create lettering on clothing or accessories, embellish quilts, or add intricate details to fabric projects.
Conclusion
Mastering the art of chain stitch embroidery opens the door to a world of creative possibilities. We’ve journeyed through the fundamentals, from choosing the right materials to understanding the basic technique.
We’ve also explored variations that allow you to add your unique touch to your embroidery projects. As you continue to practice and refine your skills, remember that embroidery is not just a craft; it’s a form of self-expression.
Each stitch tells a story, and every project is a canvas for your imagination. With dedication and patience, you’ll watch your embroidery skills flourish, creating beautiful, personalized pieces that will be cherished for generations.
So, pick up your needle and thread, and let your creativity flow. Whether you’re stitching for relaxation, personal satisfaction, or to gift your creations to loved ones, chain stitch embroidery is a timeless art that rewards your effort with beauty and elegance.
Leave a Reply