In the realm of crafting and design, precision and creativity go hand in hand. One indispensable skill that unlocks boundless possibilities is the art of welding text and images in Cricut Design Space.
This versatile feature allows creators to seamlessly merge text and graphics, resulting in visually stunning, cohesive designs.
Whether you’re crafting logos, monograms, layered projects, or unique typography, mastering welding can elevate your projects to professional levels. However, like any tool, it comes with its nuances and challenges.
In this guide, we’ll explore the intricacies of welding in Cricut Design Space, equipping you with the knowledge and skills to bring your creative visions to life with precision and finesse.
What is welding in Cricut Design Space?
Welding in Cricut Design Space is a crucial feature that allows users to fuse multiple overlapping elements into a single, seamless shape.
This process essentially merges the selected elements, eliminating any overlapping cut lines and creating a unified design. It’s particularly useful when combining text or intricate images, ensuring they cut or print as one cohesive unit.
For example, welding is indispensable when creating intricate logos, typography-based designs, or complex graphics. This function empowers users to achieve professional-grade results, enhancing precision and clarity in their crafting projects.
Understanding and mastering welding opens up a world of possibilities for creating personalized and intricate designs with the Cricut cutting machine.
How to Weld Text and Images in Cricut Design Space?
Welding text and images in Cricut Design Space is a great way to create unique and personalized designs for various projects.
Whether you’re working on custom apparel, home decor, or paper crafts, this technique can help you achieve a polished and professional look.
Here’s a step-by-step guide on how to weld text and images in Cricut Design Space:
Step 1: Open Cricut Design Space
Ensure you have the Cricut Design Space software installed on your computer or open the app on your mobile device.
When you’re new to it, take a moment to familiarize yourself with the layout. The canvas is where you’ll be creating your project, and the left-hand panel provides access to tools like text, images, and shapes.
Step 2: Create or Import Your Design
When you’re starting from scratch, think about the theme and style of your project. Consider colors, fonts, and any specific images you want to incorporate.
For importing, make sure your files are saved in compatible formats (like PNG or SVG for images, and fonts in supported formats like TTF or OTF).
Step 3: Add Text and Images
When adding text, don’t forget to experiment with different fonts and sizes to find the perfect look for your project. You can even curve or warp the text if you want to add a unique touch.
When selecting images, consider using SVG files for better quality and scalability. If you’re using your own images, ensure they’re high-resolution and clear.
Step 4: Arrange and Resize
Take your time to arrange the elements on the canvas. Consider the composition and make sure they overlap where you want them to be welded. You can use the alignment tools to help you position them precisely.
Resizing is important to ensure that the proportions of your design are just right. Remember, you can always use the “Undo” button if you want to go back a step.
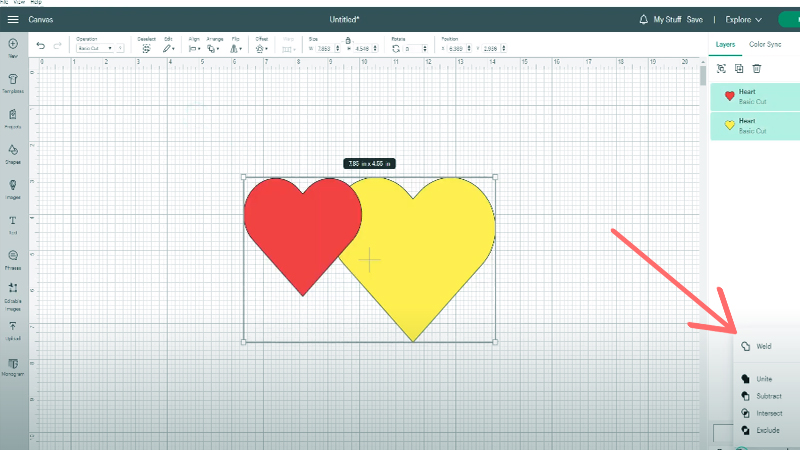
Step 5: Select and Weld
This step is crucial. Ensure that you select all the elements you want to weld together. You can select multiple elements by holding down the “Shift” key on your keyboard while clicking on them, or by clicking and dragging to create a selection box.
When you click “Weld,” you’ll see the elements blend together on the canvas. Take a moment to review and make sure everything looks as you intended.
Step 6: Adjust and Finalize
After welding, you might want to make further adjustments. You can change the color of your design or add additional elements like shapes or other text.
Remember that you can always use the “Undo” button if you’re not happy with any changes you make.
Step 7: Cutting and Final Output
Before sending your design to the Cricut machine, double-check that you’ve selected the correct material setting. The machine’s cut settings can be adjusted in the software. Ensure your machine is powered on and properly connected.
Once you initiate the cutting process, the machine will precisely follow the lines of your welded design, creating a clean and professional-looking final product.
Benefits of Welding Text and Images in Cricut Design Space
Welding text and images in Cricut Design Space offers a multitude of benefits, empowering crafters and designers to elevate their projects with precision and creativity.
Here are some compelling advantages:
Seamless Integration
Welding enables the seamless integration of text and images. It allows you to create intricate, visually appealing designs by merging various elements into one cohesive piece.
Enhanced Clarity
When you weld, overlapping lines are removed, resulting in cleaner, more professional-looking designs. This is especially valuable when working with intricate fonts or detailed images.
Customization
Welding offers creative freedom. You can customize designs to suit your preferences, ensuring that your projects are unique and tailored to your vision.
Efficiency
By welding elements together, you reduce the number of individual components, making it easier to manage and manipulate your designs. This streamlines the design process and enhances efficiency.
Precise Cutting
When you send a welded design to your Cricut machine, it cuts with precision, reducing the risk of misalignment or errors during the cutting process.
Versatility
Welding is not limited to text and images. It can be applied to shapes, making it versatile for various crafting projects, from home decor to personalized gifts.
Professional Finish
Welded designs often have a professional finish, making them suitable for selling your crafts or gifting to others.
Methods of Using Weld Text and Images in Cricut Design Space
Welding text and images in Cricut Design Space offers a versatile way to create unique and customized designs.
Here are four methods for using this feature effectively:
Custom Logos and Graphics
Creating custom logos and graphics involves importing or designing unique visual elements.
You can then incorporate text, such as a company name or slogan, into your design. By positioning the text strategically within the graphic, you can achieve a seamless integration.
Finally, selecting both the text and graphic and using the “Weld” function merges them into a single, unified logo or graphic.
Monogramming
For monogramming, start by selecting a single letter or initial from a chosen font. Then, import or design decorative elements like frames or flourishes. Position the chosen letter inside the decorative element to achieve the desired look.
By selecting both the letter and decorative element and using the “Weld” function, you create a beautifully merged monogram.
Layered Designs
Layered projects involve designing with various elements like shapes, images, and text. Overlapping these elements in your design creates depth and complexity.
To ensure each layer cuts and adheres perfectly, weld the elements in each layer separately. Finally, stack the welded layers together for a stunning, three-dimensional effect.
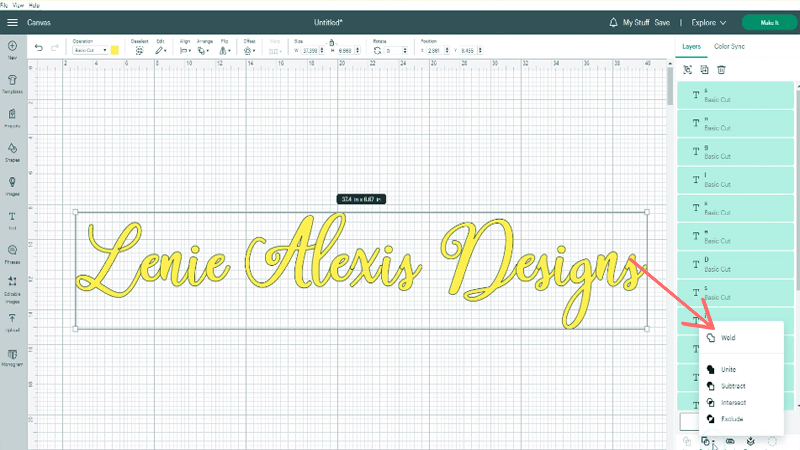
Custom Typography
To create custom typography, select a font and type out a word or phrase. Duplicate the text element multiple times and adjust the letter spacing (kerning) for each duplicate.
By positioning the duplicates to overlap, you achieve a unique typography effect. Using the “Weld” function, merge the overlapping text elements into a single, cohesive word or phrase.
Differences Between Weld and Attach
“Weld” and “Attach” are both essential features in Cricut Design Space, but they serve distinct purposes.
Here are the key differences between the two:
Weld
- Function: Welding permanently joins selected shapes or text into a single, unified object. It eliminates overlapping cut lines, creating a seamless design.
- Result: After welding, the selected elements are treated as a single unit. They share a common cut path, which means they will be cut as one piece.
- Editing: Welded elements cannot be ungrouped or individually edited. They are considered a single entity.
- Use Case: Welding is ideal for merging elements to create custom shapes, and intricate designs, or to join overlapping text.
- Example: When you have overlapping letters in a word, welding them creates a single, connected word without separate cut lines for each letter.
Attach
- Function: Attaching allows you to temporarily group elements together on the canvas. This ensures they stay in their designated positions during the cutting process.
- Result: Attached elements maintain their individual properties (color, size, etc.) but are locked in place for cutting. They are still recognized as separate pieces.
- Editing: Attach does not permanently merge elements. You can detach them at any time to reposition or modify individual elements.
- Use Case: Attach is useful for maintaining the layout of your design. For instance, if you want to keep text in a specific arrangement or ensure parts of a complex design stay together during cutting.
- Example: When creating a card with multiple elements, attaching ensures each element is cut precisely where it’s positioned on the canvas.
Common Issues and How to Fix Them When Welding
Welding in Cricut Design Space can be a powerful tool, but it’s not without its potential challenges.
Here are some common issues that may arise when welding, along with solutions to fix them:
Incomplete Welding
- Issue: Sometimes, when welding multiple elements, the welding process may not complete as expected, leaving some areas unjoined.
- Solution: Ensure that the elements you want to weld are correctly overlapped. Zoom in to check for any small gaps or disconnected lines.
Overlapping Elements Aren’t Welding
- Issue: You’ve selected overlapping elements, but the “Weld” button remains grayed out, indicating you can’t weld them.
- Solution: Verify that the elements you’re trying to weld are on the same layer. If they’re on different layers, you’ll need to move them to the same layer by selecting and dragging them in the Layers panel.
Loss of Detail or Distortion
- Issue: Welding complex or detailed designs can sometimes result in a loss of detail or distortion.
- Solution: Before welding, make a copy of your design and keep the original intact. Weld the copy, and if you encounter detail loss or distortion, consider simplifying your design or adjusting the size of your elements to maintain clarity.
Unexpected Changes in Layer Order
- Issue: After welding, the layer order of your elements may change, which can affect the final appearance.
- Solution: Before welding, right-click on the elements and choose “Move to Front” or “Move to Back” to adjust their layer order. Welding may alter the layer order, so it’s essential to plan the order before welding.
Inability to Edit Welded Elements
- Issue: Once elements are welded, you cannot ungroup or edit them individually.
- Solution: Always keep a copy of your design before welding. If you need to make changes, go back to the unmerged copy, edit the individual elements, and then re-weld as needed.
Welding Complex Fonts
- Issue: Some complex fonts may not weld correctly and could result in odd shapes or disjointed characters.
- Solution: Choose fonts carefully when welding text. Simpler, thicker fonts tend to work better for welding. If you encounter issues, consider simplifying the font or breaking the text into individual letters before welding.
Loss of Fill or Color
- Issue: After welding, you may notice that the fill or color of your design disappears.
- Solution: This can happen if you have overlapping elements with different fill colors. Before welding, select all the elements and choose a single fill color or pattern. After welding, you can adjust the color or fill as needed.
FAQs
What does “weld” mean in Cricut Design Space?
Welding in Cricut Design Space is a feature that permanently joins selected shapes or text into a single, unified object.
Can I un-weld elements after they’ve been welded?
No, once elements are welded, they cannot be ungrouped or edited individually.
Why is the “Weld” button grayed out when I try to weld elements?
The “Weld” button may be grayed out if the elements you’re trying to weld are on different layers.
How can I ensure that my welded design maintains its detail and clarity?
Before welding complex or detailed designs, consider making a copy of your design to keep the original intact.
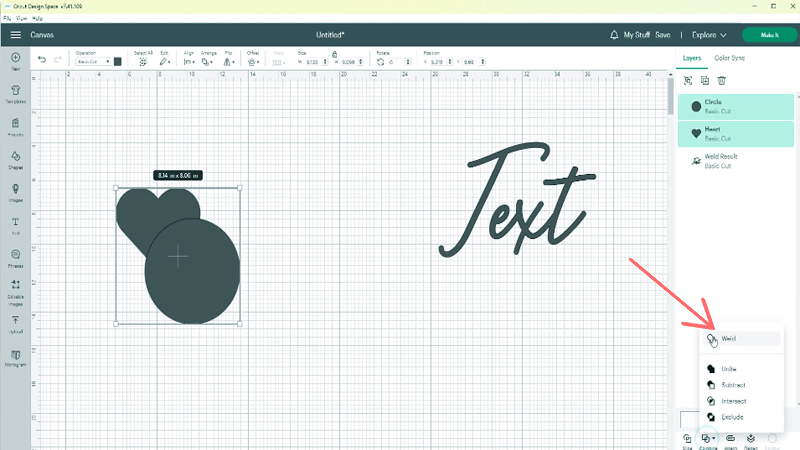
Can I weld text with images in Cricut Design Space?
Yes, you can weld text with images in Cricut Design Space.
Wrap Up
Mastering the art of welding text and images in Cricut Design Space opens up a realm of creative possibilities.
This process, which seamlessly merges overlapping elements, grants crafters and designers the ability to craft intricate, professional-grade designs.
Whether creating logos, monograms, layered projects, or custom typography, the welding feature ensures precision and visual appeal. However, it’s crucial to be mindful of potential challenges, like maintaining detail and layer order.
By understanding the nuances of welding, users can confidently wield this tool, transforming their ideas into beautifully unified creations that stand out in the world of crafting and design.
Leave a Reply