Embroidery, a timeless craft celebrated for its intricate designs on fabrics, takes a captivating twist when introduced to the delicate world of paper. Surprisingly, yes, you can indeed embark on the enchanting journey of paper embroidery.
This innovative technique opens possibilities for transforming ordinary paper into exquisite works of art.
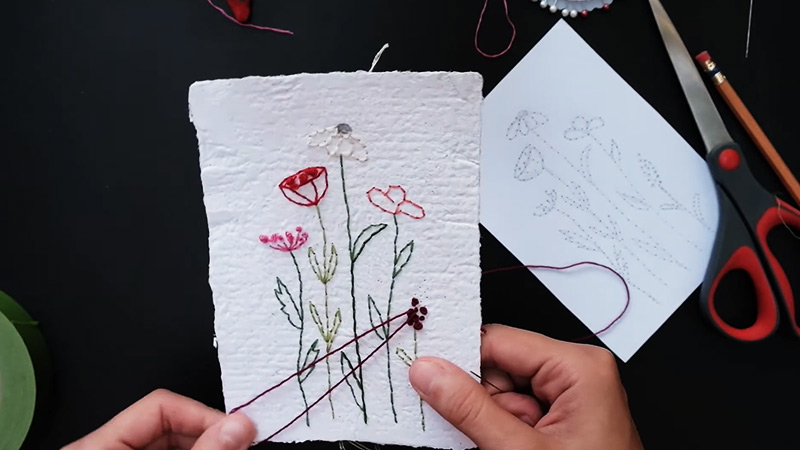
Diverging from traditional textile canvases, paper embroidery involves creating meticulous patterns using a needle and thread on sturdy paper.
Ideal for crafting personalized cards, bookmarks, or framed art, this unique fusion of needlework and paper crafts allows artisans to bring texture, color, and a touch of elegance to their creations.
Discover the artistry and versatility in the delicate marriage of embroidery and paper.
What Is Paper Embroidery?
Paper embroidery is a creative craft that involves stitching on paper to form decorative patterns and designs.
Unlike traditional fabric embroidery, it utilizes sturdy paper, such as cardstock or watercolor paper, and employs a needle and thread to navigate through small holes made in the paper.
This versatile technique is commonly applied in card making, scrapbooking, and other paper-based crafts. Crafters choose or create designs, make precise punctures, and use various stitches to bring their artistic visions to life.
Paper embroidery adds texture, dimension, and personalized touch to a wide array of paper projects, making it a popular and enjoyable artistic pursuit.
Can You Do Embroidery on Paper?
Yes, embroidery on paper, known as paper embroidery, is a captivating and creative craft. This technique uses a needle and thread to stitch intricate designs on sturdy paper, such as cardstock or watercolor paper.
Crafters create small holes in the paper, following a pattern or template, and then employ various embroidery stitches to bring the design to life. Unlike fabric embroidery, paper embroidery doesn’t require a hoop.
The resulting textured and visually appealing artwork can be applied to diverse paper-based projects, including cards, bookmarks, and framed pieces. It combines the meticulous artistry of embroidery with the unique possibilities offered by paper as a medium.
How To Do Paper Embroidery? Step-By-Step Guide
Paper embroidery is a creative and enjoyable craft that allows you to add a unique touch to paper-based projects. Here’s a step-by-step guide on how to do paper embroidery:
Materials You’ll Need
- Sturdy paper (cardstock, watercolor paper, or recycled cardboard)
- Needle (tapestry or crewel needles are suitable)
- Embroidery thread, floss, or thin thread
- Piercing tool or needle
- Template or pattern
- Scissors
- Tape
- Optional embellishments (beads, sequins, buttons, ribbons)
Step 1: Select Your Paper
Choose a type of paper that is thick enough to withstand stitching without tearing. Cardstock and watercolor paper are excellent choices for paper embroidery.
Step 2: Choose or Create a Design
Decide on a design for your paper embroidery. You can find templates online, use pre-made patterns, or unleash your creativity and design your own. For beginners, start with simpler designs.
Step 3: Prepare the Paper
If using a template, trace or transfer the design onto your chosen paper using a pencil or marker. Make sure the paper is flat and securely placed on your work surface.
Step 4: Make Holes
Use a piercing tool or needle to create small holes along the lines of your design. These holes will serve as guides for your stitches. Place a piercing mat or foam board underneath to protect your work surface.
Step 5: Thread the Needle
Cut a length of embroidery thread, thread it through the eye of the needle, and tie a knot at the end. Ensure the thread is long enough for your entire design but not overly long to avoid tangling.
Step 6: Start Stitching
Begin stitching through the holes, following your design. Experiment with different stitches to create texture and visual interest. Common stitches include running stitch, backstitch, stem stitch, chain stitch, and French knots.
Step 7: Secure Ends
When finishing a section or color, tape or knot the ends of the thread on the back of the paper to secure your stitches. Trim any excess thread.
Step 8: Add Embellishments (Optional)
Enhance your paper embroidery by incorporating optional embellishments like beads, sequins, buttons, or ribbons. Be mindful of the paper’s capacity to hold additional weight.
Step 9: Finish and Display
Once your paper embroidery is complete, secure the final threads on the back, trim any excess, and consider framing your finished piece or integrating it into a larger paper craft project.
How Do You Embroider on Paper Without Ripping It?
Embroidering on paper without ripping it requires a combination of the right materials, techniques, and careful handling.
Here are some tips to help you avoid tearing the paper while embroidering:
Choose the Right Paper
Opt for sturdy paper such as cardstock, watercolor paper, or recycled cardboard. These materials provide a robust base for stitching without being prone to tearing.
Select a Fine Needle
Use a fine needle, like a tapestry or crewel needle, to minimize the size of the holes created in the paper. This helps maintain the paper’s structural integrity.
Employ a Piercing Tool
Before stitching, use a piercing tool or a fine needle to create small, precise holes along the lines of your design. This pre-piercing minimizes resistance, reducing the risk of tearing.
Practice Gentle Stitching
Adopt a gentle stitching technique. Avoid pulling the thread too tightly, as excessive tension can cause the paper to warp or tear. Allow the needle to move through the holes smoothly.
Use Lightweight Thread
Choose lightweight embroidery thread or floss suitable for paper embroidery. Heavier threads may stress the paper and increase the likelihood of tearing.
Mindful Stitching Order
Plan the order in which you stitch your design. Starting from the center and working outward helps distribute stress evenly across the paper, reducing the risk of tearing.
Avoid Overlapping Stitches
Be mindful of stitch density. Overlapping stitches excessively can weaken the paper. Plan your stitches strategically, minimizing unnecessary penetrations.
Secure Paper Edges
Tape down the edges of the paper to your work surface or use a light adhesive to prevent shifting during embroidery. This stabilizes the paper, reducing the risk of tearing.
Start with Simple Designs
If you’re new to paper embroidery, begin with simpler designs. This allows you to hone your skills and understand how the paper responds to various stitches.
Reinforce Weak Areas
If you notice specific areas weakening, reinforce them with clear tape on the back. This extra support helps maintain the paper’s integrity.
Embellish Thoughtfully
If adding embellishments like beads or sequins, consider their weight. Distribute heavier embellishments across the design to prevent concentrated stress points.
Allow Space Between Stitches
When planning your design, leave some space between stitches, especially in intricate areas. This prevents overcrowding and potential tearing.
FAQs
Can beginners try embroidery on paper?
Absolutely, beginners can start with simple designs and gradually progress to more intricate patterns. Practicing on scrap paper first helps develop skills and confidence in paper embroidery.
What are the applications of paper embroidery?
Paper embroidery can be applied to various paper crafts such as card making, scrapbooking, and framed artwork. It adds a unique and personalized touch to projects like cards, bookmarks, and decorative paper items.
Can you use regular sewing thread for paper embroidery?
Yes, you can use regular sewing thread for paper embroidery. However, it’s advisable to choose a lightweight thread to avoid adding excessive stress to the paper.
Can you wash or wet paper embroidery projects?
It’s not advisable to expose paper embroidery projects to water or excessive moisture, as it can compromise the integrity of the paper and cause it to warp or tear. Protect finished projects from humidity.
How do you fix mistakes in paper embroidery?
If you make a mistake, carefully remove the stitches with a fine-tipped tweezer or needle. Small tears can be reinforced with clear tape on the back. It’s always helpful to practice on scrap paper before starting your main project.
To Recap
The world of paper embroidery unveils a fascinating avenue for creative expression, merging the precision of needlework with the adaptability of paper.
Through this craft, ordinary sheets transform into captivating canvases, inviting artisans to infuse their unique flair into every stitch.
Whether adorning heartfelt greeting cards, embellishing scrapbooks, or framing intricate designs, paper embroidery adds a distinctive touch to artistic pursuits.
As one delves into this delicate fusion, the realization unfolds that the boundaries between traditional textiles and unconventional mediums can be beautifully blurred.
In the realm of paper embroidery, each stitch tells a story, turning simple paper into a canvas for limitless imagination and aesthetic innovation.
Leave a Reply