Air-dry clay, also known as air-hardening clay or self-hardening clay, is a type of clay that hardens and becomes solid when exposed to air. It does not need to be baked or fired in a kiln like traditional ceramics. This makes it a convenient and accessible material for creating various crafts and projects, including jewelry.
One of the main advantages of using air-dry clay for jewelry making is that it is relatively inexpensive and easy to work with. It can be molded and shaped by hand or with tools, and it does not require any special equipment or facilities to use. It is also available in a variety of colors, making it easy to find a shade that matches your personal style.
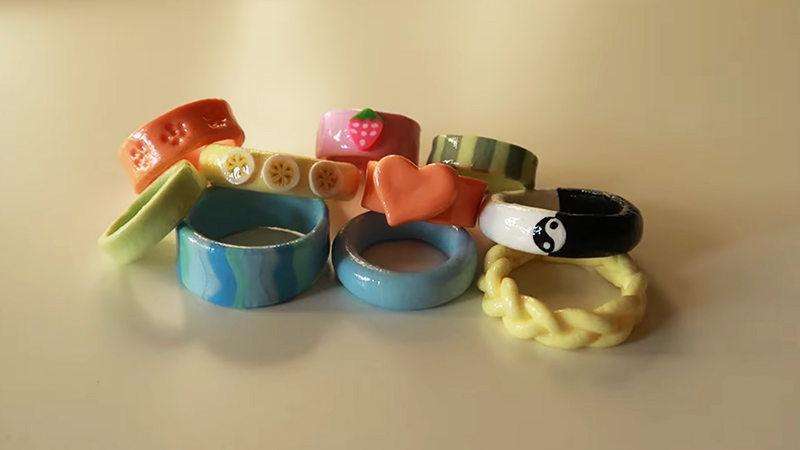
In addition to its practicality and versatility, air dry clay is also a popular choice for jewelry making because it allows for creativity and self-expression. You can use it to create unique, one-of-a-kind pieces that reflect your personality and interests. Whether you are a beginner or an experienced crafter, air-dry clay is a great material to work with and can result in beautiful, wearable pieces of art.
Materials Needed
To make air-dry clay rings, you will need the following materials:
Air Dry Clay
This is the main material you will use to create the rings. You can purchase air dry clay at most art supply stores or online.
Rolling Pin or Something Cylindrical to Roll Out the Clay
You will need something to roll out the clay to the desired thickness. A rolling pin is a common tool used for this purpose, but you can also use a small cylindrical object such as a drinking glass or a can.
Sharp Knife or Cookie Cutter to Cut Out the Shape of the Rings
You will need a tool to cut out the shape of the rings. A sharp knife or a cookie cutter can both work well for this purpose.
Straw or Other Small Cylindrical Object to Create the Hole for the Finger
You will need a small cylindrical object to create the hole for the finger. A straw is a common choice, but you can also use a small dowel or a wooden skewer.
Optional: Acrylic Paint and Brushes to Decorate the Rings
If you want to add color or designs to your rings, you can use acrylic paint and brushes. This is optional and not necessary if you prefer to leave your rings plain.
Steps to Make Air Dry Clay Rings
To make air-dry clay rings, follow these steps:
Step 1: Roll Out the Clay to the Desired Thickness
The thicker the clay, the heavier the ring will be when it dries. If you are using a rolling pin, place the clay on a flat surface and roll it out until it reaches the desired thickness. If you are using a small cylindrical object, press it into the clay to flatten it out.
Step 2: Use the Knife or Cookie Cutter to Cut Out the Shape of the Rings
Carefully press the knife or cookie cutter into the clay to create the shape of the rings. You can make the rings as small or as large as you like.
Step 3: Use the Straw or Other Small Cylindrical Object to Create the Hole for the Finger
Press the object into the center of the ring to create the hole. Make sure the hole is big enough for the finger to fit through comfortably.
Step 4: Optional: Use Acrylic Paint and Brushes to Decorate the Rings
You can use different colors and techniques to create the desired designs. Let the paint dry completely before handling the rings.
Step 5: Allow the Rings to Air Dry Completely
The drying time will depend on the thickness of the clay, but it typically takes at least 24 hours for air dry clay to fully harden. Once the rings are completely dry, they are ready to be worn!
Finishing Touches
Here are some tips for storing and caring for your finished air dry clay rings:
Keep Them Away From Water
Air-dry clay is porous and can absorb water, which can cause it to weaken or break. To ensure the longevity of your rings, avoid wearing them while washing your hands or engaging in activities that may expose them to water. If you do get the rings wet, make sure to dry them off thoroughly.
Avoid Rough Handling
Because air dry clay is not as strong as traditional ceramics, it is important to handle it gently to avoid breaking or cracking the rings. Avoid wearing the rings during activities that may cause them to get bumped or scratched, such as heavy lifting or playing sports.
Store Them Properly
To prevent the rings from getting damaged, store them in a safe place where they will not get knocked around or exposed to water. You can keep them in a jewelry box or a small container with a lid to protect them from dust and debris.
Repair Any Cracks or Chips
If the rings develop cracks or chips, you can use a small amount of air dry clay to repair them. Simply knead a small amount of clay and press it into the crack or chip, smoothing it out with your finger. Allow the repair to dry completely before wearing the rings again.
Comparison of Air Dry Clay and Traditional Ceramics
Here is a table comparing air dry clay to traditional ceramics:
| Air Dry Clay | Traditional Ceramics | |
|---|---|---|
| Hardening process | Hardens when exposed to air | Must be baked or fired in a kiln |
| Strength | Not as strong as traditional ceramics | Stronger than air dry clay |
| Cost | Generally less expensive | Generally more expensive |
| Equipment needed | None | Kiln or oven |
| Versatility | Can be molded and shaped by hand | Limited to shapes that can be formed by hand or on a pottery wheel |
FAQs
Here are some frequently asked questions about making air dry clay rings that were not discussed in the previous outline:
No, air dry clay is not meant to be baked or fired in a kiln like traditional ceramics. It hardens and becomes solid when exposed to air, so it cannot be made stronger by baking it. However, you can make the rings thicker or add reinforcement to them by layering or attaching additional pieces of clay.
Yes, it is possible to make adjustable air-dry clay rings by using a slightly larger hole and attaching a small piece of wire or elastic to the inside of the ring. This allows the ring to stretch and fit a range of finger sizes.
To store air-dry clay when you are not using it, wrap it in plastic wrap or place it in an airtight container. This will prevent the clay from drying out and cracking. You can also add a small amount of water to the clay to keep it moist if it starts to become too hard to work with.
Yes, you can add glitter or other decorative elements to your air dry clay rings by mixing them into the clay before shaping the rings or by attaching them to the surface of the rings once they have dried. Just be aware that these elements may not be as durable as the clay itself and may come off over time.
While it is possible to create intricate designs or details with air dry clay, it may be more challenging than with other materials such as metal or polymer clay. Air-dry clay is more brittle and prone to cracking, so it may be difficult to achieve fine details without the clay breaking or cracking. You can try using clay sculpting tools or a fine-tipped paintbrush to add details to the surface of the clay.
Editor’s Note
To make air-dry clay rings, you will need:
- Air dry clay
- A rolling pin or something cylindrical to roll out the clay
- A sharp knife or cookie cutter to cut out the shape of the rings
- A straw or other small cylindrical object to create the hole for the finger
- Optional: Acrylic paint and brushes to decorate the rings
Instructions:
- Roll out the clay to the desired thickness. The thicker the clay, the heavier the ring will be when it dries.
- Use a knife or cookie cutter to cut out the shape of the rings.
- Use the straw or other small cylindrical object to create the hole for the finger. Make sure the hole is big enough for the finger to fit through comfortably.
- Optional: Use acrylic paint and brushes to decorate the rings. Let the paint dry completely before handling the rings.
- Allow the rings to air dry completely. The drying time will depend on the thickness of the clay, but it typically takes at least 24 hours for air-dry clay to fully harden.
- Once the rings are completely dry, they are ready to be worn!
Conclusion
Making air dry clay rings is a fun and creative activity that can result in unique, one-of-a-kind pieces of jewelry. It is an accessible and affordable craft that can be enjoyed by people of all ages and skill levels.
To make air-dry clay rings, you will need air-dry clay, a rolling pin or something cylindrical to roll out the clay, a sharp knife or cookie cutter to cut out the shape of the rings, a straw or other small cylindrical object to create the hole for the finger, and optional acrylic paint and brushes to decorate the rings.
To make the rings, simply roll out the clay to the desired thickness, cut out the shape of the rings, create a hole for the finger, and decorate them if desired. Allow the rings to air dry completely before wearing them.
We hope this outline has provided you with a helpful guide for making your own air dry clay rings. We encourage you to give it a try and see what creative and unique pieces you can come up with!
Leave a Reply