Stickers are a popular and versatile way to add decoration, branding, or information to a variety of surfaces. They can be made of paper, vinyl, or other materials, and can be cut into different shapes and sizes.
Stickers can be used for a wide range of purposes, including labeling items, promoting a business or event, decorating a room or object, and more. One challenge with stickers is ensuring that they adhere properly to the surface you want to place them on.
This can be especially difficult when it comes to sticking stickers on fabric, as the texture and properties of fabric can make it difficult for stickers to stay in place. In this article, we will explore some tips and techniques for making stickers stick on fabric and creating successful projects with stickers and fabric.
Materials Needed
Stickers
To make stickers stick on fabric, the first requirement is, of course, the stickers themselves. You can either purchase stickers from a craft or office supply store or create your own stickers using a sticker maker or by printing your own designs onto sticker paper.
If you choose to make your own stickers, you will need a printer and sticker paper, which can be found at craft stores or online.
Fabric
Next, you need a piece of fabric to place the stickers on. It is important to select a fabric that is appropriate for your project and will work well with the stickers. Some factors to consider when selecting fabric include the type of fabric, such as cotton, polyester, or nylon, as different types of fabric, may require different adhesion methods.
The weight of the fabric is also important, as heavier fabrics may require more pressure or heat to get the stickers to stick. Additionally, the color or pattern of the fabric can also influence the appearance of the finished project.
Heat Press or Iron
The stickers must be applied to the fabric with a heat press or iron. A heat press is a specialized machine that uses heat and pressure to transfer designs onto fabric, while iron is a household appliance that you can use to apply heat and pressure to fabrics.
While either option can work for applying stickers to fabric, a heat press may provide more even heat and pressure and may be more efficient for larger projects. It is important to follow the manufacturer’s instructions for either option to ensure the best results.
Transfer Paper or Fabric Glue
To help the stickers adhere better to the fabric, you can consider using transfer paper or fabric glue. Transfer paper is a special type of paper that allows you to print designs or graphics onto it and then transfer the design onto fabric or other surfaces using heat and pressure.
Fabric glue is a type of adhesive specifically designed for bonding fabric to fabric or fabric to other surfaces. Both of these options can help to improve the adhesion of stickers to fabric, but may also change the feel or appearance of the finished project.
It is important to test any adhesive or transfer method on a small, inconspicuous area of fabric before applying it to the entire project to ensure it will work as intended.
Preparing the Fabric
Before you apply stickers to fabric, it is important to properly prepare the fabric to ensure the best possible results. Here are some steps you can take to prepare the fabric for applying stickers:
Clean the Fabric
Make sure to remove any dirt, dust, or debris from the fabric before applying stickers. This will help to ensure that the stickers adhere properly and do not get stuck to any dirt or lint on the fabric. You can use a lint roller, a fabric brush, or a vacuum to remove any unwanted particles from the fabric.
Iron the Fabric
If the fabric has any wrinkles, it is a good idea to iron it before applying stickers. This will help to smooth out the fabric and make it easier to apply the stickers evenly. Follow the care instructions for the fabric to determine the appropriate temperature and settings for ironing.
Consider Using Transfer Paper or Fabric Glue
As mentioned earlier, transfer paper and fabric glue can be useful tools for improving the adhesion of stickers to fabric. If you are using transfer paper, make sure to print your designs or graphics onto the paper according to the manufacturer’s instructions. If you are using fabric glue, apply a thin layer of glue to the fabric using a brush or roller, making sure to spread it evenly. Allow the glue to dry completely before applying the stickers.
Applying the Stickers
Once you have prepared the fabric and gathered your materials, you are ready to apply the stickers to the fabric. Here is a step-by-step guide for applying stickers to fabric:
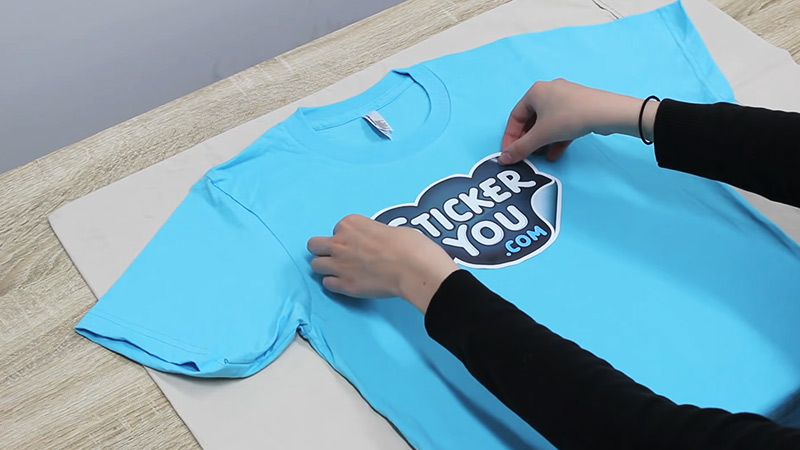
Place the Stickers on the Fabric
Arrange the stickers on the fabric in the desired location. You may want to use a ruler or straight edge to help you position the stickers evenly. Make sure that the stickers are completely flat against the fabric and that there are no air bubbles or gaps between the stickers and the fabric.
Cover the Stickers With Parchment or Pressing Paper
To protect the stickers and the fabric during the pressing process, place a piece of parchment or pressing paper over the stickers. This will help to prevent the stickers from melting or sticking to the heat press or iron.
Press Down Firmly With a Heat Press or Iron
Follow the manufacturer’s instructions for your heat press or iron to determine the appropriate temperature and time for pressing the stickers onto the fabric. Place the fabric, stickers, and parchment or pressing paper between the plates of the heat press or on the ironing board, and press down firmly. Make sure to apply even pressure across the entire surface of the stickers to ensure that they adhere properly to the fabric.
Allow the Fabric to Cool
After pressing the stickers onto the fabric, allow the fabric to cool completely before handling it. This will help to ensure that the stickers have fully adhered to the fabric and will not peel off or shift when the fabric is handled or worn.
Tips for Success
To achieve the best results when making stickers stick on fabric, here are some tips you can follow:
Experiment With Different Types of Fabric
Different types of fabric may respond differently to stickers and the pressing process. Some fabrics, such as cotton or polyester, may be more suitable for sticking stickers onto than others. Experiment with different types of fabric to see which ones work best with your stickers and which produce the best results.
Use a High-quality Heat Press or Iron
To ensure even heat distribution and consistent results, it is important to use a high-quality heat press or iron. A good heat press or iron will be able to provide even, consistent heat across the surface of the fabric, which will help to ensure that the stickers adhere properly to the fabric.
Follow the Manufacturer’s Instructions
Make sure to follow the instructions provided by the manufacturer of your stickers and heat press or iron. These instructions will provide specific guidance on the appropriate temperature and time settings for applying stickers to fabric and will help you to achieve the best results.
Table: Adhesive Options for Sticking Stickers to Fabric
| Adhesive option | Pros | Cons |
|---|---|---|
| Heat press or iron | Provides even heat and pressure | Requires specialized equipment |
| Transfer paper | Allows for easy printing and transferring of designs | May change the feel or appearance of the fabric |
| Fabric glue | Bond fabric to fabric or other surfaces | May change the feel or appearance of the fabric |
FAQs
Not all types of fabric are suitable for sticking stickers onto. Some fabrics, such as nylon or polyester, may be more receptive to stickers than others, such as silk or rayon. It is a good idea to test a small area of the fabric with a sticker before committing to a larger project to see how well the sticker adheres to the fabric.
It is possible to remove stickers from fabric, but it can be challenging and may damage the fabric in the process. If you need to remove a sticker from fabric, try using a heat gun or hair dryer to soften the adhesive on the back of the sticker. Once the adhesive is softened, you can carefully peel the sticker off of the fabric. If any adhesive residue is left behind, you can try using a commercial adhesive remover or rubbing alcohol to gently remove it.
It is generally not recommended to wash or dry items with stickers applied to the fabric, as the heat and moisture of the washing and drying process may cause the stickers to peel off or become damaged. If you need to wash or dry items with stickers applied to them, try to do so on a gentle cycle and in a low heat setting. You may also want to consider using a laundry bag or placing the items in a pillowcase to protect the stickers during the washing and drying process.
It is generally not recommended to reuse stickers that have been applied to fabric, as the adhesive on the back of the stickers may have become compromised during the pressing process. If you need to reuse a sticker, it is best to use a new sticker rather than attempt to remove and reuse an old one.
Stickers can be used on outdoor items, but it is important to choose stickers that are designed for outdoor use. Outdoor stickers are typically made of more durable materials, such as vinyl, and have stronger adhesives that can withstand exposure to the elements. Be sure to follow the manufacturer’s instructions for applying and caring for outdoor stickers to ensure the best results.
Editor’s Note
making stickers stick on fabric can be a challenging but rewarding task. By following the steps outlined above and using the right materials and techniques, you can successfully apply stickers to fabric and create unique and personal projects.
Whether you are making custom clothing, home decor, or other items, adding stickers can add a personal touch and bring your ideas to life. With a little patience and creativity, you can create beautiful and functional projects using stickers and fabric.
Conclusion
Making stickers stick on fabric can be a challenging but rewarding task. By following the steps outlined above and using the right materials and techniques, you can successfully apply stickers to fabric and create unique and personal projects.
Whether you are making custom clothing, home decor, or other items, adding stickers can add a personal touch and bring your ideas to life. With a little patience and creativity, you can create beautiful and functional projects using stickers and fabric.
Leave a Reply