Creating a chalkboard sign is an artful and versatile way to infuse your personal touch into various settings and occasions.
Whether you’re planning an event, enhancing your home decor, or adding charm to a business space, chalkboard signs offer a creative canvas for your imagination.
These versatile signs are not only customizable to suit your specific needs but also reusable, making them a popular choice for DIY enthusiasts.
In this guide, we will walk you through the step-by-step process of making a chalkboard sign, from selecting the right materials to crafting a beautiful and eye-catching design.
With a little creativity and these instructions, you’ll be well on your way to creating stunning chalkboard signage that captures attention and adds a unique flair to any setting.
10 Easy Steps to Make a Chalkboard Sign
Creating a chalkboard sign is a creative and versatile way to add a personal touch to various occasions and spaces, whether it’s for a wedding, a restaurant menu, a classroom, or your home decor.
Chalkboard signs are customizable and reusable, making them a popular choice for DIY projects.
Here’s a step-by-step guide on how to make a chalkboard sign:
Materials You’ll Need:
- Chalkboard Surface
- Chalk or Chalk Markers
- Ruler or Straight Edge
- Pencil
- Eraser
- Damp Cloth or Paper Towel
- Design Template
Step-by-Step Instructions:
Step 1: Prepare Your Chalkboard Surface
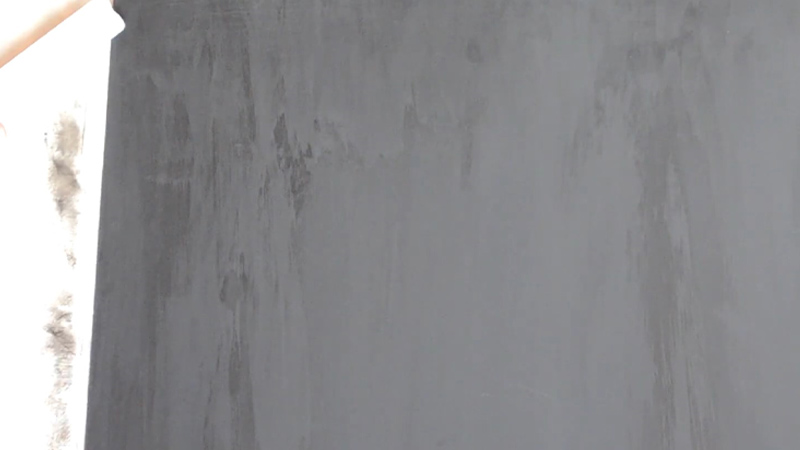
Begin by ensuring that your chosen chalkboard surface is clean and free of any dust or debris. If you’re creating your own chalkboard, follow the specific instructions provided with the chalkboard paint or contact paper.
Apply it evenly to your chosen surface, which could be wood, glass, metal, or any other suitable material. Allow it to dry according to the manufacturer’s recommendations.
Step 2: Plan Your Design
Take some time to carefully plan your chalkboard sign’s design. Consider the purpose of the sign and the message you want to convey.
Think about the style, fonts, and colors that best fit the occasion or location where you intend to display the sign.
If you’re not confident in your drawing skills, you can either print out a design template or trace a design onto the chalkboard using a pencil.
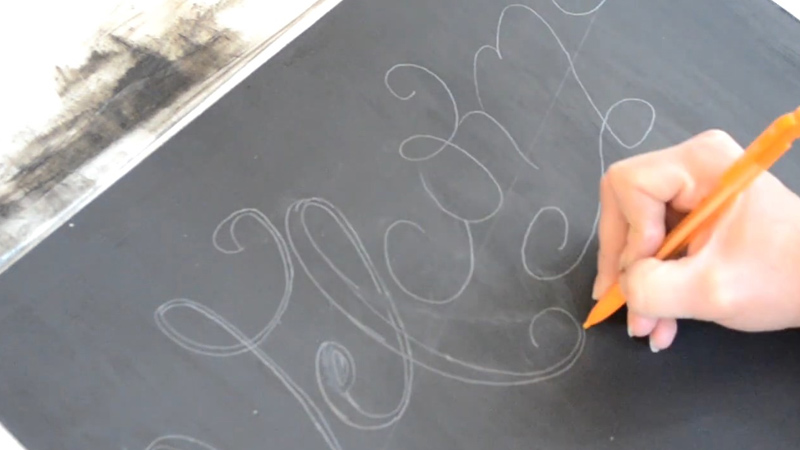
Step 3: Start with a Light Outline
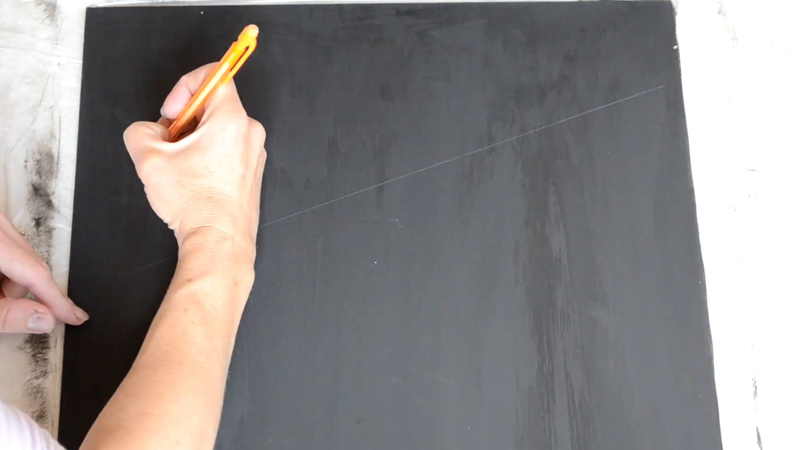
Using a pencil, create a rough sketch of your design directly on the chalkboard. This preliminary outline serves as a guide and allows you to make adjustments or corrections before committing to the design with chalk or chalk markers.
Pay close attention to the placement and proportions of elements in your design.
Step 4: Ink or Chalk Your Design
Once you’re satisfied with the pencil sketch, it’s time to start outlining and filling in your design using chalk or chalk markers.
If you choose to use chalk markers, make sure to shake them well before use and test them on a scrap surface to ensure the ink flows smoothly and evenly.
Take your time to trace and color your design neatly, using different chalk colors as needed to bring your vision to life.
Step 5: Add Details and Flourishes
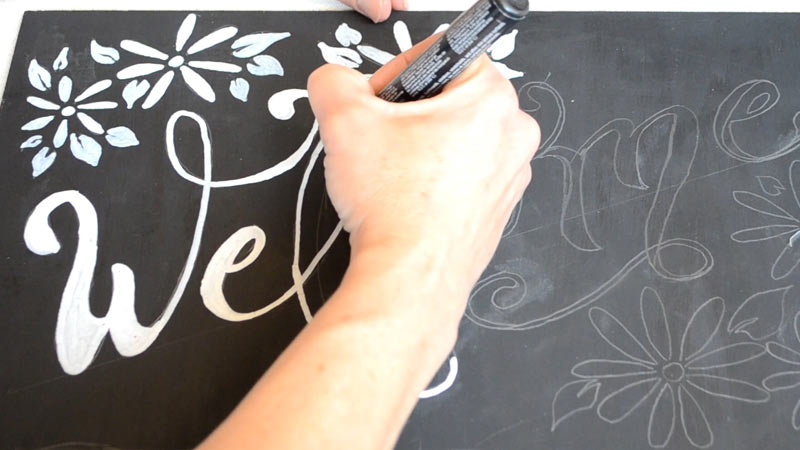
Enhance your chalkboard sign by adding intricate details, borders, or decorative elements that match your intended style.
You can use different line weights and chalk colors to create depth and dimension in your design. This step allows you to personalize your sign and make it visually appealing.
Step 6: Clean Up Mistakes
If you make any mistakes during the inking or chalking process, don’t worry. Use a damp cloth or a paper towel to gently wipe away the error.
Make sure to dry the area thoroughly before reapplying chalk or chalk marker to avoid smudging or bleeding of colors.
Step 7: Let It Dry
After completing your design, allow the chalk or chalk marker ink to dry completely. This step ensures that your work won’t smudge when touched or during transportation.
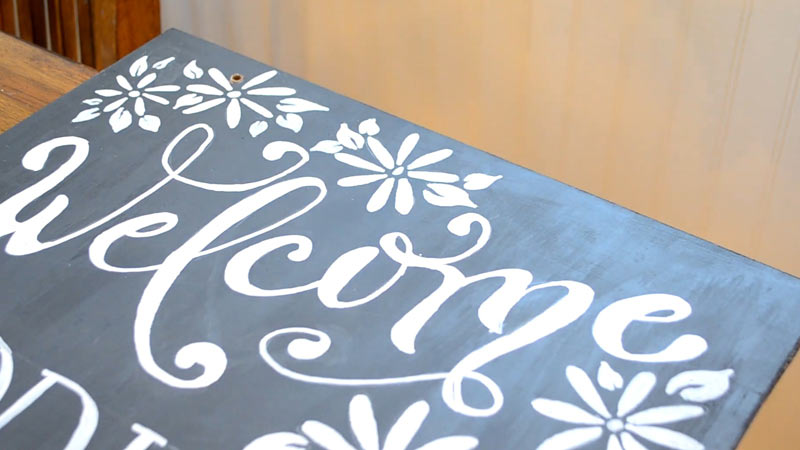
Step 8: Erase Pencil Lines
Once your design is dry and secure, carefully erase any remaining pencil lines from your chalkboard sign. This step leaves you with a clean and polished final product.
Step 9: Final Touches

Consider applying a clear chalkboard sealer over your design to enhance its longevity. This protective layer will help prevent smudging and protect the design from moisture or accidental smears.
Step 10: Display Your Chalkboard Sign
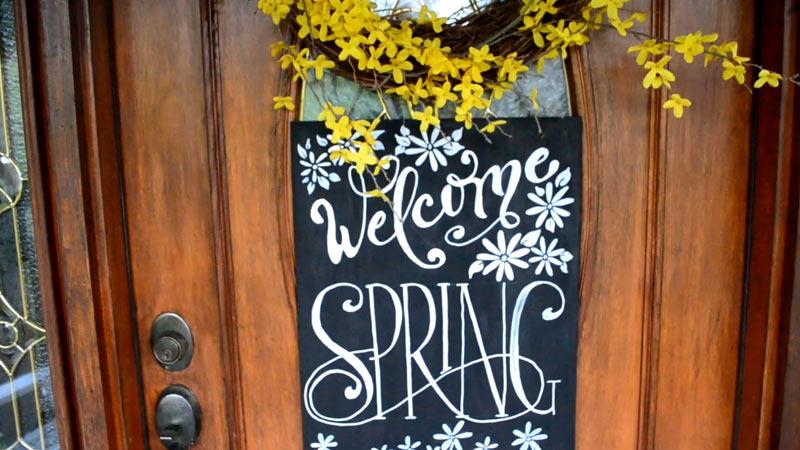
Find the ideal location to showcase your completed chalkboard sign. Depending on its purpose, you might want to place it at an event, in your home, or at your business. Ensure it’s properly positioned to catch the attention of your intended audience.
Chalkboard Sign Lettering
Creating appealing lettering on a chalkboard sign is a key aspect of making it visually attractive and effective in conveying your message.
Whether you’re designing a menu board, a welcome sign, or a decorative piece, here are some tips for achieving great chalkboard sign lettering:
Choose Your Lettering Style
Select a lettering style that suits the theme and purpose of your chalkboard sign. Popular options include traditional serif fonts, playful hand-lettering, or modern sans-serif styles. Ensure the style is legible and fits the overall design.
Plan Your Layout
Before you start lettering, sketch out the layout of your text. Determine the placement of headers, subheadings, and any decorative elements. This preliminary design will help you space the text evenly and avoid running out of space.
Use Guidelines
To maintain consistent letter sizing and alignment, lightly draw horizontal guidelines on the chalkboard with a pencil. This will serve as a reference for keeping your text straight and evenly spaced.
Practice Your Lettering
If you’re not confident in your freehand lettering skills, practice on paper first. Write out your text multiple times until you’re comfortable with the style and size you want to use.
Create a Hierarchy
Establish a hierarchy for your text, with different font sizes and styles for headings, subheadings, and body text. This helps guide the viewer’s eye and emphasizes key information.
Letter Slowly and Neatly
When it comes to actually lettering on the chalkboard, take your time. Write slowly and neatly to maintain consistency. Use the edge of the chalk or chalk marker for cleaner lines.
Pay Attention to Spacing
Proper spacing between letters and words is crucial for readability. Avoid crowding characters together, and use the guidelines to ensure even spacing. Adjust as needed to fill the available space evenly.
Add Flourishes and Decorative Elements
Depending on your design, consider adding decorative elements like swirls, borders, or illustrations to enhance the visual appeal. These can make your chalkboard sign stand out.
Correct Mistakes Thoughtfully
Mistakes are common in chalkboard lettering. If you make one, don’t worry. Use an eraser or a damp cloth to gently correct the error, and then redo the lettering. Take your time with corrections to ensure a clean result.
Seal Your Chalkboard Sign
To prevent smudging and maintain the integrity of your lettering, consider applying a clear chalkboard sealer once your design is complete. This will help protect your work and keep it looking fresh.
Practice and Experiment
Chalkboard lettering is a skill that improves with practice. Don’t be discouraged if your first attempts aren’t perfect. Experiment with different fonts, styles, and techniques to develop your own unique lettering style.
Chalkboard Sign Designs
Designing a chalkboard sign offers endless creative possibilities. The design you choose will depend on the purpose of the sign and your personal style.
Here are some chalkboard sign design ideas for various occasions:
Menu Board Design
Menu board design refers to the creative layout and visual presentation of a restaurant or cafe’s menu items on a chalkboard. It often involves the use of elegant serif fonts for headings and clean sans-serif fonts for dish descriptions.
Decorative elements such as flourishes or illustrations of featured dishes may also be incorporated to enhance the overall appeal.
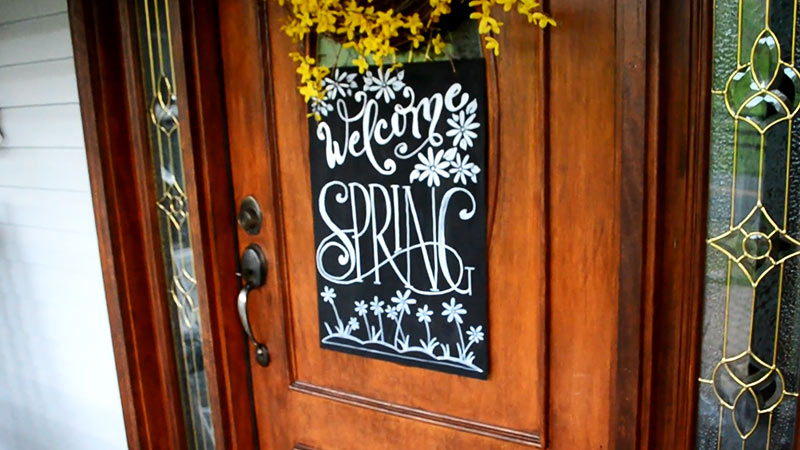
Wedding Welcome Sign Design
Wedding welcome sign design is the art of creating an aesthetically pleasing and personalized chalkboard sign that welcomes guests to a wedding ceremony or reception.
This design typically involves the use of cursive fonts for the names of the bride and groom, along with romantic flourishes, floral motifs, or monograms. A warm welcome message is often included to set the tone for the event.
Classroom Rules Design
Classroom rules design encompasses the visual representation of classroom rules and guidelines on a chalkboard. It focuses on using bold and easily readable fonts for the rules, often accompanied by colorful icons or illustrations that help illustrate each rule.
Chalkboard art techniques are employed to make the rules engaging and visually appealing to students.
Event Announcement Design
Event announcement design involves the creation of a chalkboard sign that effectively conveys event details and information.
This design typically features an eye-catching border or frame, with event-specific graphics or illustrations integrated into the design to capture the theme and purpose of the event.
Seasonal Decor Chalkboard Design
Seasonal decor chalkboard design pertains to the crafting of chalkboard signs tailored to different seasons and holidays.
It focuses on incorporating seasonal elements, colors, and thematic illustrations that align with specific occasions, such as Christmas, Halloween, or the arrival of spring, to evoke the spirit of the season.
Inspirational Quotes Chalkboard Design
Inspirational quotes chalkboard design involves the artistic presentation of motivational or uplifting quotes on a chalkboard.
This design emphasizes the use of attractive hand-lettered fonts for the quotes, accompanied by decorative elements such as vines, stars, or geometric patterns that enhance the visual appeal and convey the intended message.
Business Promotion Chalkboard Design
Business promotion chalkboard design revolves around the creation of chalkboard signs used to showcase daily specials, promotions, or offerings at a business establishment.
It often includes the incorporation of the business’s logo and brand colors to maintain consistency with the overall branding.
Birthday Party Sign Design
Birthday party sign design refers to the customization of chalkboard signs for birthday celebrations.
It typically involves personalization with the birthday person’s name and age, playful and lively fonts, and the inclusion of elements like colorful balloons or cake illustrations that resonate with the festive occasion.
Baby Shower Welcome Sign Design
Baby shower welcome sign design is the artistic arrangement of chalkboard signs for baby showers.
These designs usually feature cute and whimsical elements, pastel color schemes, and details such as the baby’s name and expected arrival date to create a warm and welcoming atmosphere.
Home Decor Chalkboard Design
Home decor chalkboard design encompasses the creation of decorative chalkboard signs for use in homes.
Examples include kitchen chalkboards with favorite recipes or weekly meal plans and living room signs featuring inspiring quotes or family mottos. These designs contribute to the overall aesthetics and ambiance of the living space.
Event Seating Chart Design
Event seating chart design involves organizing and presenting seating arrangements for an event on a chalkboard.
It includes visually appealing layouts with different fonts or styles for table names and guest names, helping guests locate their assigned seats efficiently.
Educational Charts Chalkboard Design
Educational charts chalkboard design focuses on developing visually engaging and informative charts for educational purposes, particularly for children. These charts often feature colorful graphics, large, easily readable text, and topics such as the alphabet, numbers, or shapes to facilitate learning in a fun and interactive way.
Business Chalkboard Signs
Business chalkboard signs are versatile marketing tools that allow businesses to convey messages, promotions, and important information in a creative and eye-catching way.
These signs can be used both indoors and outdoors to engage customers and attract attention.
Here are several key aspects of business chalkboard signs:
Promotional Signage
Business chalkboard signs are frequently used for promoting daily specials, discounts, and featured products or services. They enable businesses to quickly update and communicate their current offers to passersby or patrons.
Menu Boards
Restaurants, cafes, and eateries often use chalkboard signs as menu boards. They allow for flexibility in changing menu items, prices, or daily specials without the need for costly reprinting.
Chalkboard menus can be designed to match the restaurant’s branding and atmosphere.
Storefront Displays
Retail businesses use chalkboard signs to create visually appealing storefront displays. These signs can showcase new arrivals, seasonal products, or highlight the store’s unique selling points. Creative and artistic chalkboard designs can draw customers into the store.
Informational Signage
Chalkboard signs are effective tools for conveying important information, such as business hours, contact details, and policies. These signs can be strategically placed near entrances to ensure customers have access to essential information.
Event Promotion
Businesses use chalkboard signs to promote upcoming events, workshops, or special occasions. These signs help generate excitement and interest in the event, attracting attendees and participants.
Branding and Logo Display
Chalkboard signs can be used to reinforce a business’s branding by incorporating its logo, colors, and distinctive style. This consistency helps in building brand recognition.
Seasonal Decor
Many businesses decorate their chalkboard signs to reflect seasonal themes or holidays. This not only adds a festive touch but also encourages customers to explore seasonal offerings or products.
Outdoor Advertising
Some businesses place chalkboard signs outdoors to capture foot traffic and passersby. These signs are often designed with large, bold lettering to catch the attention of potential customers.
Engaging Artwork
Chalkboard signs can include artistic elements, illustrations, or hand-lettered fonts to create a visually appealing and engaging display. This artistic touch can set a business apart and make the signage more memorable.
Interactive Elements
In some cases, businesses use chalkboard signs to engage customers interactively. For example, they may include games, quizzes, or interactive challenges that encourage customers to interact with the sign and the business.
Daily Updates
One of the advantages of chalkboard signs is their flexibility. Businesses can update information daily or as often as needed. This makes them an ideal choice for showcasing changing daily specials or promotions.
Welcoming Atmosphere
Chalkboard signs can contribute to the overall ambiance of a business by creating a welcoming and charming atmosphere. They can be customized to match the decor and style of the establishment.
How to Clean a Chalkboard Sign?
Cleaning a chalkboard sign is essential to maintain its readability and overall appearance.
Here’s a step-by-step guide on how to clean a chalkboard sign effectively:
Step 1: Remove Loose Chalk Dust
Begin the cleaning process by gently tapping the chalkboard sign. Lightly knock it against a soft surface, such as a table or your palm. This tapping action helps dislodge any loose chalk dust or particles clinging to the surface. The goal is to minimize the risk of smudging or spreading chalk dust around during cleaning.
Step 2: Erase the Chalk
Take a chalkboard eraser, ensuring it’s clean and soft, and commence the process of erasing the chalk markings. Start at one corner of the sign and work your way systematically across the surface. To ensure even coverage, maintain a consistent erasing motion.
You can choose to erase either from the top of the sign to the bottom or from left to right. This step removes the bulk of the chalk residue, preparing the surface for a more thorough cleaning.
Step 3: Wipe with a Damp Cloth or Sponge
Following the chalk erasing step, prepare a clean cloth or sponge by dampening it with water. Alternatively, you can use a commercial chalkboard cleaner if you prefer.
Wring out the cloth or sponge to eliminate excess moisture, leaving it only slightly damp. It’s essential that the cloth or sponge is not too wet, as excessive water can potentially damage the chalkboard.
Step 4: Dry the Chalkboard
After using the damp cloth or sponge, switch to a dry cloth or paper towel. Thoroughly dry the chalkboard sign, paying particular attention to areas where moisture may have accumulated during the wiping process.
Proper drying helps prevent water spots, streaks, or potential damage caused by excessive moisture.
Step 5: Inspect for Residue
Examine the cleaned chalkboard sign carefully to check for any remaining stubborn chalk marks, dust, or residue.
If you spot any lingering chalk residue or marks, you have the option to either re-erase those areas using the chalkboard eraser or repeat the damp cloth wiping process until the surface is entirely clean.
Step 6: Season the Chalkboard
If your chalkboard sign is frequently cleaned and you notice it becoming less porous over time, you can choose to re-season it to maintain its chalk-holding ability.
To season the chalkboard, take a piece of chalk and rub it evenly across the entire surface. Afterward, erase the chalk with the chalkboard eraser.
This process helps restore the chalkboard’s porous surface, allowing it to hold chalk more evenly during future use.
FAQS
Can I Use Regular Paint Instead of Chalkboard Paint for the Base?
Yes, you can use regular paint as a base, but it won’t give you the same chalk-friendly surface as chalkboard paint.
If you go this route, apply a few coats of clear chalkboard sealer to create a usable chalkboard surface.
What’s the Best Way to Create a Shaded or Gradient Effect on a Chalkboard Sign?
Achieving a shaded or gradient effect on a chalkboard sign can be challenging. Try using a soft cloth or blending tool to smudge and blend the chalk or chalk marker colors together gently.
How Do I Prevent My Chalkboard Marker from Drying Out Quickly?
Chalk markers can dry out if not stored properly. Store them horizontally and with the cap securely closed. Shake the marker before each use to maintain a consistent ink flow.
Is It Possible to Fix a Chalkboard Sign That Has Permanent Chalk Marker Stains?
Unfortunately, permanent chalk marker stains can be difficult to remove completely from a chalkboard surface. You may need to repaint or replace the chalkboard to get rid of stubborn stains.
Can I Make a Chalkboard Sign on a Textured Wall?
While it’s possible to create a chalkboard sign on a textured wall, it may be more challenging to achieve smooth and consistent writing or drawing.
To Recap
Crafting a chalkboard sign is a delightful journey of self-expression and creativity. Throughout this guide, we’ve explored the steps to transform a plain chalkboard surface into a captivating work of art, perfectly tailored to your unique vision and needs.
From the initial planning to the final touches, you’ve learned how to sketch, ink, and bring your ideas to life with chalk or chalk markers.
The versatility of chalkboard signs makes them suitable for various occasions, whether it’s a wedding, a menu board, or home decor.
Remember that practice and experimentation are key to honing your chalkboard sign-making skills.
So, embrace this artistic endeavor, and let your imagination flourish as you continue to create stunning chalkboard signage that leaves a lasting impression.
Leave a Reply