Embroidery, a meticulous art form that breathes life into fabric, deserves a careful touch when it comes to cutting around its intricate designs.
“How Do You Cut Around Embroidery?” delves into the delicate process of preserving the beauty of stitched creations.
Navigating the balance between precision and creativity, this guide explores the essential tools, preparation steps, and techniques required for a flawless cut.
Whether crafting appliqués, patches, or ornaments, mastering the art of cutting around embroidery unlocks a world of possibilities, transforming stitched masterpieces into versatile elements ready for new projects.
Join us on a journey that celebrates the fusion of meticulous craftsmanship and artistic expression.
How Do You Cut Around Embroidery?
Cutting around embroidery requires careful steps to ensure that you preserve the integrity of the stitched design. Here’s a step-by-step guide on how to cut around embroidery:
Materials Needed
- Sharp embroidery scissors or small, pointed scissors
- Cutting mat or a flat, stable surface
- Ruler or a measuring tape
- Pins or clips
- Optional: Fusible interfacing for stability
Step-by-Step Guide:
Prepare the Embroidery
Ensure that your embroidered fabric is clean, pressed, and free of any loose threads. If necessary, apply fusible interfacing to the back for additional stability.
Secure the Fabric
Place the embroidery on the cutting surface and use pins or clips to secure it in place, ensuring it lies flat and does not move during cutting.
Mark the Cutting Line
Use a ruler or measuring tape to mark the cutting line around the embroidery. Leave a small margin between the stitches and the cutting line, depending on your preference.
Create a Template (Optional)
If you have a specific shape in mind, create a template or stencil and use it to trace the cutting line onto the fabric. This ensures uniformity in your final cut.
Choose the Right Scissors
Select small, pointed scissors or embroidery scissors for better control, especially in intricate areas of the design.
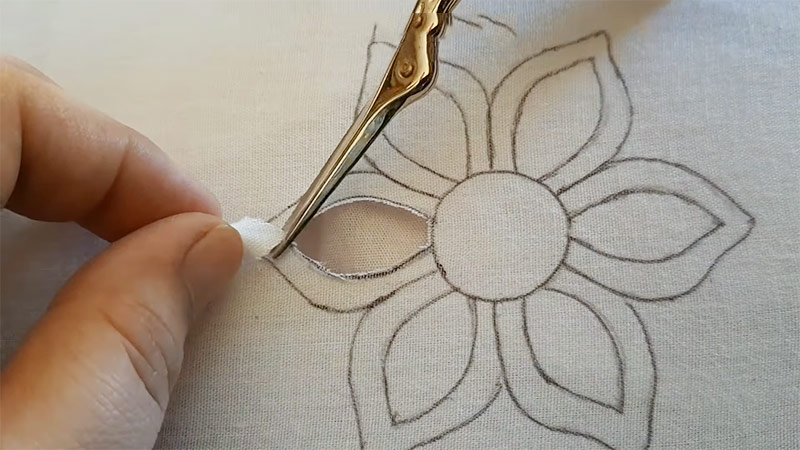
Start Cutting
Begin cutting along the marked line, focusing on areas where there is a clear separation between the stitches and the background fabric. Make small, controlled cuts to navigate curves and intricate details.
Follow the Contours
Follow the contours of the design, adjusting the angle of your cutting as needed. Rotate the fabric to maintain a comfortable cutting position, especially around curves.
Trim Excess Threads
After completing the cut, remove any pins or clips, and trim any excess threads or fabric sticking out from the edges.
Optional: Finish Edges
If you want to prevent fraying, consider finishing the edges using a zigzag stitch, satin stitch, or applying a fabric fray check.
Inspect and Adjust
Inspect the cut edges and make any necessary adjustments. Trim or shape areas that require refinement.
Optional: Practice on Scrap Fabric
If you’re unsure about the process or working with a delicate fabric, practice on a scrap piece with similar characteristics before cutting the actual embroidery.
Where Do You Cut Around Embroidery?
When cutting around embroidery, the specific location where you make the cut depends on the design, your intended result, and the project you are working on. Here are the general guidelines:
Cut Close to the Stitches
For simple and well-defined designs, you can cut close to the stitches. This method allows the embroidered details to be the focal point. Exercise caution to avoid cutting into the stitches.
Leave a Margin
Leave a small margin of fabric beyond the stitched area if you want to add a border around the embroidery. This is especially useful if the design has open areas, and it helps prevent accidental cutting into the stitches.
Follow the Contours
When cutting around intricate designs or curves, follow the contours of the stitches. Make small, precise cuts, and rotate the fabric as needed to maintain the shape of the design.
Use a Template
If you have a specific shape in mind, use a template or stencil to mark the cutting line. This ensures uniformity and helps you achieve the desired shape without freehand cutting.
Consider the Project
The project you have in mind will also influence where you make the cut. If you’re planning to sew the embroidered piece onto another fabric, leave a seam allowance. If it’s for an appliqué, cut right up to the stitches.
Check for Loose Threads
Before cutting, inspect the embroidery for any loose threads on the edges. Secure them by tying knots or using fabric glue to prevent unraveling after the cut.
Adapt for Different Fabrics
Different fabrics behave differently when cut. Adjust your cutting technique based on the type of fabric. Some fabrics may fray more easily, so leaving a margin or finishing the edges might be necessary.
Finish the Edges (Optional)
If you want a polished look and to prevent fraying, consider finishing the edges of the cut-out embroidery. Techniques such as a zigzag stitch, satin stitch, or applying fray check can be used.
How To Use Your Cut-Out Embroidery?
Once you’ve successfully cut out your embroidery, you can use it for various creative projects. Here are some ideas on how to make the most of your cut-out embroidery:
Applique
Sew the cut-out embroidery onto another fabric as an appliqué. You can use a straight stitch, zigzag stitch, or a blanket stitch to attach it. Alternatively, use fusible web or fabric glue for a no-sew option.
Patch
Use the cut-out embroidery as a decorative patch. Sew it onto clothing, bags, or accessories to cover holes and stains or simply to add a personalized touch. Iron-on adhesive can be a convenient option for attaching patches.
Ornament
Turn your cut-out embroidery into a decorative ornament for your home, Christmas tree, or gifts. Add ribbons, beads, buttons, or other embellishments for a festive touch. Attach a string or ribbon for hanging.
Jewelry
Transform your cut-out embroidery into wearable art. Attach jump rings, chains, pins, or earring hooks to make it into a pendant, brooch, or pair of earrings. This is a unique way to showcase your embroidery skills.
Magnet
Convert your cut-out embroidery into a magnet for your fridge, bulletin board, or locker. Glue small magnets to the back of the embroidery for a functional and decorative touch.
Frame it
Place your cut-out embroidery in a frame for display. Choose a frame that complements the design and use it as wall art or a decorative piece for your home.
Bookmark
Create personalized bookmarks by attaching your cut-out embroidery to a strip of fabric or stiff paper. Add additional embellishments if desired, and laminate for durability.
Greeting Cards
Incorporate your cut-out embroidery into handmade greeting cards. Attach it to the front of the card using adhesive or stitching, creating a unique and personalized touch.
Scrapbooking
Include your cut-out embroidery in scrapbooking projects. It can be a beautiful addition to memory albums, highlighting special events or achievements.
Textile Collage
Incorporate your cut-out embroidery into a larger textile collage. Combine it with other fabric pieces, textures, and colors to create a visually appealing composition.
FAQs
Can I cut around embroidery on delicate fabrics?
Yes, you can. However, exercise extra caution, consider stabilizing the fabric, and use appropriate cutting techniques to prevent damage.
Is it necessary to wash the fabric before cutting around the embroidery?
Washing the fabric before cutting is recommended to eliminate any sizing or residues that might affect the final cut. Ensure the fabric is dry before cutting.
Can I cut around machine-embroidered designs the same way as hand-embroidered ones?
Yes, the cutting process is generally similar. However, machine-embroidered fabrics may have a stabilizer on the back, so take that into consideration.
What should I do if I accidentally cut into the stitches?
If you accidentally cut into the stitches, you can repair it by carefully stitching the damaged area or applying a fabric patch from the back.
Are there specific considerations when cutting around metallic or specialty threads?
Yes, cutting around metallic or specialty threads requires extra care. Consider using specialized scissors and adjusting your cutting technique to avoid damaging these threads.
To Recap
Mastering the skill of cutting around embroidery unveils a realm of creative expression. Through careful precision and attention to detail, each stitch becomes a work of art, ready to adorn various projects.
The satisfaction lies not just in the final result, but in the journey of transforming embroidered designs into versatile elements for appliqué, patches, ornaments, and beyond.
As you navigate the contours of intricate designs, remember that this artistry is as much about patience and practice as it is about the scissors in your hand.
So, embark on your creative ventures, let your imagination flourish, and revel in the beauty of your cut-out embroidery masterpieces.
Leave a Reply