Bargello embroidery, a mesmerizing needlework art, traces its origins to 16th-century Italy, inspired by the exquisite needlecraft adorning the chairs of the Bargello Palace in Florence.
This technique, or Florentine or flame stitch, involves creating intricate geometric patterns with long, straight stitches.
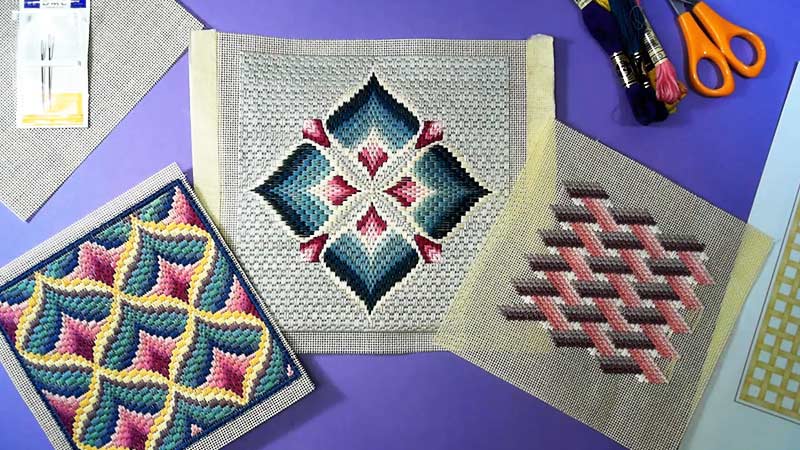
Practitioners draw a grid and follow charts to stitch rows that produce the characteristic zigzag or flame-like effect using even-weave fabrics like canvas, linen, or Aida.
With a rich history and versatility in design, Bargello embroidery invites enthusiasts to explore a world of color, pattern, and creativity, making it an engaging and rewarding craft.
What Is Bargello Embroidery?
Bargello embroidery, also known as Florentine embroidery or flame stitch, is a captivating needlework technique that originated in Italy during the 16th century.
This form of embroidery is recognized for its distinctive geometric patterns created using long, straight stitches.
The name “Bargello” is derived from the Bargello Palace in Florence, Italy, where chairs adorned with this needlework inspired the technique.
Key characteristics of Bargello embroidery include:
Straight Stitches
The fundamental element of Bargello is the use of straight stitches, often covering a specific number of threads horizontally and vertically on an even-weave fabric.
Geometric Patterns
Bargello designs typically feature repeating geometric shapes and motifs. These patterns can range from simple zigzags to more intricate, complex arrangements.
Grid System
Bargello relies on a grid system, with stitches forming a grid on the fabric. The grid helps guide the placement of stitches and contributes to the precision of the final design.
Color Play
Bargello allows for creative expression through the use of colors. Crafters can experiment with various color combinations, gradients, or variegated threads to achieve visually striking effects.
Even-Weave Fabric
Bargello is commonly worked on even-weave fabrics such as canvas, linen, or Aida cloth. The even weave helps maintain consistent stitch size and spacing.
How Do You Do Bargello Embroidery? A Step-By-Step Guide
Bargello embroidery, also known as Florentine embroidery or flame stitch, is a captivating needlework technique that creates intricate geometric patterns using long, straight stitches.
Follow these steps to embark on your Bargello embroidery project:
Gather Your Materials
Start by gathering the necessary materials, including even-weave fabric (canvas, linen, or Aida), a tapestry needle, wool or silk thread in various colors, a ruler, a pencil or water-soluble marker, and an optional embroidery hoop or frame.
Prepare Your Fabric
If your fabric is not pre-cut, trim it to your desired size. Ensure the fabric is taut using an embroidery hoop or frame, as this helps maintain tension during stitching.
Draw a Grid
Use a ruler, pencil, or water-soluble marker to draw a grid on the fabric. This grid will guide your stitches, and a common grid size is 10 by 10 threads per square.
Select Your Thread
Choose wool or silk thread in various colors. Consider the color scheme you want to achieve, and explore different thread textures for added visual interest.
Choose a Pattern or Create Your Own
Find a Bargello embroidery pattern online, in books, or create your own on graph paper. Bargello designs often feature repeating geometric motifs, and the pattern will guide your stitch placement.
Thread Your Needle
Cut a length of thread and thread your tapestry needle. Adjust the number of strands based on your fabric’s thickness and the desired impact of your stitches.
Start Stitching
Begin stitching from the bottom left corner of your fabric. Bring the needle up through the fabric at the bottom left corner of a square, and create a stitch covering four threads horizontally and one thread vertically. Bring the needle down through the fabric at the top right corner of the same square.
Continue Stitching Rows
Move to the next row and offset your stitches by one thread. This offset creates the characteristic zigzag or flame stitch pattern. Follow your pattern, adjusting colors as needed for a visually appealing design.
Experiment with Stitches
While the typical Bargello stitch covers four threads horizontally and one thread vertically, feel free to experiment with stitch angles. Try straight, diagonal, or curved stitches to add variety to your design.
Use an Embroidery Hoop or Frame (Optional)
Consider using an embroidery hoop or frame to maintain consistent tension in your fabric. This helps ensure uniform stitches throughout your project.
Finish Your Work
Continue stitching until you complete the entire pattern or fill the fabric to your liking. Secure the thread at the back of your work by running it under some stitches and trimming any excess.
Display or Use Your Finished Piece
Once your Bargello embroidery is complete, display it as wall art, turn it into a pillow, or incorporate it into other creative projects. Enjoy the unique and visually striking results of your Bargello craftsmanship!
Tips and Tricks for Doing Bargello Embroidery
With its intricate patterns and long, straight stitches, Bargello embroidery can be a rewarding needlework project.
Here are some tips and tricks to enhance your Bargello embroidery experience:
Start with Simple Patterns
If you’re new to Bargello, begin with simpler patterns to grasp the technique before tackling more complex designs. This will help build your confidence and familiarity with the stitching process.
Choose the Right Fabric
Select a suitable even-weave fabric like canvas, linen, or Aida. Ensure the fabric has a consistent thread count to maintain uniform stitches.
Experiment with Color Combinations
Bargello offers ample opportunities for creative color play. Experiment with different color combinations, gradients, or variegated threads to add depth and interest to your designs.
Use an Embroidery Hoop or Frame
While not mandatory, using an embroidery hoop or frame can help maintain consistent tension on the fabric. This ensures your stitches are uniform throughout the project.
Pay Attention to Stitch Tension
Keep your stitches consistent and maintain proper tension. This is crucial for achieving a polished and professional-looking Bargello piece.
Practice Different Stitch Directions
Bargello stitches can be straight, diagonal, or curved. Practice various stitch directions to add dimension and texture to your designs.
Mark Your Fabric Carefully
Accurate marking is essential in Bargello embroidery. Use a ruler and a water-soluble marker to create a precise grid on your fabric, ensuring your stitches align correctly.
Counting Threads Accurately
Take time counting threads, significantly when changing colors or shifting rows. Precise counting is crucial to maintaining the integrity of the Bargello pattern.
Organize Your Threads
Keep your threads organized and labeled according to the colors you plan to use. This helps streamline the stitching process and minimizes confusion.
Backstitch for Outlines
Consider using backstitching for outlining specific elements in your Bargello design. This can add definitions and highlight certain shapes within the pattern.
Experiment with Stitch Density
Adjust the density of your stitches to create different effects. You can use fewer stitches per unit for a more open and airy look, while a denser stitch arrangement will result in a more intricate pattern.
Take Breaks and Relax
Bargello embroidery can be time-consuming, so take breaks to avoid eye strain and maintain focus. Enjoy the process, and don’t rush through the stitching.
Finishing Techniques
Explore different finishing techniques, such as framing, lining, or turning your Bargello piece into a functional item like a pillow or bag.
FAQs
Can I mix different thread types in Bargello embroidery?
Yes, Bargello allows for creative experimentation. Mixing wool, silk, and metallic threads can add texture and visual interest to your embroidery project.
How do I choose the right needle for Bargello embroidery?
Opt for a tapestry needle with a blunt tip, suitable for even-weave fabrics. The needle’s size should match the thread thickness you use for your project.
Can I combine Bargello with other embroidery techniques?
Absolutely! Bargello blends well with other embroidery styles. Incorporating traditional stitches or embroidery techniques to create unique and personalized designs.
Can I make Bargello embroidery 3D?
While Bargello is primarily a flat embroidery technique, you can experiment with techniques like padding or using different thread thicknesses to add a three-dimensional effect to certain areas of your design.
How can I correct mistakes in Bargello embroidery?
If you make a mistake, carefully unpick the stitches with your tapestry needle. Correct the error and continue stitching. Take your time to avoid damaging the fabric.
To Recap
Bargello embroidery unveils a captivating journey through time-honored craftsmanship and artistic expression. Originating in the cultural tapestry of Renaissance Italy, this needlework marvel continues to enchant modern enthusiasts.
The rhythmic interplay of long, straight stitches creates mesmerizing geometric patterns, making each piece a unique testament to creativity.
As practitioners navigate the grid on even-weave fabrics, they embark on a tactile voyage, blending tradition with contemporary flair. With a spectrum of colors and intricate designs, Bargello offers a canvas for personal expression.
Whether adorning walls, pillows, or functional items, the allure of Bargello embroidery lies in its ability to transform threads into timeless works of art, celebrating the enduring charm of this needlecraft tradition.
Leave a Reply