Embarking on the enchanting journey of line art embroidery on canvas is a creative odyssey that fuses the precision of needlework with the expressive allure of visual art.
This craft transforms a blank canvas into a captivating tapestry of intricate designs, leveraging the simplicity of stitches to achieve stunning, illustrative effects.
From outlining with the meticulous backstitch to the artful incorporation of diverse embroidery techniques, this guide explores the step-by-step process of creating line art on canvas.
With an array of tips, tricks, and creative liberties, discover how to breathe life into your designs, adding a personalized touch to each stitch and ultimately crafting timeless pieces that speak volumes through the language of thread and fabric.
What Is Line Art Embroidery on Canvas?
Line art embroidery on canvas is a creative stitching technique where intricate designs are crafted using simple stitches, transforming a plain canvas into a visually striking piece. This form of embroidery emphasizes clean lines and outlines, resembling a drawn illustration.
The process involves outlining the design with stitches like the backstitch, filling it in with various stitches, and adding color and texture.
Typically done with 6-strand cotton embroidery floss, this versatile craft allows for personalization with different stitches, colors, and optional embellishments.
The finished pieces are often framed or incorporated into the decor, showcasing the fusion of artistry and needlework.
How Do You Do Line Art Embroidery on Canvas?
Embarking on the journey of line art embroidery on canvas is a delightful and artistic endeavor that allows you to create visually captivating designs through the medley of stitches and colors.
Here is a comprehensive guide on how to bring your line art to life on canvas:
Step 1: Gather Your Materials
Start by assembling the essentials – canvas fabric, an embroidery hoop, needles, embroidery floss, scissors, and a pencil or water-soluble marker. Ensuring you have the right tools sets the foundation for a successful embroidery project.
Step 2: Prepare Your Canvas
Cut the canvas fabric slightly larger than your chosen embroidery hoop. Secure the fabric within the hoop, adjusting the tension to create a smooth and taut surface. This step provides the stability needed for precise stitching.
Step 3: Choose or Create a Design
Select a design that inspires you. It could be a simple illustration, a geometric pattern, or quote. Trace or draw the chosen design onto the canvas using a pencil or water-soluble marker, taking care to ensure clarity and simplicity.
Step 4: Select Your Thread
Pick embroidery floss in colors that complement your design. Separate the floss into strands, typically using two strands for line art embroidery. The choice of colors can significantly influence the visual impact of your artwork.
Step 5: Begin Stitching (Backstitch)
Thread your needle with a knotted 18-inch length of embroidery floss. Commence stitching using the backstitch to outline your design. This foundational stitch establishes the contours of your artwork, providing a roadmap for subsequent stitches.
Step 6: Explore Different Stitches
Experiment with various stitches to bring depth and texture to your design. Utilize satin stitch for solid areas, French knots for dimension, and lazy daisy stitches for delicate embellishments. The combination of stitches adds intricacy and visual interest.
Step 7: Pay Attention to Detail
Mindful attention to detail is crucial. Ensure your stitches are even and aligned with the outline of your design. This meticulous approach contributes to the overall polished appearance of your line art embroidery.
Step 8: Finish and Secure
As you complete your design, cut off excess floss and secure the ends at the back of the fabric. Remove the embroidery hoop, gently iron the fabric to eliminate wrinkles, and trim any excess fabric if necessary. This step marks the conclusion of the stitching process.
Step 9: Personalize and Embellish (Optional)
Consider adding personal touches or embellishments to enhance your embroidery. Metallic thread, beads, sequins, or experimenting with different thread textures can elevate the artistic impact of your creation.
Step 10: Display Your Artwork
Showcase your completed line art embroidery by framing it, hanging it on a wall, or incorporating it into other fabric-based projects. Your unique creation is a testament to the fusion of creativity and craftsmanship.
Tips and Tricks for Line Art Embroidery on Canvas
Embarking on a line art embroidery project on canvas can be a rewarding and creative experience. To enhance your embroidery skills and ensure a successful outcome, consider the following tips and tricks:
Practice Basic Stitches
If you’re new to embroidery, practice basic stitches on a scrap piece of fabric before starting your project. Familiarize yourself with stitches like the backstitch, satin stitch, French knot, lazy daisy, and chain stitch.
Use a Hoop for Tension
Secure your canvas in an embroidery hoop to maintain tension. This ensures a smooth and taut surface for stitching, making creating even and neat stitches easier.
Choose the Right Fabric
Select a canvas fabric that is not too thick or stiff. A more flexible fabric allows for easier stitching and a smoother finish. Consider the size of the weave in the fabric as well.
Start with a Simple Design
Especially if you’re a beginner, begin with a simple design. Intricate patterns can be challenging, and mastering basic stitches on uncomplicated designs will build confidence.
Trace Your Design Carefully
When tracing your design onto the canvas, use a light touch with a pencil or a water-soluble marker. Ensure the lines are clear and easily visible but won’t leave permanent marks after stitching.
Separate Embroidery Floss Strands
For most line art embroidery projects, use two strands of embroidery floss. Separate the strands carefully to achieve the desired thickness without creating bulk.
Mind Your Tension
Maintain consistent tension in your stitches. Too loose or tight stitches can affect the overall appearance of your embroidery. Practice achieving a balance in tension.
Experiment with Colors
Don’t be afraid to experiment with different colors of embroidery floss. Consider creating gradients, using contrasting colors, or incorporating subtle variations for added visual interest.
Secure Ends Neatly
When starting and finishing a thread, ensure the ends are securely knotted and neatly tucked at the back of the fabric. This not only secures your stitches but also maintains a clean finish.
Embellish for Extra Flair
Add embellishments like metallic floss, beads, sequins, or buttons to enhance your design. Ensure these embellishments are securely attached with extra stitches or glue.
Undoing Stitches
If you make a mistake or wish to change something in your design, you can gently pull out the floss with your needle or scissors. Be careful not to damage the fabric or leave visible holes.
Washing and Care
Use cold water and mild soap if you plan to wash your line art embroidery on canvas. Avoid rubbing or wringing the fabric. Lay it flat to dry and iron on low heat if needed.
Document Your Progress
Keep a record of your progress, especially when working on a complex design. It can help troubleshoot mistakes and see how your skills evolve.
Take Breaks and Enjoy the Process
Embroidery is a creative and meditative process. Take breaks to avoid eye strain and fatigue. Enjoy the journey of bringing your line art to life on canvas.
What Are Some Popular Line Art Embroidery Designs for Canvas?
Line art embroidery on canvas provides a versatile canvas for various designs, from intricate patterns to minimalist illustrations.
Here are some popular line art embroidery design ideas to inspire your creative projects:
Floral Motifs
Create elegant and timeless designs with simple floral motifs. Roses, daisies, or delicate leaves can be outlined with precise stitches, offering a touch of nature to your canvas.
Animals and Wildlife
Capture the essence of your favorite animals through line art embroidery. From graceful birds to playful pets, these designs can range from realistic to whimsical.
Geometric Patterns
Explore the world of geometry with clean lines and shapes. Circles, triangles, and squares arranged in abstract or symmetrical patterns create a modern and visually appealing aesthetic.
Botanical Illustrations
Detailed line art representations of plants and herbs can add a touch of natural beauty to your canvas. Consider featuring herbs like lavender or rosemary, or create a botanical composition.
Abstract Art
Dive into the world of abstract art by experimenting with shapes, lines, and patterns. Abstract line art allows for creative freedom, enabling you to convey emotions and concepts through your stitches.
Quotes and Typography
Express yourself through embroidered quotes or typography. Choose a meaningful phrase, word, or even your initials and stitch them in a stylish font for a personalized touch.
Cityscapes and Skylines
Capture the iconic skyline of a favorite city or create your interpretation of a bustling urban landscape. Cityscape line art can evoke a sense of place and nostalgia.
Celestial Designs
Embroider celestial elements such as stars, moons, or constellations. These designs can bring a dreamy and magical vibe to your canvas.
Mandalas
Craft intricate mandalas with detailed patterns radiating from a central point. Mandalas offer a meditative and aesthetically pleasing design that can be calming and visually striking.
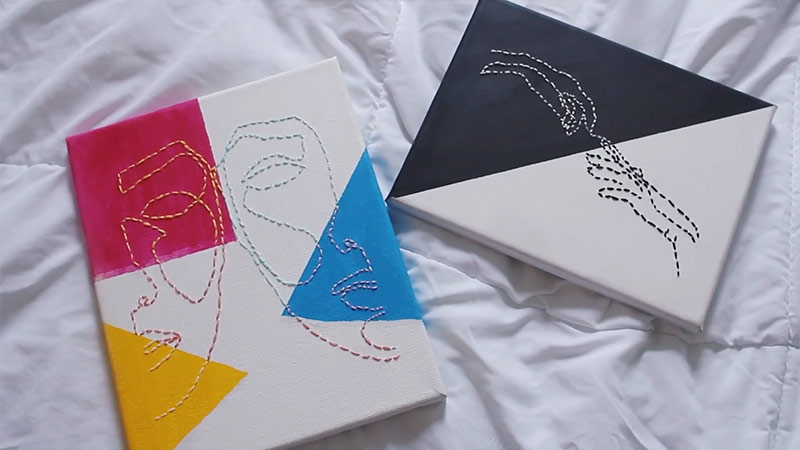
Portraits and Silhouettes
Create a minimalist representation of faces or silhouettes. Portraits or profile silhouettes can be a captivating and stylish addition to your line art embroidery collection.
FAQs
Can line art embroidery on canvas be personalized?
Yes, line art embroidery allows for a high degree of personalization. Stitchers can experiment with different stitches and colors and add embellishments like metallic thread, beads, or sequins to make their designs unique.
How can one create a gradient effect in line art embroidery?
Achieve a gradient effect by using different shades of the same color or transitioning between complementary colors. Experiment with satin stitches or other filling techniques to blend the colors in your design smoothly.
How long does it take to complete a line art embroidery project?
The time required varies based on the complexity of the design and the individual’s embroidery skills. Beginners may take longer, while experienced stitchers can complete projects more efficiently.
Can line art embroidery be combined with other art forms?
Yes, line art embroidery can be seamlessly combined with other art forms. Collaborate with painters, incorporate embroidered elements into mixed media art, or experiment with various artistic mediums to create unique pieces.
How should one finish and care for a line art embroidery project?
The final steps involve securing ends neatly, removing the embroidery hoop, ironing the fabric gently, and optionally embellishing. Washing can be done with cold water and mild soap, and the finished piece can be framed or displayed in various ways.
To Recap
Line art embroidery on canvas unveils a realm where meticulous craftsmanship converges with boundless creativity.
Through the rhythmic dance of stitches, a blank canvas metamorphoses into a canvas of self-expression adorned with intricate designs and vibrant hues.
The fusion of precision and artistic flair outlined in this guide invites novices and seasoned stitchers to embark on a journey of creativity.
As each stitch weaves a story, and every color choice paints an emotion, the concluded masterpiece transcends mere fabric and thread, becoming a testament to the fusion of artistry and skill.
In every framed piece or incorporated decor, the legacy of line art embroidery persists as a timeless ode to the beauty born from the simple act of stitching.
Leave a Reply