To start stitching, you’ll need some fabric and a backing fabric. Pin down the front of your quilt against the back of your embroidery backing fabric so that it’s sandwiched in between them.
Sew along the edge of the pinned-down fabric with a zigzag stitch to secure it in place. Repeat on the other side, then turn your quilt over so that the right side is facing up and sew around all four sides again using a zigzag stitch to finish off. Finally, press down firmly onto both fabrics and cut away any excess material.
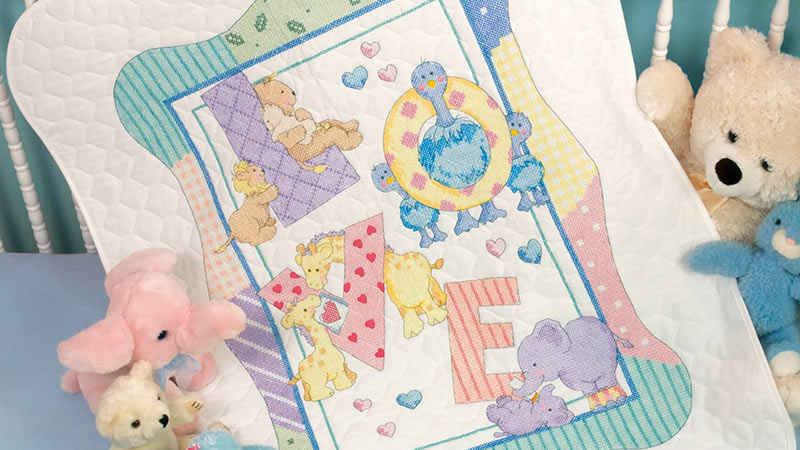
How Do You Finish A Cross Stitch Baby Quilt?
To cross-stitch, you’ll need a backing fabric and a pin down fabric. Sew the edges of the two fabrics together so that they form a border around your quilt top.
Cross stitch over the stitches from your front to back piece, then sew down the open end of your border. Repeat on the other side of your quilt top. You can now enjoy your finished project—just be sure not to move it for at least six weeks so that all of the stitching holds up well.
Cross-Stitch
To finish a cross-stitch baby quilt, you will need to attach the squares together using either thread or fabric glue. You can also add borders, embellishments and other design elements to make your quilt look its best.
Be sure to follow the specific instructions that come with your kit in order to create a perfect finished product. Once you’ve completed your project, be sure to give it a good clean so that it looks new every time you display it.
Cross-stitching is an easy hobby that anyone can enjoy – don’t let this beautiful art form stay hidden in the corner of your room.
Backing Fabric
You need to find a backing fabric that matches the quilt’s colors and style. Cut it to size and hem or allowance as necessary. Sew it onto the back of the quilt top with right sides together, making sure not to stretch it out of shape.
Trim any excess fabric so your finished product looks neat and tidy. Enjoy your beautiful cross stitch baby quilt.
Pin Down Fabric With Back Against Quilt
To finish a cross stitch baby quilt, you’ll need to pin down the fabric with back against the quilt. Make sure that all of your stitches are even and in the same direction before completing your project.
Use clamps or weights to hold the fabric in place while you work, and keep a close eye on the quilt so it doesn’t get too bunched up along the edges. When you’re finished, carefully remove any pins and begin sewing any loose threads together.
Sew Edges Down
To finish a cross stitch baby quilt, sew the edges down using a running stitch or another method that will hold the fabric together. Be sure to use a thread that is colorfast and won’t run when you Sew Down the Edges of Your Quilt You can also use batting and/or an interfacing to help support your stitches and keep it in place while you’re sewing down the edge of your quilt.
Finally, make sure to Trim Any Unnecessary Fabric From Around The Edge Of Your Quilt After You Sew It Together
How do you finish a cross stitch quilt?
To finish a cross stitch quilt, you’ll need to applique the stitches and then bind it together. You can either use a traditional binding method or something more creative like piecing together blocks of fabric.
Place Border Fabric Face Down
When you are finished stitching your quilt top, it is time to start attaching the border fabric. Before you do this, make sure that the back and front fabrics are placed correctly so that they will not get damaged in the process. Next, place the border fabric on top of the other two fabrics and align its edges with those of the backing and wadding fabrics. Finally, attach it down one side at a time by slipping stitch in between these layers.
Place Wadding and Backing Fabric Behind
Once you have attached one side of your border fabric, it is time to flip over your quilt top so that you can begin attaching the opposite edge. First, line up all four corners of your border with corresponding points on either side of your quilt’s center panel (or batting). Make sure that both borders meet at exactly one point along their length—this will ensure a symmetrical finish for your cross stitch project. Then use a straight stitch or zigzag to secure them together firmly.
ttach Border Fabric Down One Side at a Time
After securing each corner of your border using stitches or pins, turn them inward so that they form an “X” shape inside the opening left by previous stitches/pins. Once all four sides have been turned in this way, gently pull on each individual thread until they reach their final position; be careful not to pull too tightly as this may cause damage to your quilt top surface. Now it’s time to add finishing touches: embroidery designs or appliqués if desired. To complete this step quickly and easily without any sewing machine mishaps please try our handy guide here: How To Sew Cross Stitch With A Machine
lip Over Border, Turn Under Edge And Slip Stitch In Place
Now that everything has been stitched together nicely from end-to-end once again. It’s finally time for some extra security. Flip over your completed border piece so its wrong ( RIGHT ) side faces outwards,. Again lining up 4 corners carefully. And slipping stitch through both layers. Ta da You now have a perfectly finished cross stitch project
What do you do at the end of a cross stitch?
When you’re finished with a cross stitch, it’s important to take care of the fabric and tools. You can either wash them in warm water and soap, or dry them off completely before storing them away.
When you’re done stitching, it’s important to make a small “X” with your needle in the thread just before it exits the fabric surface. This will help keep the threads together and prevent them from unraveling.
Bring your needle up through the “X” and down into the fabric below it on either side of the stitch you want to bury. Hold on to your cross-stitch frame or work table for support as you pull tight on both threads, making sure that all of the stitches are buried well beneath the fabric surface.
How do you finish the edges of cross stitch fabric?
There are a few ways to finish the edges of cross stitch fabric. One is to use a seam ripper or serger, which can be done by hand or with an automatic machine. Another way is to use a zigzag stitch, which will keep the stitches close together and prevent them from unraveling.
Overcast Edge
To finish the edges of a cross stitch fabric, you can either use an overcast or hemmed edge. Overcasting is simply sewing the edge of your fabric together with a straight seam allowance, while hemming is sewing the edge to itself plus 1/4 inch (6 mm).
Hemmed Edge
Hemming helps keep stitches neat and eliminates any puckering that may occur when stitching around curves or corners. It also prevents fraying on the outer border of your project due to stress from repeated turning motions.
Sew Into Fabric
If you don’t want to use an existing edge or if hemming isn’t an option, then you can sew your cross stitch fabric into place using thread and a needle. This method is best used for projects that will not be subjected to heavy wear and tear such as quilts or cushion covers.
Multiple Edges
Is it better to cross stitch with or without a hoop?
Cross stitching without a hoop is possible, but it takes more time and effort. Hand embroidery with a hoop is easier, faster and produces better results than cross stitching without a hoop.
If you’re new to hand embroidery, start out by practicing on smaller projects first before moving onto larger ones. You can buy or make hoops specifically for cross stitch, or use an old piece of fabric to create your own makeshift hoop.
Be creative and experiment with different stitches and designs – the sky’s the limit.
Is it better to quilt by hand or machine?
It’s up to you. You can quilt either by hand or with a machine, it just depends on what you prefer. Functional quilting is a great way to get the job done quickly and easily, while more traditional quilting techniques are often considered features rather than quick fixes.
Ultimately, the choice is yours – whichever method works best for you in terms of time and ease of use will be perfect.
To Recap
A baby quilt is a special project that can be finished in a number of ways. You could hand-sew the edges together, use an adhesive to attach the pieces, or even sew them together on the bias.
The possibilities are endless.
Leave a Reply