Discover the art of perfecting appliqué edges with a blend of sewing machine precision and the intricate touch of hand techniques.
In this guide, we unveil the essential steps to achieve immaculate results, whether you opt for the speed and efficiency of a sewing machine or the personalized touch of hand finishing.
From preventing fraying and enhancing durability to preserving the intended design and contributing to a polished appearance, the edge-finishing methods explored here offer a comprehensive approach to elevate your appliqué projects.
Explore the seamless integration of technique and creativity as we delve into the world of finishing appliqué edges with both machine and hand craftsmanship.
What Is a Finishing Applique Edge?
A finishing appliqué edge refers to the meticulous process of securing and refining the raw edges of an appliqué design to enhance its durability and aesthetic appeal.
Whether accomplished through machine stitching or hand techniques, the goal is to prevent fraying, preserve the intended design, and contribute to a polished finish.
This crucial step involves carefully stitching along the perimeter of the appliqué shape, ensuring that the fabric remains intact and the overall project maintains a clean, professional appearance.
The finishing appliqué edge not only adds structural stability but also reflects the artisan’s commitment to craftsmanship and attention to detail.
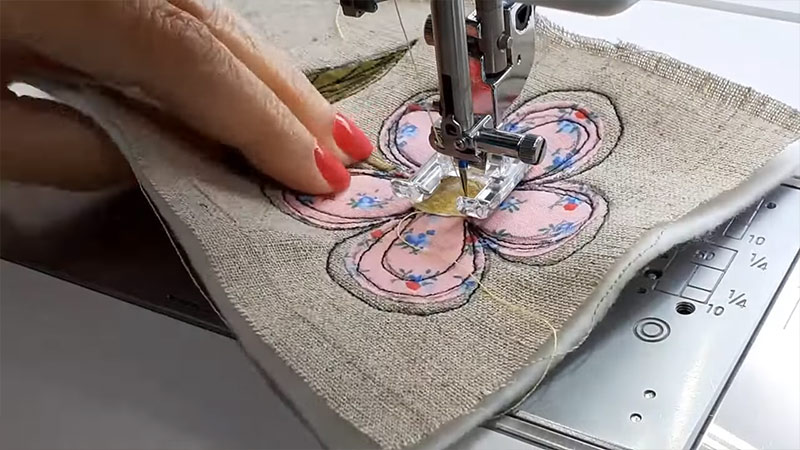
How Do You Finish the Edge of an Applique? Step-By-Step Guide for Sewing Machine Users
Finishing the edge of an appliqué is a critical step that adds durability and a polished look to your sewing projects. There are various methods to finish appliqué edges, and one common approach involves using a sewing machine.
Here’s a step-by-step guide on how to finish the edge of an appliqué using a sewing machine:
Materials Needed
- Appliqué fabric
- Background fabric
- Sewing machine
- Thread (matching or contrasting)
- Scissors
- Fusible web or interfacing (optional, for fusible appliqué)
Steps:
Prepare the Appliqué
Cut out the appliqué shape from your chosen fabric, leaving a small seam allowance around the edges (usually 1/8 to 1/4 inch).
Position the Appliqué
Place the appliqué onto the background fabric in the desired position. Secure it with pins or use a temporary fabric adhesive to prevent shifting during sewing.
Choose a Machine Stitch
Select a machine stitch suitable for finishing the edges of the appliqué. Common choices include:
- Zigzag Stitch: Ideal for preventing fraying and securing edges.
- Satin Stitch: Creates a smooth, polished look.
- Blanket Stitch: Adds a decorative edge while securing the appliqué.
Adjust Stitch Settings
Set your sewing machine to the appropriate length and width for your chosen stitch. Test on a scrap piece of fabric to ensure the desired result.
Start Stitching
Begin stitching around the edge of the appliqué, guiding the machine along the seam allowance. If using a zigzag or blanket stitch, make sure the stitches extend over the edge of the appliqué to secure it.
Pivot at Corners
Lift the presser foot and pivot the fabric when you reach corners or curves. This ensures a smooth and even edge.
Finish the Entire Edge
Continue stitching until you have completed the entire edge of the appliqué. Ensure that the stitches adequately secure the fabric and prevent fraying.
Secure the Threads
Tie off or backstitch at the end to secure the threads. Trim any excess thread.
Optional: Fusible Appliqué with Machine Stitching
If using fusible web or interfacing, follow the manufacturer’s instructions to fuse the appliqué to the background fabric before machine stitching. This provides an additional layer of security.
Inspect and Adjust
Inspect the finished edge and make any necessary adjustments. Trim any uneven edges or excess fabric if needed.
Press the Appliqué
Set the stitches and create a smooth finish by pressing the appliqué with a warm iron.
How To Finish Applique Edges by Hand? A Beginner’s Guide
Finishing appliqué edges by hand adds a personal touch and allows for more control over the stitching. One common technique for hand-finishing appliqué edges is the turned-edge method. Here’s a step-by-step guide:
Materials Needed
- Appliqué fabric
- Background fabric
- Needle
- Thread (matching or contrasting)
- Scissors
- Fabric marker or pencil
- Pins
- Iron
Steps:
Prepare the Appliqué
Cut out the appliqué shape from your fabric, leaving a small seam allowance around the edges (usually 1/8 to 1/4 inch).
Position the Appliqué
Place the appliqué on the background fabric in the desired position. Pin it securely to prevent movement during stitching.
Mark the Seam Allowance
On the wrong side of the appliqué fabric, use a fabric marker or pencil to mark the seam allowance. This line will serve as a guide for turning under the fabric.
Turn Under the Seam Allowance
Starting at one end, gently turn the fabric along the marked line to the wrong side. You can use your fingers or a small iron to press the folded edge in place. Repeat this process along the entire edge of the appliqué.
Pin the Appliqué in Place
Once the seam allowance is neatly turned under, pin the appliqué in place on the background fabric. Ensure that the edges lie flat and are securely pinned.
Thread the Needle
Thread a needle with an appropriate thread length, usually around 18 inches. Tie a knot at the end.
Begin Stitching
Insert the needle from the backside of the background fabric to the front, bringing it up close to the folded edge of the appliqué.
Choose a Stitch
Select a hand-sewing stitch suitable for turned-edge appliqué. Common choices include the slip stitch, blind stitch, or ladder stitch. Each provides a secure hold while keeping the stitches discreet on the front side.
Secure the Folded Edge
With the needle, pick up a small amount of the folded edge of the appliqué and a small amount of the background fabric. Pull the thread through, securing the folded edge in place.
Repeat the Stitch
Continue the chosen stitch along the entire edge of the appliqué. Take small, even stitches to ensure a secure attachment without creating noticeable stitches on the front side.
Secure the Thread
When you reach the end of the appliqué, make a small knot or secure the thread with a few backstitches. Trim any excess thread.
Press the Appliqué
Set the stitches and create a smooth finish by pressing the appliqué with a warm iron.
Why Is It Important To Finish the Edges of an Applique?
Finishing the edges of an appliqué is a critical step in the sewing and crafting process, contributing to the overall aesthetics, durability, and longevity of the project.
Several reasons highlight the importance of carefully finishing the edges:
Preventing Fraying
Fabrics used in appliqué projects are often cut into intricate shapes. Unfinished edges are prone to fraying, which not only compromises the clean lines of the design but can also lead to the deterioration of the fabric over time.
Properly finished edges act as a barrier against fraying, preserving the integrity of the appliqué.
Enhancing Durability
Finished edges add strength and resilience to the appliqué. This is particularly crucial in projects that will undergo regular use, handling, or washing.
A well-finished edge ensures that the appliqué can withstand the stresses of daily life without losing its form or becoming damaged.
Preserving the Design
Finishing the edges helps maintain the intended shape and design of the appliqué. Unfinished edges can distort over time, altering the visual impact of the project.
Proper finishing ensures that the appliqué looks as intended, preserving the artistic and creative aspects of the design.
Contributing to a Polished Appearance
Finished edges contribute significantly to the overall aesthetics of the appliqué. Neatly finished edges provide a polished and professional look, elevating the quality of the craftsmanship. This attention to detail enhances the visual appeal of the finished project.
Preventing Unraveling
Unfinished edges can lead to unraveling threads, not only affecting the appearance but also compromising the structural integrity of the fabric.
By finishing the edges, the threads are secured, preventing unraveling and ensuring a tidy and well-maintained appearance.
Enabling Washing and Care
Finishing the edges is crucial for washability for appliqué projects incorporated into items like quilts, clothing, or home decor.
Well-finished edges can withstand laundering without fraying or losing their shape, allowing for practical use and easy maintenance.
Showcasing Craftsmanship
Finished edges are a testament to the craftsmanship and attention to detail invested in the project. Whether for personal enjoyment or showcasing one’s skills, a well-finished appliqué demonstrates a commitment to quality, reflecting positively on the creator’s abilities.
Adding Structural Stability
Finished edges contribute to the structural stability of the appliqué. They help anchor the fabric securely to the background, preventing shifting or distortion. This stability ensures the appliqué remains intact and well-positioned within the overall project.
FAQs
Can you add embellishments while finishing appliqué edges?
Absolutely. Adding embellishments like beads, sequins, or embroidery can enhance the visual appeal of the appliqué. Ensure they are securely attached during the finishing process for durability.
Should the choice of thread color match or contrast with the appliqué fabric?
It depends on the desired effect. Matching thread creates a subtle, seamless look while contrasting thread adds a decorative element. Consider the overall design and personal preference when choosing thread color.
How can you fix mistakes in finishing appliqué edges?
For machine finishing, carefully unpick the stitches using a seam ripper. For hand-finishing, gently remove stitches with a small scissors. Adjust the fabric and re-stitch as needed. Extra care prevents damage to the appliqué.
Are there any special considerations for finishing appliqué edges on stretch fabrics?
Yes, when working with stretch fabrics, it’s essential to use stitches or techniques that accommodate the fabric’s stretch. A narrow zigzag or stretch stitch on a sewing machine can help prevent seam puckering.
How do you choose between machine and hand finishing for appliqué edges?
Machine finishing offers speed and efficiency, which is ideal for large projects. Hand finishing provides a personalized touch, suitable for delicate fabrics or projects that require intricate detailing. The choice depends on the project requirements and personal preference.
To Recap
The journey of finishing appliqué edges, we’ve unveiled the harmonious blend of sewing machine precision and handcrafted finesse.
Whether you opt for the speed and efficiency of modern technology or the intimate touch of traditional hand techniques, the art lies in the meticulous details.
From preventing fraying to showcasing craftsmanship, each method adds unique charm to elevate your projects. As the stitches come together, a seamless integration of technique and creativity emerges.
The final touch of a pressed, polished appliqué symbolizes not just a finished edge but a testament to dedication and skill. In this masterpiece, the journey of creation meets the satisfaction of a well-executed finale.
Leave a Reply