Embarking on an embroidery project with the Bernina Magnetic Hoop introduces a seamless and efficient approach to securing fabric without the hassle of traditional hooping methods.
This innovative accessory, consisting of a metal frame and a magnetic mat, offers a time-saving alternative for enthusiasts.
This guide delves into a step-by-step process, unveiling the simplicity and advantages of using a Bernina Magnetic Hoop.
From choosing the right size to aligning designs effortlessly, discover how this tool streamlines the embroidery process, saves time, prevents fabric damage, and provides unparalleled versatility for diverse fabric types in pursuit of an elevated and enjoyable stitching experience.
What Is a Bernina Magnetic Hoop?
A Bernina Magnetic Hoop is an embroidery accessory designed for Bernina sewing machines. It comprises a metal frame and a magnetic mat.
The metal frame attaches to the embroidery machine, while the magnetic mat securely holds the fabric in place using strong magnets.
This innovative hooping solution eliminates the need for traditional methods like pins or clips, saving time and preventing fabric damage.
The Bernina Magnetic Hoop accommodates various fabric types, offers flexibility in design placement, and enhances creativity.
It’s user-friendly, providing a smooth and efficient embroidery experience for enthusiasts seeking convenience and precision in their projects.
How Do You Use a Bernina Magnetic Hoop?
Using a Bernina Magnetic Hoop is a convenient and efficient way to secure fabric for embroidery without the need for traditional hooping methods.
Here’s a step-by-step guide on how to use a Bernina Magnetic Hoop for your embroidery projects:
Materials Needed
- Bernina Magnetic Hoop (choose the appropriate size)
- Embroidery machine
- Fabric
- Stabilizer
- Optional: Temporary spray adhesive, ruler, or template
Step-by-Step Instructions:
Select the Right Size
Begin by choosing the appropriate size of the Bernina Magnetic Hoop based on the dimensions of your embroidery project.
Attach the Metal Frame
Securely attach the metal frame of the magnetic hoop to your embroidery machine. Ensure that it is firmly locked in place for stability during the embroidery process.
Prepare the Fabric
Place a suitable stabilizer under your fabric. The stabilizer provides support and prevents distortion of the fabric during embroidery. Choose the type of stabilizer (tear-away, cut-away, or wash-away) based on your fabric and project requirements.
Optional: Secure Stabilizer with Adhesive
If desired, use temporary spray adhesive to secure the stabilizer to your fabric. This step helps prevent any shifting of the stabilizer during the embroidery process.
Position Fabric on Magnetic Mat
Lay your fabric on top of the magnetic mat, ensuring that it covers the entire surface. Smooth out the fabric to remove any wrinkles or folds.
Place Magnetic Mat on Metal Frame
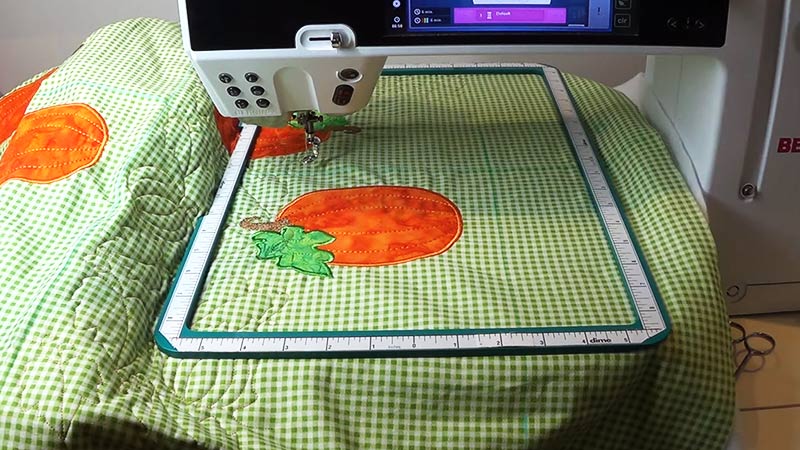
Position the magnetic mat on top of the metal frame. The strong magnets within the hoop will automatically align and securely hold your fabric in place.
Optional: Mark the Center of the Fabric
To ensure precise design placement, use a ruler or template to mark the center of your fabric. Align this mark with the center of the magnetic mat.
Select Embroidery Design and Adjust Settings
On your embroidery machine, select the desired design and adjust settings such as size, color, and stitch type according to your preferences and project requirements.
Start Embroidering
Once everything is set, initiate the embroidery process on your machine. The Bernina Magnetic Hoop will securely hold your fabric, allowing for accurate and stable stitching.
Fine-Tune Position if Necessary
Use the needle position function on your machine to adjust the needle to any point on your design without stitching. This feature enables you to fine-tune the position of your fabric on the magnetic mat.
Preview Design with Trace Function
Optionally, use the trace function on your machine to preview the outline of your design before starting the actual embroidery. This step helps verify the design placement and alignment.
Finish Embroidering
Allow your embroidery machine to complete the stitching process. Once finished, carefully remove the fabric from the Bernina Magnetic Hoop.
Remove Excess Stabilizer
Use scissors or a seam ripper to carefully trim any excess stabilizer from your fabric after completing the embroidery. Take care not to damage the fabric or the embroidered design.
Benefits of Using a Bernina Magnetic Hoop for Embroidery
Using a Bernina magnetic hoop for embroidery offers several benefits, making it a popular choice among embroidery enthusiasts. Here are some of the key advantages:
Time and Effort Savings
The Bernina magnetic hoop eliminates the need for traditional methods like pinning, clipping, or basting fabric before embroidery. This saves time and effort, allowing you to start stitching more quickly.
Prevents Fabric Damage
Traditional hooping methods can cause damage to delicate fabrics or leave marks on them. The magnetic hoop securely holds the fabric in place without the need for pins or clips, preventing any potential damage.
Versatility with Fabric Types
The magnetic hoop can handle a wide range of fabric types, including thick or delicate materials that might be challenging to hoop with traditional methods. This versatility allows for embroidery on diverse fabrics such as leather, velvet, denim, or silk.
Flexibility in Design Placement
The magnetic hoop allows for easy repositioning of the fabric on the magnetic mat. This flexibility enables precise alignment of designs, making it easier to create complex or precisely positioned embroidery.
Enhanced Creativity
The ability to easily reposition fabric and embroider on larger or smaller areas than the hoop size provides more creative freedom. This is particularly useful for those who want to experiment with different design layouts.
Compatibility with Thick Fabrics
Some fabrics are too thick for conventional hooping methods. The strong magnets in the Bernina magnetic hoop ensure a secure hold even on thick fabrics, expanding the range of materials that can be used for embroidery.
Smooth and Intact Fabric Surface
Since the magnetic hoop eliminates the need for pins or clips, the fabric remains smooth and intact during the embroidery process. This results in a cleaner and more professional-looking finished product.
Alignment Assistance
The magnetic hoop, when used in conjunction with rulers or templates, assists in marking the center of the fabric accurately. This ensures that the embroidery design is centered and aligned as intended.
Ease of Use
The magnetic hoop is designed to be user-friendly, making it accessible for both beginners and experienced embroiderers. The simple process of placing the fabric on the magnetic mat and securing it with the frame streamlines the embroidery setup.
Minimizes Disturbance to Embroidery Area
Unlike traditional hoops that might require frequent rehooping, the Bernina magnetic hoop minimizes disturbances to the embroidery area. This is beneficial when working on more extensive or continuous embroidery designs.
Tips and Tricks for Using a Bernina Magnetic Hoop
To maximize the effectiveness and convenience of using a Bernina magnetic hoop for embroidery, consider the following tips and tricks:
Use Temporary Adhesive
Secure the stabilizer to the fabric with a temporary spray adhesive before placing it on the magnetic mat. This prevents the stabilizer from shifting during embroidery, ensuring better stability.
Mark the Center of the Fabric
Use a ruler or template to mark the center of your fabric. Align this mark with the center of the magnetic mat to ensure that your embroidery design is centered and straight.
Leverage Basting Function
Many embroidery machines have a basting function. Before starting the actual embroidery, use this function to stitch a temporary outline around the embroidery area. It helps you check the placement and size of your design and make adjustments if needed.
Utilize the Needle Position Function
Take advantage of the needle position function on your embroidery machine. It allows you to move the needle to any point on your design without stitching. This feature is helpful for fine-tuning the position of your fabric on the magnetic mat.
Preview with Trace Function
Use the trace function on your machine to preview the outline of your design before starting the embroidery. This lets you see if the design fits within the fabric and helps prevent stitching outside the fabric edges.
Reposition Fabric for Alignment
If needed, you can reposition the fabric on the magnetic mat to align your designs or create different effects. This flexibility adds to the creative possibilities offered by the magnetic hoop.
Experiment with Fabric Types
Since the magnetic hoop can handle various fabric types, consider experimenting with different materials. Embroidering on thick or delicate fabrics, such as leather, velvet, or silk, opens up new creative possibilities.
Check and Adjust Tension
Ensure that the fabric is tensioned adequately within the magnetic hoop. Check for any wrinkles or folds and adjust as necessary to achieve a smooth surface for embroidery.
Use the Trace Function for Alignment
Before stitching, use the trace function to check the alignment of the embroidery design. This can help you identify potential issues and make adjustments before the embroidery process begins.
Trim Excess Stabilizer Carefully
After completing the embroidery, use scissors or a seam ripper to trim any excess stabilizer from the fabric carefully. Take care not to cut or damage the fabric or the embroidered design.
Maintain and Clean the Hoop
Regularly clean the magnetic hoop to ensure optimal performance. Remove any dust or debris that may affect the magnetic hold. Follow the manufacturer’s guidelines for maintenance.
FAQs
Can I use the Bernina Magnetic Hoop with any fabric type?
Yes, the magnetic hoop is versatile and accommodates various fabric types, including delicate and thick materials.
Is the Bernina Magnetic Hoop compatible with all Bernina embroidery machines?
Yes, the magnetic hoop is designed to be compatible with most Bernina embroidery machines, providing a seamless stitching experience.
How do I clean and maintain the Bernina Magnetic Hoop?
Clean the magnetic hoop regularly by removing dust or debris. Follow the manufacturer’s guidelines for proper maintenance to ensure optimal performance.
Can I embroider on larger or smaller areas than the hoop size?
Yes, the magnetic hoop allows you to easily reposition fabric, enabling embroidery on larger or smaller areas than the actual hoop size.
Does the Bernina Magnetic Hoop work well with intricate embroidery designs?
Absolutely, the secure hold of the magnetic hoop ensures precise stitching, making it ideal for intricate and detailed embroidery designs.
To Recap
Utilizing a Bernina Magnetic Hoop for embroidery not only simplifies the hooping process but also revolutionizes the creative journey.
By eliminating the need for traditional securing methods, this accessory offers time efficiency, prevents fabric damage, and accommodates a broad spectrum of materials.
Its user-friendly design, coupled with the flexibility it provides in design placement, enhances the overall embroidery experience.
As you explore the step-by-step guide and leverage the tips provided, the Bernina Magnetic Hoop becomes a reliable and indispensable tool, empowering enthusiasts to embark on projects with precision, ease, and a newfound freedom to experiment creatively.
Elevate your embroidery endeavors with the innovative and efficient Bernina Magnetic Hoop.
Leave a Reply