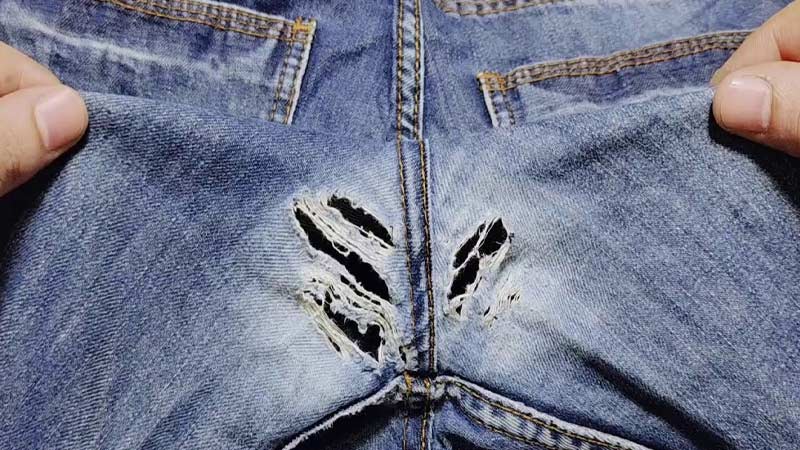
We’ve all been there – the dreaded moment when you discover a hole in the crotch of your favorite pair of pants.
Before you resign them to the depths of your closet or, worse, toss them in the trash, consider this: repairing a hole in the crotch is not only possible but also surprisingly simple.
In this comprehensive guide, we’ll walk you through the process of how to fix a hole in your pants crotch. Whether you’re a seasoned seamstress or a novice with a needle and thread, our step-by-step instructions will empower you to tackle this common wardrobe woe confidently.
Say goodbye to inconvenient wardrobe malfunctions and hello to a renewed sense of accomplishment as you learn the art of mending. Let’s dive into the world of DIY clothing repair and give your pants a second chance to shine!

How To Fix A Hole In Pants Crotch? 5 Steps
Wardrobe malfunctions happen to the best of us, and discovering a hole in the crotch of your favorite pants can be disheartening.
This comprehensive guide will walk you through the step-by-step process of fixing a hole in your pants’ crotch, giving you the skills to revive your wardrobe and reduce unnecessary waste.
Step 1: Assess the Damage

Examine the hole carefully to determine its size and whether the surrounding fabric is frayed. Understanding the extent of the damage will guide your repair strategy.
Ensure the area around the hole is clean and free of any loose threads or debris. This will provide a smoother surface for your repair and help the new stitches hold better.
Step 2: Choose Your Approach
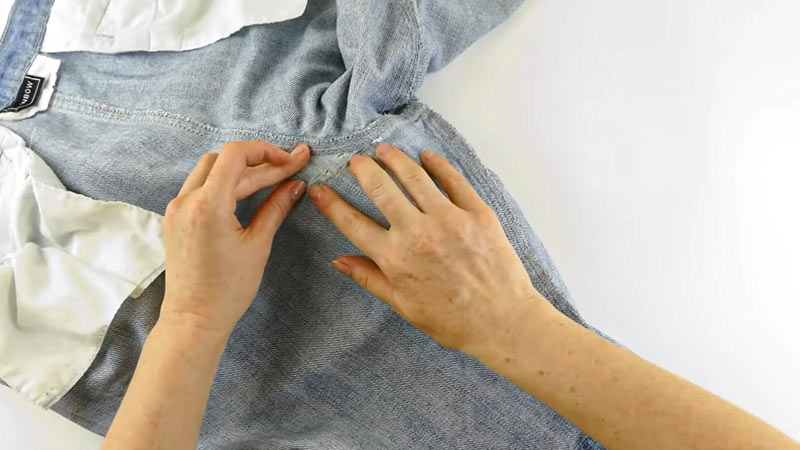
If the hole is small, you can close it with a basic sewing technique. Thread your needle and sew a series of small, tight stitches across the hole until it is completely closed.
For a larger hole, consider using a fabric patch or scrap. Cut the patch to a size slightly larger than the hole and position it on the inside of the pants. Sew around the edges of the patch, securing it to the pants and covering the hole.
Step 3: Thread the Needle
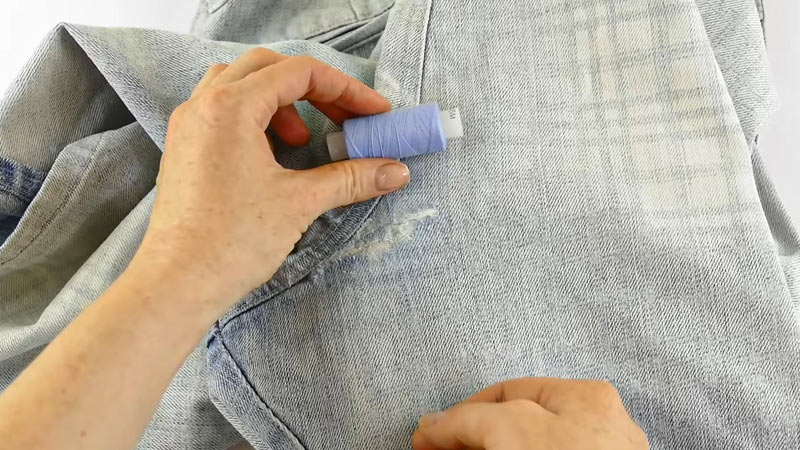
Thread your needle with a length of thread that is manageable and won’t tangle easily. Knot one end securely.
Begin sewing from the inside of the pants to conceal the knot. If the fabric is thick, you may want to use a thimble to protect your fingers. Use small, even stitches, pulling the thread tight to close the hole.
Step 4: Reinforce if Necessary
For added strength, consider sewing over the repaired area a second time. This reinforcement can prevent future unraveling and ensure a longer-lasting repair.
Once you are satisfied with the repair, trim any excess thread, leaving a small tail. Be careful not to cut too close to the knot to prevent unraveling.
Step 5: Finishing Touches
If you use a fabric patch, ensure the edges are securely sewn to prevent fraying. Iron the repaired area gently to smooth out any wrinkles caused by the sewing process.
Tips for Successfully Fix a Hole in Crotch Pants
If you’re new to sewing, practice stitching on a scrap piece of fabric before tackling the repair. Adjust the tension on your sewing machine or regulate your hand-sewing tension to ensure even and secure stitches.
Periodically check the seams of your pants for signs of wear, and reinforce them before holes develop.
By following these steps, you can rescue your pants from the brink of disposal and gain valuable skills in the process.
Remember, mending clothes saves you money and contributes to a more sustainable and eco-friendly approach to fashion.
Can You Fix Hole in Crotch Pants by Hand Embroidery?
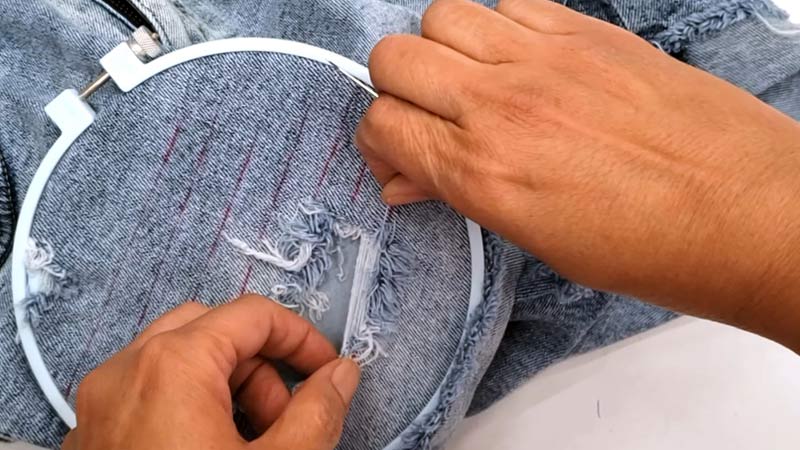
Embarking on a journey to fix a hole in the crotch of your pants with hand embroidery mends the damage and adds a unique and personalized touch to your wardrobe.
Here, we’ll walk you through the steps to learn how to fix a hole in the crotch of jeans by hand for a stylish and durable fix.
Step 1: Assess the Hole
Examine the hole to determine its size and shape. This assessment will guide your embroidery design and help you decide whether a fabric patch is necessary.
Embrace the opportunity to get creative! Plan an embroidery design that covers the hole and adds flair to your pants. Consider geometric shapes, floral patterns, or simple stitches for an elegant touch.
Step 2: Thread Your Needle
Thread your embroidery needle with the chosen embroidery thread. A single strand is often sufficient for delicate designs, while you can use multiple strands for bolder, more pronounced stitches.
Start stitching from the inside of the pants to conceal the knot. Use your chosen design to cover the hole, stitching along the edges to secure the embroidery. If you’re using a fabric patch, attach it to the inside of the pants before starting your embroidery.
Step 3: Experiment with Stitches
Explore different embroidery stitches to enhance your design. Common stitches include the backstitch, satin stitch, and French knot. Mix and match these stitches to create texture and visual interest.
Step 4: Reinforce if Necessary
To repair the crotch of the pants effectively, reinforce your embroidery by stitching over the design again. This secures the threads and ensures a longer-lasting and resilient repair.
Once you’re satisfied with the embroidery, trim any excess thread, leaving a small tail. Be careful not to cut too close to the knot to prevent unraveling.
Step 5: Finishing Touches
If you use a fabric patch, ensure it is securely stitched to the pants. Gently iron the repaired area to smooth out any wrinkles caused by the stitching process.
Play with a variety of colors to create an eye-catching design. Mixing and matching thread hues can elevate the aesthetic appeal of your embroidered repair.
Tips for Successfully Mending Pants Crotch
Ensure that your knots are secure to prevent unraveling. Double-knotting or using a small drop of fabric glue can add extra stability. Hand embroidery allows for a certain level of artistic freedom.
Embrace any imperfections, as they contribute to the uniqueness of your repair. By learning how to sew a hole in pants, you salvage a cherished garment and infuse it with a personalized touch.
How to Repair Pants Crotch by Gluing on a Patch?
If you’re looking for a swift and efficient way to mend a hole in the crotch of your pants, using a fabric patch and fabric glue can be a convenient alternative to sewing.
This method is especially handy for those without sewing skills or needing rapid repair. In this guide, we’ll take you through the step-by-step process of fixing a pant crotch hole using a fabric patch and fabric glue.
Step 1: Clean the Area
Ensure the crotch area around the hole is clean and free from any loose threads or debris. This prepares the fabric for optimal adhesion.
Using fabric scissors, cut the fabric patch into a shape that adequately covers the hole with a slight overlap. The patch should seamlessly blend with the color and pattern of your pants.
Step 2: Insert a Barrier (Optional)
If you want to prevent the glue from reaching the backside of the pants, insert a piece of cardboard or plastic behind the hole. This creates a protective barrier during the gluing process.
Step 3: Apply Fabric Glue
Squeeze a small amount of fabric glue onto the patch, ensuring even coverage. Be mindful not to use an excessive amount, as this can lead to a messy application.
Step 4: Position and Press the Patch
Carefully place the patch over the hole, pressing it firmly against the fabric. Ensure that the patch’s edges align with the surrounding fabric to create a seamless repair.
Step 5: Smooth Out Air Bubbles
Gently smooth out any air bubbles or wrinkles in the patch, ensuring a flat and even surface. This step is crucial for a neat and discreet repair.
Allow the fabric glue to dry completely according to the instructions on the product label. This may take a few hours, depending on the type of fabric glue used.
Step 6: Trim Excess Fabric
Once the glue is fully dry, use fabric scissors to trim any excess fabric from the patch’s edges carefully. Take your time to achieve a clean and polished finish.
Tips for Success
Investing in a reliable and washable fabric glue ensures a durable bond that withstands regular wear and washing. Before applying the glue to a visible part of your pants, test it on a small, inconspicuous area to ensure compatibility with the fabric.
FAQs
Can I repair a hole in my pants if I don’t have sewing experience?
Absolutely! This guide is designed for all skill levels. Start with small holes, practice basic stitches on scrap fabric, and gradually improve. With patience, anyone can master this essential DIY skill.
What if the hole is too big to sew?
For larger holes, consider using a fabric patch. Cut the patch to cover the hole, position it inside the pants, and sew around the edges. This reinforces the area and adds a creative touch to your repair.
Are there specific thread and needle recommendations for different fabrics?
Yes, choose a thread that matches the color and material of your pants. Use a smaller needle for lightweight fabrics, while thicker fabrics may require a sturdier needle. Adapting your tools to the fabric ensures a smoother repair process.
How do I prevent future holes in the crotch of my pants?
Regularly inspect your pants for signs of wear, especially in high-friction areas like the crotch. Reinforce seams before holes develop, and consider using a quality thread during original construction or repairs for added durability.
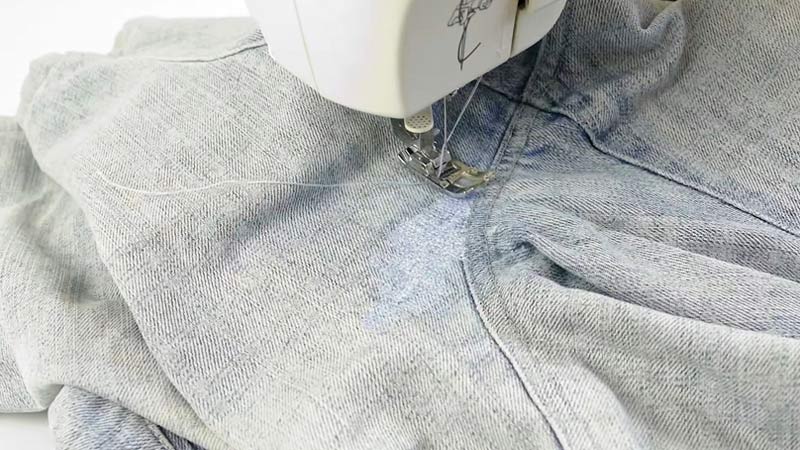
Can I use a sewing machine instead of hand-sewing?
Certainly! A sewing machine can expedite the process, especially for larger trouser crotch repairs. Adjust the machine’s tension according to your fabric, and follow a straight or zigzag stitch for optimal results.
Conclusion
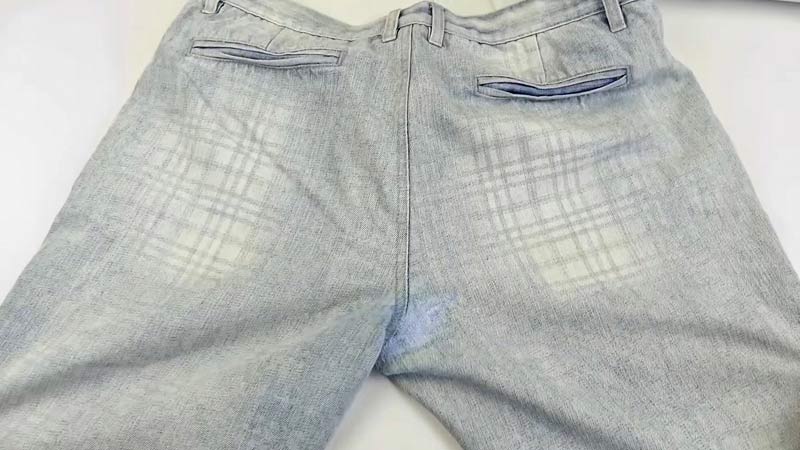
Congratulations! You’ve successfully navigated the art of fixing a hole in your pants’ crotch, saving a cherished garment from premature retirement.
Remember, mastering this skill adds a practical dimension to your DIY repertoire and contributes to a more sustainable approach to fashion. The satisfaction of reviving your clothing and reducing waste is immeasurable.
As you admire your handiwork, take a moment to appreciate the resilience of your pants and your newfound ability to mend them.
This guide has equipped you with the knowledge and confidence to address similar issues in the future, transforming potential fashion disasters into triumphs of repair.
With a bit of patience and skill, you can extend your wardrobe’s life and positively impact the environment, one repaired pair of pants at a time. Happy mending!
Leave a Reply