Hemming workout leggings is a practical skill that allows you to customize the fit of your activewear for maximum comfort and style.
Whether you’re looking to shorten the length or achieve a snugger fit around the ankles, this guide will walk you through the process step-by-step.
You don’t need advanced sewing skills or specialized equipment; a regular sewing machine and some basic supplies are all you’ll require.
From measuring and marking to selecting the right stitch, we’ll cover each detail to ensure your leggings are tailored to perfection.
With this guide, you’ll be able to confidently hem your workout leggings, creating a custom fit that enhances your exercise experience.
How to Hem Workout Leggings?
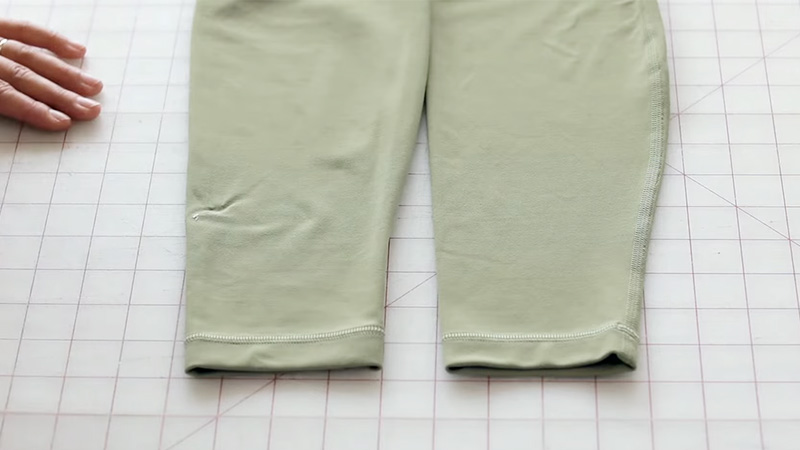
Hemming workout leggings can be a useful skill, especially if you find a pair that fits perfectly in all aspects except length.
Whether you’re looking to shorten them for comfort or style, here’s a step-by-step guide on how to hem your workout leggings:
Materials Needed:
- Workout Leggings.
- Measuring Tape.
- Pins.
- Needle and Thread.
Step-by-Step Guide:
Try on the Leggings
Put on the leggings and fold the excess fabric at the bottom to the desired length. Take a moment to move around and ensure you’re comfortable with the new length.
This step is crucial to get a visual and tactile sense of how the leggings will fit after hemming.
Mark the Length
Using a fabric marker or pins, mark the new hemline. It’s advisable to do this while looking in a full-length mirror to ensure that the length is even and suits your preference.
Measure from the floor to the marked point on both legs to confirm uniformity.
Prepare the Leggings
Turn the leggings inside out. Lay them flat on a clean, flat surface. Smooth out any wrinkles or folds to ensure that the fabric is even and the hem will be straight.
Fold and Pin
Fold the fabric up to the marked line. Take your time to make sure the fold is even and smooth all the way around.
Use pins to secure the fold in place. Placing pins perpendicular to the fold can help keep the fabric in place more securely.
Check Length Again
Put the leggings on again to double-check the length. Take this opportunity to make any final adjustments. It’s better to be sure now than to have to redo the process later.
Thread the Needle
Thread a needle with a length of thread (about 18 inches is a good starting point) and tie a knot at the end. Make sure the thread color matches the leggings for a seamless finish.
Start Sewing
Begin sewing from the inside of the legging, close to the seam. This will hide the initial knot. Use a straight stitch, sewing through both layers of fabric.
Be careful not to pull too tight, as this might cause the fabric to pucker.
Continue Sewing
Work your way around the leg, about 1/8 inch from the edge of the fabric. Keep your stitches even and close together for a secure hem.
If you encounter a seam or any thick areas, sew through them slowly to avoid breaking the needle.
Tie Off the Thread
When you reach the starting point, tie off the thread securely with a knot. To do this, pass the needle through the loop before pulling it tight. Trim any excess thread.
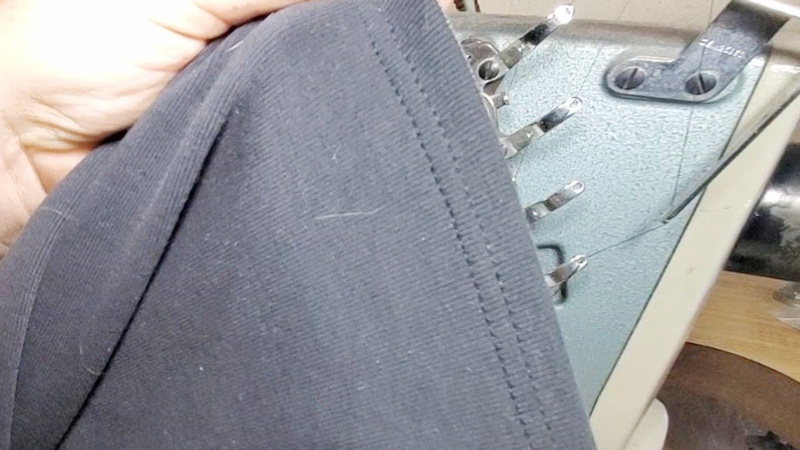
How to Hem Workout Leggings with a Cover Stitch Machine?
A cover stitch machine is a specialized tool perfect for creating professional-looking hems on knit fabrics.
It ensures a flat, stretchy, and durable finish without any tunneling or rippling.
Here’s how to hem your workout leggings using a cover stitch machine:
Materials Needed:
- Cover Stitch Machine.
- Stretch twin or triple needle.
- Polyester or nylon thread.
- Ballpoint or stretch needle.
- Ruler or measuring tape.
- Fabric marker or chalk.
- Pins or clips.
Step-by-Step Guide:
Prepare the Leggings
Wash and iron your leggings to account for any potential shrinkage and to relax the fabric fibers, which will make it easier to work with.
Mark the New Hemline
Put on the leggings and mark where you want the new hem with a fabric marker or chalk. If you’re uncertain, you can fold up the excess fabric and pin it in place to visualize the look.
Measure and Mark
Lay the leggings flat on a table. Measure the distance from the original hem to the marked line.
Add 1/2 inch for seam allowance and mark this measurement around the leg opening. Accuracy here ensures an even finish.
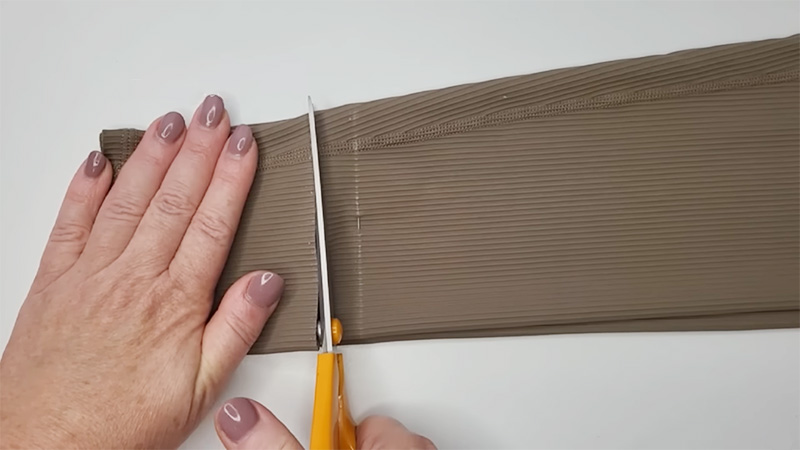
Trim Excess Fabric
Using sharp scissors or a rotary cutter, cut off the excess fabric along the marked line. Take care to make the cut as even as possible.
Fold and Press
Fold up the raw edge 1/2 inch towards the wrong side of the fabric. Press it with an iron and secure it in place with pins or clips. This fold gives you a clean edge to work with.
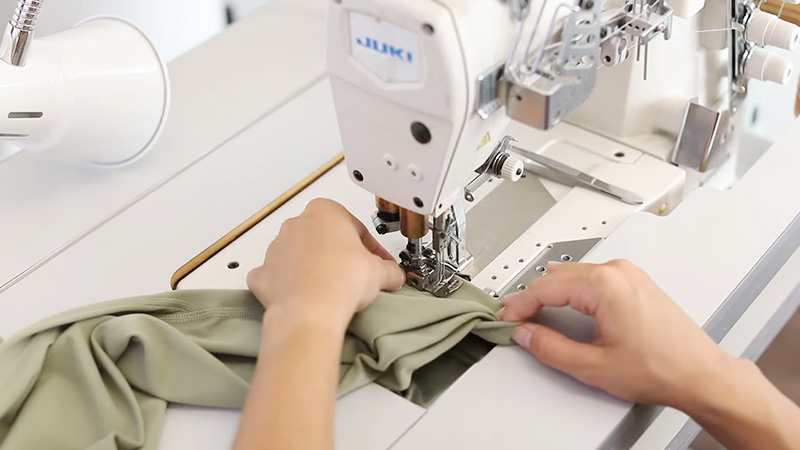
Set Up the Machine
Load your overstitch machine with a stretch twin or triple needle, depending on the desired width of your hem.
Thread the machine with polyester or nylon thread matching the fabric color. This combination ensures a strong and flexible seam.
Insert Needle
Use a ballpoint or stretch needle that matches the fabric and thread size. This specialized needle prevents snags or damage to the stretchy material.
Position the Leggings
Place the leggings under the presser foot of your machine, aligning the folded edge with the needles.
Ensure the right side of the fabric faces up, and the raw edge is enclosed by the looper thread on the wrong side. This setup ensures your stitches will form correctly.
Start Stitching
Sew around the leg opening, gently stretching the fabric as you go. Overlap your stitches at the end and cut the threads, leaving long tails.
The gentle stretching ensures the hem will remain flexible and comfortable during movement.
Secure Threads
Gently pull the thread tails to bring them to the wrong side of the fabric. Tie them in a knot and trim off any excess threads. This step ensures your work is secure and won’t unravel.
Repeat for the Other Leg
Repeat steps 3 to 10 for the other leg opening. Consistency is key to a polished final result.
Final Press
Press your hem with an iron on low heat to set the stitches and admire your professionally hemmed workout leggings. This step adds that final touch of professionalism.
How to Hem Workout Leggings with a Sewing Machine?
If you don’t have access to a cover stitch machine, you can still achieve a professional-looking hem on your workout leggings with a regular sewing machine.
Follow these steps, using the right stitch, needle, and thread to create a hem that’s both stretchy and neat.
Materials Needed:
- A sewing machine
- A stretch twin needle or a zigzag stitch
- Polyester or nylon thread
- Ballpoint or stretch needle
- Ruler or measuring tape
- Fabric marker or chalk
- Pins or clips
- Water-soluble stabilizer (optional)
Step-by-Step Guide:
Preparation
Wash and iron your leggings to allow for any potential shrinkage and to relax the fabric fibers, making them easier to work with. Ensure they are dry before beginning.
Mark the New Hemline
Put on the leggings and mark where you want the new hem with a fabric marker or chalk. This gives you a visual guide for where the new hem will be.
For precision, try folding up the excess fabric and pinning it in place to see how it looks.
Measure and Mark
Lay the leggings flat on a table. Measure the distance from the original hem to the marked line.
Add 1 inch for seam allowance and mark this measurement around the leg opening. This ensures uniformity in the final result.
Trim Excess Fabric
Using sharp scissors or a rotary cutter, cut off the excess fabric along the marked line. Take care to make the cut as even as possible. A clean and even cut contributes to a professional finish.
Fold and Press
Fold up the raw edge 1/2 inch towards the wrong side of the fabric. Press it with an iron and secure it in place with pins or clips.
This fold gives you a clean edge to work with and ensures the hem stays in place during sewing.
Set Up Your Sewing Machine
Decide between using a stretch twin needle or a zigzag stitch. The twin needle will create two parallel rows of stitches, while the zigzag stitch will provide a stretchy finish.
Thread your machine with polyester or nylon thread matching the fabric color. A well-matched thread provides durability and a seamless finish.
Insert Needle
Use a ballpoint or stretch needle that matches the fabric and thread size. This specialized needle prevents snags or damage to the stretchy material. A correct needle choice ensures smooth sewing.
Optional Stabilizer
If using a stretch twin needle, place a strip of water-soluble stabilizer under the folded edge.
This helps prevent tunneling or rippling between the rows of stitches, resulting in a smoother finish.
Position the Leggings
Place the leggings under the presser foot of your machine, aligning the folded edge with the needle(s).
Ensure the right side of the fabric faces up, and the raw edge is enclosed by the stitches on the wrong side. This setup ensures your stitches will form correctly.
Start Sewing
Sew around the leg opening, gently stretching the fabric as you go. Overlap your stitches at the end and cut the threads, leaving long tails.
The gentle stretching ensures the hem will remain flexible and comfortable during movement. Even stitching contributes to the longevity of the hem.
Finishing the Seam
If you used a stretch twin needle, gently pull the thread tails to bring them to the wrong side of the fabric.
Tie them in a knot and trim off any excess threads. This step ensures your work is secure and won’t unravel.
Repeat for the Other Leg
Repeat steps 3 to 11 for the other leg opening. Consistency is key to a polished final result. Matching both legs ensures a balanced and professional look.
Final Press
Press your hem with an iron on low heat to set the stitches and admire your professionally hemmed workout leggings.
This step adds that final touch of professionalism. It smooths out any wrinkles and sets the stitches for durability.
Precautions to Hem Workout Leggings
Hemming workout leggings is a straightforward task, but it’s important to take some precautions to ensure the best results.
Here are some essential steps and considerations to keep in mind when hemming your workout leggings:
Wash and Iron First
Before you begin the hemming process, it’s crucial to wash and iron your leggings.
This step ensures that any potential shrinkage in the fabric has already occurred, preventing the hem from becoming too short after the first wash.
Choose the Right Needle and Thread
Selecting the appropriate needle and thread is key to a successful hem. Opt for a ballpoint or stretch needle, specially designed for knit fabrics.
Pair it with a thread that matches the color of your leggings for a seamless finish.
Test on Scrap Fabric
Practice your hemming technique on a scrap piece of similar fabric before starting on your leggings.
This allows you to familiarize yourself with the machine settings and stitching technique, ensuring a clean and even finish on your actual project.
Secure the Fabric
Use pins or clips to secure the fabric in place before sewing. This prevents any shifting or misalignment during the sewing process, resulting in a straight and even hem.
Be Mindful of the Pattern
If your leggings feature a specific pattern or design, carefully consider how hemming may impact it.
Altering the length can potentially disrupt the pattern, so plan your hemming strategy accordingly.
Avoid Overstretching
While sewing, gently stretch the fabric as needed to accommodate the stretch of the leggings.
However, exercise caution not to overstretch, as this can lead to puckering or uneven stitching. Maintaining a balanced tension is crucial.
Use the Right Stitch
Ensure you select the appropriate stitch for your machine. If using a regular sewing machine, opt for a zigzag or stretch stitch, which allows for movement without causing the stitches to break.
For cover stitch machines, choose the appropriate settings for a professional finish.
Check for Tunneling
If you’re using a twin needle or cover stitch machine, be vigilant for tunneling, where the fabric bunches up between the rows of stitching.
To prevent this issue, consider using a water-soluble stabilizer, which provides support during stitching.
Press Carefully
When pressing the hem, use a low heat setting on your iron and a pressing cloth to safeguard the fabric.
Avoid excessive heat, as it can potentially damage the fabric or distort any elastic fibers, particularly in activewear.
Take Your Time
Hemming requires precision, so resist the urge to rush. Take your time to ensure even stitching and a professional finish.
Rushing can lead to mistakes and uneven hems that may detract from the overall look and feel of your leggings.
FAQS
Can I use a regular sewing machine to hem workout leggings?
Yes, a regular sewing machine is suitable for hemming leggings. Just make sure to use a stretch or ballpoint needle, and select the appropriate stitch for stretchy fabrics.
What’s the advantage of using a cover stitch machine for hemming?
A cover stitch machine creates a professional-looking, stretchy hem ideal for activewear.
Should I wash the leggings before hemming them?
Yes, it’s recommended to wash and iron the leggings before hemming. This accounts for any potential shrinkage and relaxes the fabric fibers for easier handling.
How do I prevent the fabric from bunching or stretching while sewing?
Use pins or clips to secure the fabric in place before sewing. Additionally, consider using a water-soluble stabilizer or tissue paper underneath the fabric to prevent tunneling.
Can I alter the length of the leggings with printed designs or patterns?
While it’s possible, be cautious when hemming leggings with intricate patterns. Altering the length may disrupt the design.
To Wrap Up
Learning how to hem workout leggings empowers you to personalize your athletic attire, ensuring both comfort and style.
Whether you opted for a cover stitch machine or a regular sewing machine, these step-by-step instructions have equipped you with the skills to achieve a professional finish.
From precise measurements to selecting the appropriate needle and stitch, your workout leggings can now be tailored to your exact preferences.
Hemming not only enhances the aesthetics but also provides functionality, preventing unwanted fabric bunching or tripping during workouts.
Embrace your newfound sewing prowess and take pride in donning leggings that fit like a second skin, allowing you to perform your best during every fitness endeavor.
Leave a Reply