Cross stitch, an art form steeped in tradition, yields intricate and captivating creations. Yet, the final step, ironing, is often overlooked.
Properly ironing a cross-stitch piece is pivotal in bringing out its full potential. This delicate process smoothens fabric, enhances detail, and prepares it for framing or mounting.
However, it demands precision and care to avoid damaging the meticulously crafted stitches.
This guide delve into the nuances of ironing a cross stitch, offering step-by-step insights and crucial tips.
By mastering this essential finishing touch, your cross stitch projects will radiate a professional, polished allure, captivating admirers with their beauty and craftsmanship.
What Is Cross Stitch?
Cross stitch is a form of counted thread embroidery that involves creating patterns and designs on fabric using X-shaped stitches. It is named for how the stitches intersect to form a small “X” shape.
In cross stitch, a grid of tiny squares is created on the fabric, each square representing a single stitch. The pattern is typically provided on a chart or pattern grid, where each symbol or color corresponds to a specific stitch type.
Cross stitch is a versatile craft that can be applied to various projects, including samplers, framed art, clothing embellishments, and decorative household items like pillows or tablecloths.
How to Iron a Cross Stitch?
Ironing cross stitch is an important step in the finishing process, as it helps to remove wrinkles and creases, resulting in a smooth and professional-looking piece. Here’s a step-by-step guide on how to properly iron a cross stitch:
Materials Needed:
- Finished cross stitch piece
- Clean, lint-free cloth (such as a cotton or linen tea towel)
- Iron
- Ironing board or flat, padded surface
Steps:
Prepare Your Workspace
Clear a dedicated space for ironing, ensuring it’s clean and flat. If you’re using an ironing board, ensure it’s stable and covers a comfortable working area.
When using a towel on a table, ensure the table is sturdy and level. Having ample space prevents any accidental creasing or bunching of your cross stitch.
Set Your Iron
Verify that your iron is clean, and if needed, wipe the soleplate with a damp cloth to remove any residue. Set the iron to a low heat setting.
When it has fabric-specific settings, select one suitable for cotton or linen. Starting with low heat helps prevent any damage to delicate threads or specialty fabrics.
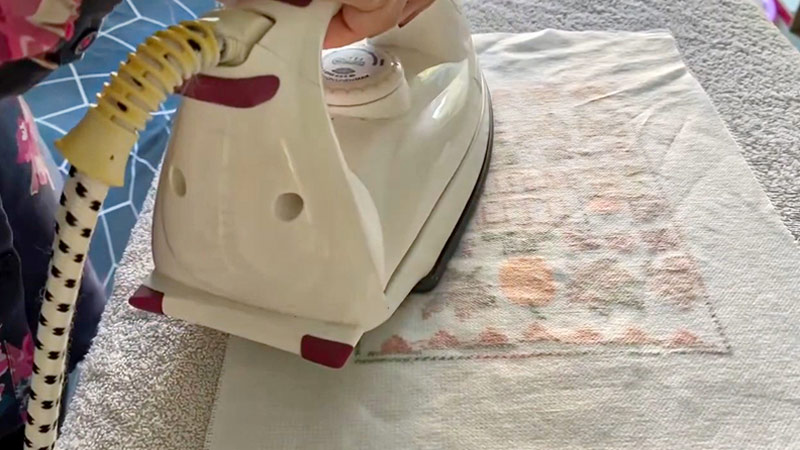
Place the Cross Stitch Face Down
Position your cross stitch with the stitched side facing down onto the clean cloth. This ensures that the iron’s heat directly affects the backside, which usually has fewer raised or intricate elements, reducing the risk of damage to the stitches.
Cover with a Damp Cloth
When your cross stitch has deep wrinkles or persistent creases, a damp cloth can be used to add a bit of moisture. However, it’s crucial that the cloth is not excessively wet, as excess moisture could damage the threads or cause color bleeding.
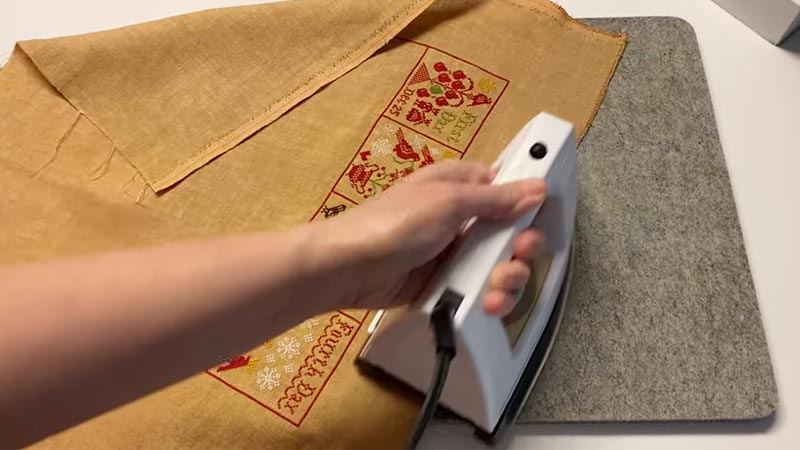
Press, Don’t Rub
Lower the iron gently onto the cloth-covered back of the cross stitch. Apply even pressure without any rubbing or sliding motion.
Allow the heat to penetrate briefly before lifting and moving to the next section. This method effectively smoothens the fabric without risking damage to the stitches.
Avoid Ironing Directly on the Stitches
Exercise extreme caution to ensure the iron never touches the actual stitched threads. Applying direct heat to the stitches can cause them to flatten, melt, or even discolor, irreparably damaging your painstaking work.
Pay Extra Attention to Corners and Edges
Corners and edges tend to hold creases more stubbornly. Spend a little more time on these areas, using the iron tip to focus on specific spots. Be gentle and precise to prevent any unintended stretching or distortion of the fabric.
Check Your Progress
Lift the cloth occasionally to assess your progress. If wrinkles persist, continue ironing, not rushing the process. It’s better to be thorough and cautious than risk damaging your cross stitch.
Inspect the Front
Turn your cross stitch over and carefully inspect the front. Ensure it’s smooth and free of any visible wrinkles. Repeat the ironing process on the back when you spot any remaining creases, using the damp cloth sparingly if needed.
Allow to Cool
Allow your cross stitch to cool completely before handling it further. Warm fabric is more susceptible to stretching or distortion, so giving it time to cool down ensures it retains its original shape and tension.
Finishing Touches
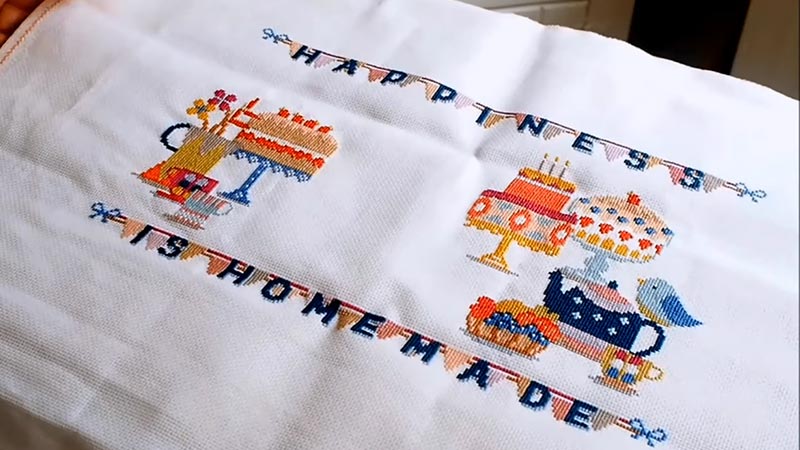
With your cross stitch properly ironed, you can proceed with any additional finishing steps, such as framing, mounting, or incorporating it into a larger project. Take pride in your beautifully preserved work of art!
Why Do You Need to Iron a Cross Stitch?
Ironing a cross stitch piece is a crucial step in finishing, playing a pivotal role in enhancing its overall appearance.
Here’s why it’s essential:
Elimination of Wrinkles and Creases
Over the course of stitching, especially with larger or more intricate projects, cross-stitch fabric can develop creases and wrinkles. Ironing smooths out these imperfections, giving the piece a polished and professional finish.
Enhancing Presentation
A well-ironed cross stitch showcases the intricate details and colors of the design more clearly. This makes the effort put into each stitch more evident, resulting in a visually appealing final product.
Preparing for Framing or Mounting
An evenly ironed cross stitch provides a clean and flat surface, which is essential for framing or mounting. Wrinkles and creases can distort the appearance and make it challenging to secure the piece properly.
Ensuring Longevity
Ironing helps set the stitches in place, securing them long-term. This is particularly important for pieces that may be handled frequently, like those incorporated into everyday items like cushions or wall hangings.
Creating a Professional Finish
Whether it’s for personal satisfaction or if you plan to gift or sell your cross stitch, a well-ironed piece reflects a level of craftsmanship and attention to detail that distinguishes it as a high-quality handcrafted item.
Facilitating Storage and Display
An ironed cross stitch is easier to store or display. It lies flat and can be neatly folded or framed without any unwanted wrinkles or creases.
Correcting Stitch Tension
Ironing can help even out any irregularities in stitch tension that may have occurred during the stitching process. This ensures a consistent appearance across the entire piece.
Alternatives to Ironing a Cross Stitch
While ironing is the most common method to finish a cross stitch project, there are alternative ways to achieve a smooth and well-finished look:
Steam Blocking
Instead of using a hot iron, you can use steam to block your cross stitch. Hover a garment steamer or a steam iron just above the fabric, allowing the steam to penetrate and relax the fibers. Be cautious not to touch the fabric with the hot soleplate.
Dry Mounting
Dry mounting involves adhering your cross stitch to a firm backing board using an adhesive, such as double-sided tape or a heat-activated adhesive. This method provides a flat, wrinkle-free finish suitable for framing.
Stretching on a Frame
Stretching your cross stitch on a wooden frame or stretcher bars can help eliminate wrinkles and creases. Secure the fabric tightly and evenly, then trim any excess fabric before framing.
Washing and Blocking
For stubborn wrinkles, you can gently hand wash your cross stitch, allow it to air dry, and then block it using pins and a blocking board. Be cautious with this method, as washing can affect colors and thread integrity.
Professional Framing Services
Consider taking your cross stitch to a professional framer who can perfectly stretch, mount, and frame your piece. They have the expertise and equipment to ensure a flawless finish.
Using a Tensioning System
Some cross stitchers use tensioning systems like Q-Snaps or scroll frames that keep the fabric taut while stitching, reducing the need for extensive blocking or ironing afterward.
Heat Bonding
Crafters sometimes choose to laminate or heat bond their cross stitch to a stiff backing material. This method ensures a flat, durable finish but should be carefully approached to avoid damage.
Tips for Ironing a Cross Stitch
Ironing a cross-stitch project requires careful attention to detail to avoid damaging your hard work.
Here are some tips to help you iron your crossstitch effectively:
Start with a Clean Surface
Before you begin, wipe down your ironing board or chosen surface with a clean, damp cloth. Ensure it’s free from dust, lint, or debris that could transfer onto your cross stitch.
Use a low-heat setting
Always err on the side of caution with heat. Begin with the lowest setting and gradually increase if needed. It’s better to be conservative with the heat for delicate fabrics or specialty threads to avoid any potential damage.
Avoid Direct Heat on Stitches
Remember, the integrity of your stitches is paramount. Placing the iron directly on them can lead to flattening, melting, or color distortion. A protective cloth is your best defense against any potential mishaps.
Gently Press, Don’t Rub
When applying the iron, use a gentle yet firm touch. Imagine you’re giving your crossstitch a reassuring pat. Avoid any sliding movements that can inadvertently disturb the threads.
Focus on the Back Side
Starting with the back is strategic. This side is usually less intricate, and by addressing it first, you’re minimizing the risk to the front where the detailed stitching is. This step sets the foundation for a smooth finish.
Use a Damp Cloth Sparingly
When wrinkles are particularly stubborn, consider using a slightly damp cloth. I wring it out well, so it’s just damp, not wet.
This added moisture can aid in relaxing the fibers, but be cautious to avoid over-saturation.
Pay Attention to Corners and Edges
The corners and edges often require extra care. Use the point of the iron to concentrate on these areas, ensuring they lie flat and free from any residual creases.
Check Your Progress
Regularly lift the cloth to assess your progress. Take your time, especially with larger or more intricate pieces. It’s better to spend a little longer to achieve a perfect result than rush and risk damaging your work.
Inspect the Front Carefully
When you turn your project over, do so with care. Inspect the front side meticulously, feeling for any remaining wrinkles.
You can repeat the ironing process on the back or front, always using a protective cloth when necessary.
Let It Cool
This step is crucial. Allowing your cross stitch to cool down fully ensures it retains its shape and tension.
It also prevents any accidental distortion that might occur while the fabric is still warm.
Finishing Steps
When you’re framing or mounting your cross stitch, do so with the same level of care you’ve applied to ironing.
Ensure everything is aligned perfectly to showcase your hard work in the best possible light.
Protect Your Iron
Cleaning the soleplate of your iron during the process is a proactive measure. This prevents any residue or buildup from affecting future ironing sessions and maintains the integrity of your projects.
FAQS
Can I iron my cross stitch directly without using a cloth?
Using a clean, lint-free cloth as a protective barrier between the iron and your cross stitch is strongly advised. Direct contact can damage the delicate stitches.
What should I do if my cross stitch is very wrinkled?
When your cross stitch is heavily wrinkled, you can slightly dampen a cloth and place it over the back of the piece before ironing.
Can I use a steam iron for cross-stitching?
It’s generally recommended to avoid using steam, as excessive moisture can harm the threads and fabric.
Is it possible to over-iron a cross stitch?
Yes, over-ironing can potentially damage the threads or cause them to flatten. It’s important to be patient and use a low heat setting, gradually increasing if needed.
What precautions should I take when ironing corners and edges?
When ironing corners and edges, be extra gentle and precise. Use the tip of the iron to target specific spots, and avoid applying excessive pressure to prevent unintended stretching or distortion of the fabric.
To Recap
Mastering the art of ironing a cross stitch is an invaluable skill for any needlework enthusiast. This meticulous process transforms a stitched piece into a masterpiece, enhancing its clarity and presentation.
By carefully smoothing out wrinkles, you prepare it for framing or mounting and ensure its longevity and professional finish. The attention to detail exhibited through this step demonstrates a dedication to craftsmanship.
Additionally, an ironed cross stitch is easier to store and display, reflecting the care and pride invested in its creation.
Overall, this final touch elevates a completed project into a cherished work of art, ready to be admired and enjoyed for years to come.
Leave a Reply