Kitchener Stitch, a revered technique in knitting, grants a seamless finish to projects by skillfully grafting two sets of live stitches.
This method, also known as “grafting,” is invaluable for joining the toes of socks, closing the underarms of sweaters, and creating a seamless look in various knitting endeavors.
While it may seem intricate, mastering Kitchener Stitch is a rewarding venture for any knitter. This step-by-step guide will elucidate the process, offering tips and insights to ensure a polished, professional finish.
With patience and practice, Kitchener Stitch will become an essential skill in your knitting repertoire, elevating the quality and aesthetic of your creations.
How to Kitchener Stitch in Knitting?
Kitchener Stitch, also known as grafting, is a seamless way to join two sets of live stitches together in knitting.
It is commonly used for closing the toes of socks, joining the shoulders of sweaters, or connecting two pieces of fabric without a visible seam.
Here’s a step-by-step guide on how to perform Kitchener Stitch:
Materials Needed:
- Two knitting needles with live stitches
- A length of yarn
- A tapestry needle or yarn needle with a large eye
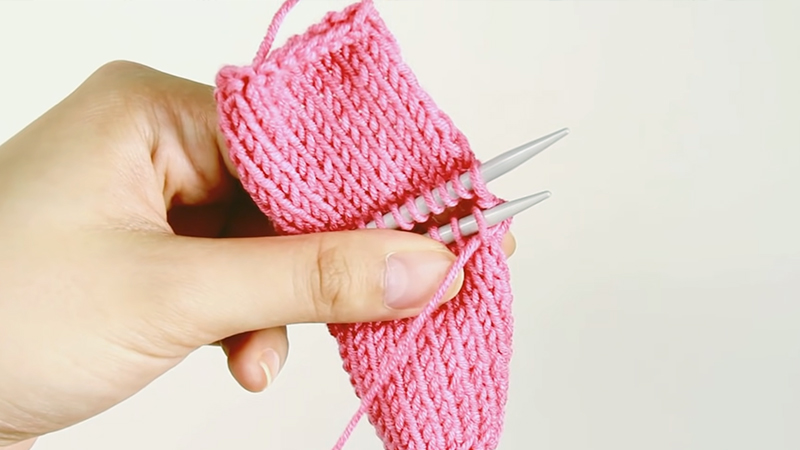
Set Up Your Needles
Begin by threading the yarn onto your tapestry needle. Leave a tail of a few inches. This tail will be used later to secure the seam. Ensure that the yarn is securely attached to the needle.
Hold the two pieces of knitting with the right sides facing each other. Position the needles so they are parallel, with the working yarn attached to the back needle.
Insert the Needle
Gently insert the tapestry needle purlwise into the first stitch on the front needle, as if you were preparing to purl. This means you’re entering the stitch from right to left, going from the right side of the stitch to the left side.
Once the needle is through, pull the yarn through, making sure not to pull too tightly. Leave the stitch on the needle.
Insert the Needle on the Back Needle
Now, insert the tapestry needle knitwise into the first stitch on the back needle, just as if you were about to knit it.
This involves inserting the needle from left to right, going from the left side of the stitch to the right side. Pull the yarn through, once again, taking care not to pull too tightly. Leave the stitch on the needle.
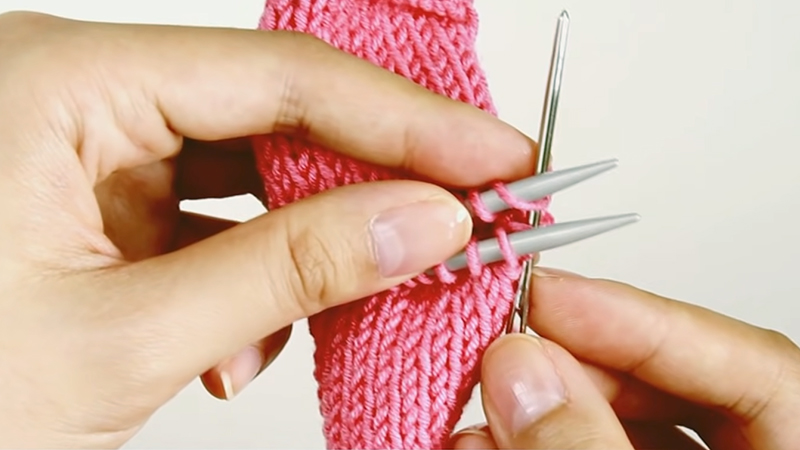
First Set of Stitches
Slip the first stitch off the front needle as if you were going to knit it. This is done by simply transferring the stitch from the left needle to the right needle without knitting it. Leave it on the right needle.
Second Set of Stitches
Now, slip the first stitch off the back needle as if you were going to purl it. Again, this involves transferring the stitch from the left needle to the right needle without actually working it. Leave it on the right needle.
Repeat
Continue repeating steps 2 to 5 until you have just one stitch remaining on each needle. Keep a steady rhythm to create a smooth, even seam.
Finishing
For the final stitches, insert the tapestry needle purlwise into the last stitch on the front needle and gently slide it off. This is similar to slipping a stitch in knitting.
Then, insert the tapestry needle knitwise into the last stitch on the back needle and gently slide it off, similar to slipping a stitch in purling. Gently tighten the yarn to close any gaps, but be cautious not to over-tighten, as this can distort the seam.
Secure the Yarn
To secure the yarn, weave it through the last stitch on the back needle. This helps anchor the end securely in place. You can do this by passing the tapestry needle through the stitch multiple times.
Weave in Ends
Finally, weave in the yarn tails from the beginning and end of your graft. This ensures they are securely fastened and hidden within the fabric, giving your project a neat and professional finish.
Use the tapestry needle to weave the tails through the back of the work. Trim any excess yarn, leaving a small tail for added security.
What Are Some Variations of Kitchener Stitch?
While the traditional Kitchener Stitch is highly effective for seamlessly joining two sets of live stitches, there are several variations and adaptations of this technique.
These variations are particularly useful in specialized knitting projects or when you want to achieve specific design elements.
Here are some notable variations of Kitchener Stitch:
Garter Stitch Kitchener
This variation is used when you want to graft two pieces of fabric that have been worked entirely in garter stitch.
It involves slight alterations in the technique to accommodate the different stitch pattern.
Stockinette Stitch Kitchener
Similar to the garter stitch variation, this version is applied when you’re grafting pieces with a stockinette stitch pattern.
Adjustments are made to create a seamless join in this commonly used stitch pattern.
Reverse Kitchener Stitch
In this variation, the steps of the Kitchener Stitch are performed in the opposite order.
This can be particularly useful when you need to work from left to right instead of right to left.
Purl Kitchener Stitch
Instead of exclusively using knit and purl stitches, the purl Kitchener Stitch incorporates purl stitches into the process. This is typically utilized for fabrics that involve a combination of knit and purl textures.
Rip Stitch Kitchener
Also known as “Frogging,” this technique allows you to undo the Kitchener Stitch if you’ve made a mistake or need to modify your work. It involves carefully unraveling the seam and picking up the stitches again.
Double Kitchener Stitch
This variation is used when joining two sets of live stitches with a substantial gap between them. It involves working two sets of Kitchener Stitch in succession to bridge the gap.
Lace Kitchener Stitch
Adapted for lace knitting, this variation involves working the Kitchener Stitch in a way that maintains the lace pattern.
It requires a good understanding of lace techniques and careful attention to stitch placement.
Brioche Kitchener Stitch
This variation is used in brioche knitting, a technique that creates a textured, reversible fabric.
The Kitchener Stitch is modified to accommodate the unique characteristics of brioche knitting.
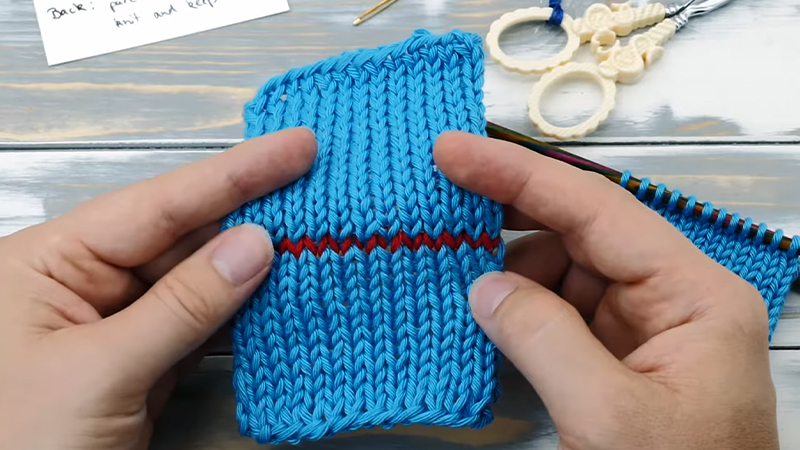
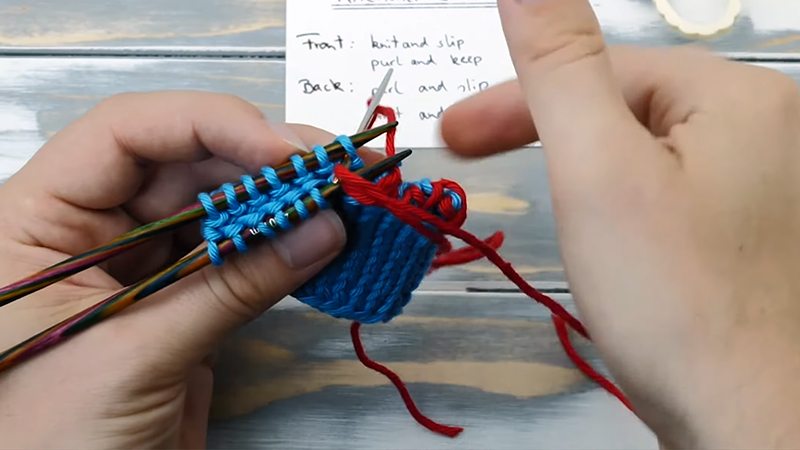
Two-Color Kitchener Stitch
This technique allows you to graft together two sets of stitches that are different colors.
It’s often used in colorwork knitting to create a seamless join between sections of contrasting colors.
Grafting in Pattern
This involves using the Kitchener Stitch to join two pieces of fabric while maintaining a specific stitch pattern. It requires careful attention to stitch placement to ensure the pattern is preserved.
Common Mistakes to Avoid When Doing Kitchener Stitch
Kitchener Stitch, though a highly effective technique, can be a bit tricky, especially for beginners. It involves a specific sequence of steps that, if not executed correctly, can lead to noticeable errors in your finished project.
Here are some common missteps to watch out for:
Uneven Tension
Symptoms: Stitches are noticeably tighter or looser in some sections.
Solution: Pay attention to your tension while knitting. Practice consistent and even tension by keeping a relaxed grip on the yarn. If necessary, adjust your needle size to achieve the desired tension.
Dropped Stitches
Symptoms: Stitches slip off the needles, leading to ladders or gaps in your work.
Solution: Use a stitch marker to mark the start of your row, making it easier to spot dropped stitches. If you drop a stitch, use a crochet hook or knitting needle to pick it up and return it to the needle.
Twisted Stitches
Symptoms: Stitches are twisted, causing an unusual texture in your fabric.
Solution: Ensure that you insert your needle correctly when knitting. For most stitches, the needle should enter from left to right for the right-hand needle and right to left for the left-hand needle.
Uneven Rows or Columns
Symptoms: Your fabric has visible irregularities in the alignment of stitches.
Solution: Count your stitches and rows regularly to ensure consistency. Pay attention to your tension and maintain a steady rhythm while knitting to achieve even results.
Gaps at the Edges of Circular Knitting
Symptoms: When knitting in the round, you may notice small gaps at the transition point.
Solution: To avoid these gaps, ensure that the first stitch of each round is worked tightly. Additionally, you can use the “magic loop” or “traveling loop” technique to minimize gaps.
Twisted Cast-On Edge
Symptoms: The cast-on edge of your work appears twisted or distorted.
Solution: When casting on, make sure that the stitches are oriented correctly on the needle. They should be facing the same direction. Take care not to twist the row when joining in the round.
Yarn Over Mistakes
Symptoms: Accidental yarn overs create extra stitches in your work.
Solution: Pay close attention to yarn overs, especially in lace or patterned knitting. If you notice an extra stitch, you may need to carefully unknit or tink (knit backward) to correct the mistake.
Uneven Increases or Decreases
Symptoms: Increases or decreases are not evenly distributed across a row or round.
Solution: Follow the pattern instructions carefully and make sure you are working the correct number of stitches for each increase or decrease. Count your stitches regularly to catch any discrepancies.
Tips and Tricks For Kitchener Stitch
Kitchener Stitch, also known as grafting, is a technique in knitting that allows you to join two sets of live stitches seamlessly, creating an almost invisible seam.
While it can seem a bit tricky at first, there are some tips and tricks that can make the process smoother and more manageable:
Use a Darning Needle with a Blunt Tip
When selecting a tapestry needle for Kitchener Stitch, opt for one with a rounded, blunt tip.
This prevents the needle from splitting the yarn fibers, making it easier to weave through the stitches smoothly and without snagging.
Practice with Scrap Yarn
Before tackling Kitchener Stitch on your main project, it’s highly beneficial to practice on a small swatch or with spare yarn.
This hands-on rehearsal allows you to get accustomed to the motions and build confidence in the technique.
Maintain Tension Consistency
Consistent tension is key to achieving an even and virtually invisible seam. Resist the urge to pull the yarn too tightly, as this can distort the stitches. Instead, aim for a gentle, uniform tension throughout the process.
Write Down the Steps
When you’re new to Kitchener Stitch, jot down the steps on a piece of paper and keep it within easy reach. This serves as a helpful reference until you’ve internalized the technique.
Use a Row Counter
Employing a row counter or placing removable stitch markers every 10 stitches can be a lifesaver.
It aids in keeping track of your progress, minimizing the chances of making mistakes and simplifying recovery if you lose your place.
Start with the Right Setup
Ensure that the two sets of stitches you’re grafting together are correctly aligned.
For instance, when joining the toes of socks, make sure both sets of stitches are oriented in the same direction to achieve a seamless result.
Weave in Ends Strategically
After completing the Kitchener Stitch, take care when weaving in the yarn ends.
Opt for an inconspicuous spot and weave them in securely to maintain the tidiness and invisibility of your seam.
Count Your Stitches
After each repetition of steps 2 to 5, take a moment to count the stitches on both needles. This simple check ensures that you haven’t inadvertently made any mistakes.
Catching errors early can save you from having to undo a significant portion of your work.
Practice Patience
Kitchener Stitch can be a meticulous process, particularly on larger projects. Resist the temptation to rush. Patient, deliberate movements lead to a cleaner finish. Remember, the end result justifies the effort.
Watch Video Tutorials
Sometimes, visual guidance can be immensely helpful. Numerous video tutorials are available online, offering a step-by-step demonstration of Kitchener Stitch.
Watching an expert can provide valuable insights and clarify any uncertainties you may have.
FAQs
What is Kitchener Stitch used for in knitting?
Kitchener Stitch, also known as grafting, is a technique used to join two sets of live stitches together seamlessly.
Can I use Kitchener Stitch for different stitch patterns?
Yes, Kitchener Stitch can be adapted for various stitch patterns. There are specific variations for garter stitch, stockinette stitch, lace, and more.
How do I prevent gaps when using Kitchener Stitch?
To prevent gaps, maintain a consistent tension in your working yarn throughout the process. Avoid pulling too tightly, as this can distort the stitches.
Are there any tips for practicing Kitchener Stitch?
Practice on a small swatch or with scrap yarn before attempting it on your main project. Use a blunt-tipped tapestry needle.
Can I “frog” or undo a Kitchener Stitch if I make a mistake?
Yes, you can undo a Kitchener Stitch if needed. This process, often called “ripping” or “frogging,” involves carefully unraveling the seam and picking up the stitches again.
Wrap Up
Mastering Kitchener Stitch in knitting is a valuable skill for creating seamless, polished finishes. Through careful practice and attention to detail, you can achieve an almost invisible join between two sets of live stitches.
Remember to use a blunt-tipped needle, practice on scrap yarn, and maintain consistent tension.
Writing down the steps and using markers can also aid in the learning process. Starting with the right setup and weaving in ends strategically ensures a tidy outcome.
While Kitchener Stitch may initially seem intricate, with patience and dedication, it becomes a valuable tool for elevating the quality of your knitting projects.
Leave a Reply