Transforming the style of a sweater can be a creative and practical endeavor, and one way to do so is by removing a cowl neck.
A cowl neck adds an elegant, draped collar to a garment, but sometimes, you may wish to simplify its appearance or repurpose the sweater.
In this guide, we’ll explore how to skillfully remove a cowl neck from a sweater step by step. This DIY project offers the opportunity to give your sweater a fresh look and adapt it to your evolving fashion preferences.
You can achieve a new stylish sweater without a cowl neck with patience and attention to detail.
What Is a Cowl Neck?
A cowl neck is commonly found on sweaters, dresses, and other garments. It’s characterized by its draped, loose-fitting fabric that forms a soft, folded collar around the neck.
The fabric typically extends down from the neckline, creating a cozy, draped effect. Cowl necks can vary in size and depth. Some may have a slight, subtle drape, while others can be more voluminous, providing extra warmth and style.
They can be made from fabrics, from lightweight knits to heavier materials like wool or cashmere.
This neckline style is famous for its versatility and ability to add a touch of elegance or coziness to an outfit, depending on the fabric and how it’s styled.
Cowl necks are often favored for their flattering drape and ability to provide comfort while still looking chic.
How to Remove a Cowl Neck From a Sweater?
A cowl neck can be a stylish feature on a sweater, but sometimes, you may want to change the look. Removing a cowl neck is a simple DIY project that can breathe new life into an old sweater.
This step-by-step guide will walk you through the process.
Materials Needed:
- Sweater with a cowl neck
- Seam ripper or small sharp scissors
- Sewing pins
- Matching thread
- Sewing machine or needle and thread
Gather Your Materials
Before you begin, ensure you have all the materials in your workspace. Double-check that you have your sweater, a seam ripper or small sharp scissors, sewing pins, and matching thread.
Turn the Sweater Inside Out
Gently turn the sweater inside out, careful not to stretch or distort the fabric. This will expose the inner seam that attaches the cowl neck to the shirt’s body.
Identify the Seam
Look closely at the seam that connects the cowl neck to the sweater body. It typically runs parallel to the edge of the neckline. Familiarizing yourself with this seam will help you navigate the removal process.
Secure the Sweater
Using sewing pins, carefully secure the layers of fabric together along the seam. Place pins regularly, ensuring the fabric is flat and aligned. This precaution will prevent any accidental snipping or tearing while you work.
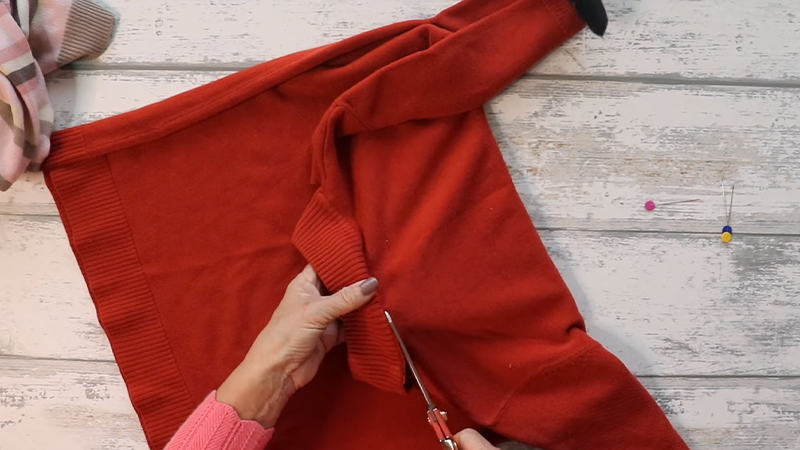
Begin Seam Removal
Start at one end of the seam with your seam ripper or small sharp scissors. Insert the seam ripper’s pointed end beneath the thread and gently lift it to release it.
If you’re using scissors, carefully snip the thread, not cutting into the fabric.
Remove Stitches
Continue to carefully remove the stitches along the entire length of the seam. Take your time, especially when navigating around any tight corners or curves.
Use the seam ripper’s edge to carefully lift and release each stitch, working steadily, controlled.
Check for Residual Threads
Once the seam has been completely undone, inspect the area for any remaining threads or loose fabric. Pull them away from the edge to ensure a clean, even finish.
Finish the Edges
Consider using a sewing machine or hand-sewing a narrow hem along the raw edge to prevent fraying.
This step is crucial if your sweater is made of a fabric prone to fraying. It provides a neat, polished finish to the newly exposed neckline.
Turn the Sweater Right Side Out
Carefully turn the sweater right side out again, being mindful not to tug or stretch the fabric.
Take a moment to appreciate the transformation as you see the sweater without the cowl neck for the first time.
Inspect and Make Adjustments
With the sweater now in its altered state, closely inspect the neckline. If you notice uneven edges or loose threads, use your scissors or seam ripper to trim or fix them. This final touch ensures that your revamped sweater looks clean and well-crafted.
Tips and Considerations
Embarking on a DIY project like removing a cowl neck from a sweater can be rewarding. However, it’s essential to approach it with care and attention to detail.
Here are some key tips and considerations to keep in mind:
Select the Right Sweater
Begin by choosing a sweater with a cowl neck that you want to alter. Opt for one in good condition, free from stains or excessive wear.
Additionally, consider the color and pattern, as these factors can influence the overall aesthetic of the final piece.
Take Your Time
Precision is critical in this project. Rushing may lead to mistakes or unintended damage to the fabric. Allocate sufficient time, especially for the stitch removal, and work comfortably to ensure a clean and professional finish.
Use Quality Tools
Investing in a high-quality seam ripper or sharp scissors is crucial. A well-made tool will provide better control and reduce the risk of accidentally cutting the fabric. Ensure the tool is sharp and in good condition before starting.
Secure the Fabric
Before removing any stitches, pin the layers of fabric together along the seam. This will prevent any shifting or stretching, ensuring a clean removal process.
Ensure the pins are placed perpendicular to the seam to avoid interference with the seam ripper or scissors.
Check for Double Seams
Some sweaters may have an additional layer of stitching for reinforcement. Take extra care to inspect the neckline thoroughly for any hidden stitches. Removing these secondary seams may require additional time and attention.
Consider the Fabric Type
Different fabrics may respond differently to the removal process. Delicate materials like silk or cashmere require extra caution to avoid damage.
Use a lighter touch and consider practicing on a scrap piece of fabric if you’re uncertain about the material’s durability.
Finish the Edges
Consider adding a narrow hem along the newly exposed edge when the fabric tends to fray.
This step not only prevents fraying but also enhances the durability and overall appearance of the sweater. Choose a thread color that matches the fabric for a seamless finish.
Inspect for Uneven Edges
After removing the cowl neck, carefully inspect the neckline for any irregularities.
Use small, sharp scissors to trim any loose threads or uneven edges. Take your time to achieve a polished and professional finish.
Test for Fit
Try on the altered sweater to ensure it fits comfortably without unintended puckering or stretching in the neckline.
Make any necessary adjustments to achieve the desired fit before completing the project.
FAQs
Can I remove a cowl neck from any sweater?
While removing a cowl neck from most sweaters is possible, it’s best suited for those with a relatively simple construction.
Do I need specialized tools for this project?
A seam ripper or small sharp scissors are essential for removing stitches. Additionally, sewing pins can help secure fabric layers.
Can I remove a cowl neck without damaging the sweater?
Careful attention and patience can remove a cowl neck without damaging the sweater.
What should I consider before starting this project?
Before beginning, select a sweater in good condition and ensure you have all the necessary materials. Take your time, and consider the fabric type and any potential hidden stitches.
Can I add a new neckline after removing the cowl neck?
Yes, you can certainly customize the neckline further. You might want to consider adding a different type of collar or leaving it open for a more casual look.
Wrap Up
Removing a cowl neck from a sweater can breathe new life into your wardrobe, allowing you to adapt and personalize your clothing to your evolving style.
Though this DIY project requires patience and careful execution, it offers a rewarding transformation.
Following the step-by-step guide, you’ve learned to undo stitches delicately, secure fabric layers, and consider fabric types, resulting in a sweater with a revamped neckline.
Whether you’re upcycling an old favorite or modifying a recent purchase, this process empowers you to take control of your fashion choices.
Now, enjoy the versatility of your updated sweater, ready to complement your style and keep you cozy in various settings.
Leave a Reply