In the world of DIY crafting and personalization, Cricut Design Space stands as a powerful tool for unleashing your creativity.
Among its many features, the “Flatten” function is a game-changer. This capability allows you to seamlessly merge multiple design layers into a single, printable image.
Whether you’re crafting stickers, labels, intricate papercrafts, or multi-layered vinyl decals, understanding how to use Flatten effectively is essential.
In this guide, we will explore the step-by-step process, tips, and advanced techniques to harness the full potential of Flatten in Cricut Design Space. Get ready to elevate your crafting projects to new heights of precision and creativity.
What Is Flatten in Cricut Design Space?
“Flatten” in Cricut Design Space is a fundamental feature that streamlines the process of creating intricate, multi-layered designs. It allows users to combine multiple elements into a single, printable image.
This is particularly valuable for projects involving stickers, labels, and complex vinyl decals. By using Flatten, you convert your design into a cohesive unit, ensuring that it prints and cuts seamlessly.
Essentially, it eliminates the need to cut individual layers separately, saving time and effort. This feature is especially beneficial for tasks like print-then-cut projects, where precision and accuracy are crucial.
Understanding how to effectively use Flatten empowers creators to take on a wide range of crafting endeavors with confidence and precision.
How to Use Flatten in Cricut Design Space?
Flatten in Cricut Design Space is a handy feature that allows you to convert multi-layered designs into a single, printable image.
This is particularly useful when you want to print and then cut intricate designs without having the individual layers cut separately.
Here’s a step-by-step guide on how to use the Flatten tool in Cricut Design Space:
Opening Cricut Design Space
Begin by launching the Cricut Design Space application on your device. This application is the digital workspace where you create, edit, and manage your design projects.
When you haven’t logged in, do so to ensure that all your designs and projects are synced and saved across devices.
Creating or Uploading Your Design
Depending on your project, you have the option to start a new project or work with an existing design. To begin a new project, click on the “New Project” button.
This will open a blank canvas, providing you with a fresh space to begin your design. When you’re working with an existing design, simply go to the “Upload” button on the left-hand menu. Follow the prompts to select and import your design.
Adding and Selecting Layers
Once you’re in the canvas, start adding the elements you want to include in your design.
This can be done using the various tools on the left-hand side, such as the Shapes, Text, and Upload buttons. If you’re working with an uploaded design, select it from the “Recently uploaded images” section.
Arranging Layers
Position the elements on the canvas as you envision them in your final design. You can do this by clicking on individual elements to select them.
Then, use the bounding box handles to resize, rotate, or adjust their position. For precise adjustments, you can input specific values in the Edit panel.
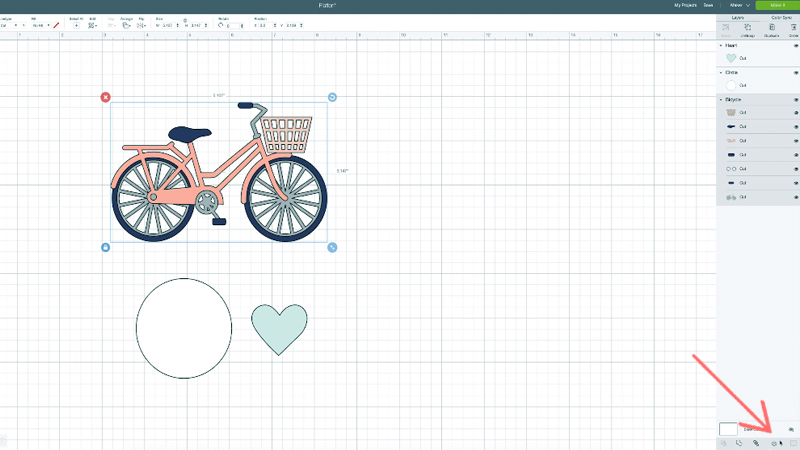
Selecting Layers to Flatten
To utilize the Flatten tool, you’ll need to select the layers you want to combine. This can be done by holding down the Shift key on your keyboard and clicking on each layer, or by clicking and dragging a box around the layers you want to include in the flattened image.
Accessing the Flatten Tool
With your desired layers selected, navigate to the Layers panel on the right side of the screen. Scroll down to the bottom of the panel to find the toolbar. Here, you’ll locate the “Flatten” button. Click on it to apply the Flatten function.
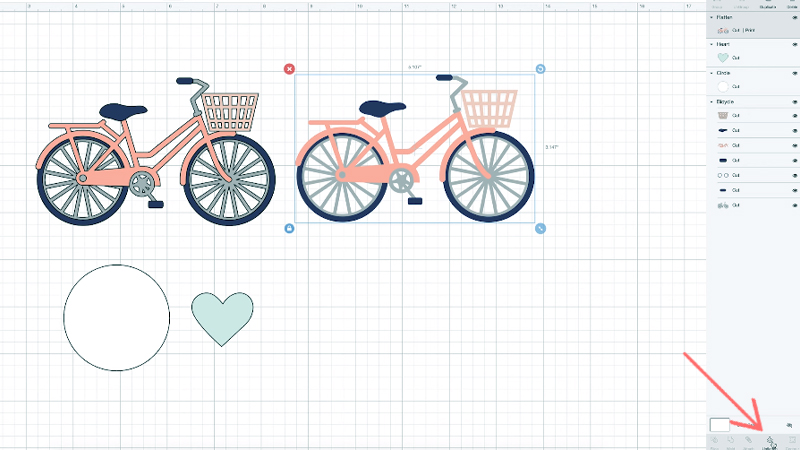
Viewing the Flattened Image
After clicking “Flatten,” observe how the selected layers are seamlessly merged into a single, flattened image. This transformation ensures that these layers are now treated as one entity in the Layers panel, simplifying the management of intricate designs.
Adjusting Position and Size
If necessary, click on the flattened image to select it. This will allow you to use the bounding box handles for resizing or rotating. Additionally, you can utilize the Position options in the Edit panel to make precise adjustments to its location on the canvas.
Preparing for Printing and Cutting
Click on the “Make It” button situated in the top-right corner of the screen. This action takes you to the mat preview screen, where you’ll get a visual of how your design will be printed and subsequently cut.
Printing and Cutting
Follow the on-screen instructions to prepare your chosen material for printing and cutting. For instance, if you’re using printable sticker paper, ensure it’s loaded correctly into your printer and properly aligned.
Finalizing Your Project
Once the cutting process is complete, carefully remove your design from the cutting mat. Be especially cautious with delicate elements. Integrate the finished design into your project or craft, bringing your creative vision to life.
When to Use Flatten?
The “Flatten” feature in Cricut Design Space is an invaluable tool that serves a specific purpose in the crafting process. Knowing when to employ it can greatly enhance your design capabilities.
Here are situations in which you should consider using the Flatten feature:
Simplifying Multi-Layered Designs
Sometimes, intricate designs consist of multiple layers. To transform them into a single, printable image without cutting each layer separately, the Flatten tool is indispensable.
Creating Print-Then-Cut Projects
When you intend to print an image and subsequently have it precisely cut by your Cricut machine, the Flatten feature is crucial. It ensures that your design is treated as a single unit for the cutting process.
Working with Printable Materials
If you’re using printable materials like sticker paper, printable vinyl, or cardstock, the Flatten tool is essential. It enables you to merge various design elements into a cohesive, printable image.
Designing Stickers and Labels
For projects involving stickers, labels, or any items that require a printed design before cutting, the Flatten feature streamlines the process. It ensures accurate alignment of the printed image for subsequent cutting.
Creating Intricate Designs with Overlapping Elements
In cases where your design incorporates overlapping elements, using the Flatten tool can help avoid any unintended cut lines. It combines the elements seamlessly, providing a clean and polished finished product.
Sculpture and 3D Projects
When working on projects that require intricate 3D assembly, the Flatten feature aids in creating templates. It allows you to print precise shapes that can be easily assembled into complex structures.
Designs with Special Effects or Patterns
If you’re using special effects, gradients, or intricate patterns that may not translate well into individual cut layers, flattening the design ensures that it’s accurately reproduced.
Projects with Text and Graphics
Combining text and graphics into a single, printable image is often necessary for projects like custom cards, invitations, or personalized gifts. The Flatten tool simplifies this process.
Streamlining Production
In situations where you’re creating multiples of the same design, flattening it can save time and resources. It allows you to print and cut multiple copies in one go, without the need for individual layer adjustments.
Advanced Techniques with Flatten
Once you’ve mastered the basics of using the Flatten feature in Cricut Design Space, you can delve into more advanced techniques that open up a world of creative possibilities.
Here are some advanced techniques to elevate your crafting projects:
Creating Layered Designs with Print Then Cut
Take your designs to the next level by combining both print and cut elements. First, flatten the print elements to create a seamless image. Then, overlay intricate cut designs to achieve stunning layered effects.
Adding Shadows and Outlines
Experiment with shadows and outlines to enhance the visual impact of your designs.
After flattening, duplicate the flattened layer and adjust the color to create a shadow effect. For outlines, duplicate the original layer and slightly increase its size.
Designing 3D Papercrafts
Dive into the world of papercrafts by utilizing the Flatten tool to create templates for intricate 3D structures.
Print the flattened template on sturdy cardstock, then score, fold, and assemble to bring your 3D creations to life.
Incorporating Gradient Colors
Take advantage of gradients to add depth and dimension to your designs. Create a gradient-filled shape, flatten it, and then combine it with other elements to achieve eye-catching visual effects.
Designing Tactile Projects
Utilize the Flatten feature for projects that require tactile elements, such as braille labels or raised designs for visually impaired individuals. Flatten the design before printing on specialized materials like swell paper.
Layering Specialty Materials
Explore the possibilities of working with specialty materials like glitter paper, foil, or embossed paper.
Flatten the design to ensure that these materials are printed accurately, and then apply them to your project for a touch of elegance or texture.
Creating Complex Vinyl Decals
When designing intricate vinyl decals with multiple layers, use the Flatten feature to streamline the process. Flatten each layer individually and then align them perfectly for a seamless application on surfaces.
Designing Intricate Iron-On Transfers
When working with iron-on materials for apparel and fabric projects, utilize the
Flatten tool to merge multiple layers into a single, heat-transferable image. This ensures precise application and alignment on your fabric.
Advanced Mixed Media Projects
Combine various crafting techniques, such as painting, drawing, and digital elements, by flattening them into a cohesive design. This allows you to create mixed-media masterpieces with precision and accuracy.
Tips and Tricks for Using Flatten Effectively
Mastering the Flatten feature in Cricut Design Space can significantly enhance your crafting capabilities.
Here are some valuable tips and tricks to use the Flatten feature effectively:
Organize Your Layers
Before applying the Flatten tool, ensure your design elements are well-organized. Group similar layers together, label them appropriately, and arrange them on the canvas for easy selection.
Use Duplicate for Experimentation
Duplicate your design before applying the Flatten tool. This way, you can keep an unaltered version for experimentation or adjustments without affecting the original.
Adjust Transparency for Visual Clarity
If your design has overlapping elements, adjust the transparency of layers to clearly visualize how they interact. This can help you decide which elements to include in the Flatten.
Combine Text and Graphics
To create intricate designs, combine text and graphics before flattening. This allows you to seamlessly integrate fonts and images, ensuring they print and cut together accurately.
Utilize Contour for Precision
Use the Contour tool to fine-tune your design before applying Flatten. This allows you to remove unnecessary cut lines, resulting in a cleaner and more precise finished product.
Experiment with Layer Effects
After flattening, apply additional layer effects like shadowing or outlining. This adds depth and dimension to your designs, elevating them to a professional level.
Check Print Then Cut Settings
Before sending your design to print, double-check the settings to ensure they’re optimized for your specific material. This includes adjusting the bleed, saturation, and other print settings.
Combine Images and Patterns
Combine uploaded images with patterns from the Cricut library to create unique designs. Flatten these combinations to ensure seamless integration before printing and cutting.
Adjust Cut Pressure for Specialty Materials
If you’re working with specialty materials like vellum, fabric, or thicker cardstock, adjust the cut pressure settings accordingly. This ensures clean and accurate cuts without damaging delicate materials.
Save As a Print Then Cut the Image
Once you’ve applied the Flatten tool, consider saving your design as a Print Then Cut image. This makes it easy to access and use in future projects without having to repeat the flattening process.
FAQs
What is the Flatten feature in Cricut Design Space?
The Flatten feature in Cricut Design Space allows you to merge multiple layers into a single, printable image.
How do I access the Flatten tool?
After selecting the layers you want to flatten, go to the Layers panel on the right side of the screen. At the bottom of the panel, you’ll find the toolbar with the “Flatten” button. Click on it to apply the Flatten effect.
Can I adjust the position and size after flattening?
Yes, you can. Click on the flattened image to select it, then use the bounding box handles to resize or rotate.
What are some common use cases for Flatten?
Flatten is used for creating print-then-cut projects, simplifying multi-layered designs, designing stickers and labels, working with printable materials, and streamlining the production of multiples.
Can I undo the Flatten effect?
Yes, you can. Use the Undo button (Ctrl+Z or Command+Z) immediately after applying the Flatten effect to revert to the previous state before flattening.
Wrap Up
Mastering the Flatten feature in Cricut Design Space opens up a world of creative possibilities. From complex multi-layered designs to precise print-then-cut projects, this tool streamlines the crafting process.
By understanding when and how to use Flatten effectively, you can bring your visions to life with precision and efficiency.
Remember to organize your layers, experiment with effects, and fine-tune settings for specialty materials. Additionally, always keep an unflattened version for future edits.
With these techniques, you’ll transform your crafting endeavors, achieving polished, professional results. Embrace the power of Flatten and watch your creations come to life with a new level of precision and creativity.
Leave a Reply