Sewing darts is a fundamental skill in garment construction that contributes to a well-fitted and tailored look. Darts are commonly used to shape fabric around curves and contours, such as bust darts in blouses or waist darts in dresses.
Learning how to sew darts easily is essential for sewists of all levels, from beginners to experienced craftsmen.
In this guide, we’ll explore a straightforward approach to sewing darts, providing you with the knowledge and confidence to tackle your sewing projects with precision and finesse.
By following these simple steps and tips, you’ll discover that sewing darts can be a straightforward and satisfying process that enhances the fit and style of your garments.
So, let’s dive into the world of dart sewing and unlock the secrets to creating beautifully contoured and well-fitted clothing effortlessly.
How to Sew Darts Easily?
Darts are triangular folds of fabric that are sewn into the garment to create more shape and definition at the bust, waist, or hips. Darts can make your garment more flattering and fitted for your body shape and size.
Here are some simple steps to follow:
Gather Your Materials
You will need a sewing machine, scissors, pins, thread, measuring tape, an iron, and a seam ripper. You will also need some fabric for your project and a pattern or a template for your darts.
You can use a pattern that already has darts marked on it, or you can make your own by tracing an existing garment or using your body measurements as a guide.
Cut Out Your Fabric Pieces
You will need to cut out your fabric pieces according to your project and your pattern or template. You can use scissors or a rotary cutter to cut out your fabric pieces, leaving some extra length for seam allowance and hem allowance.
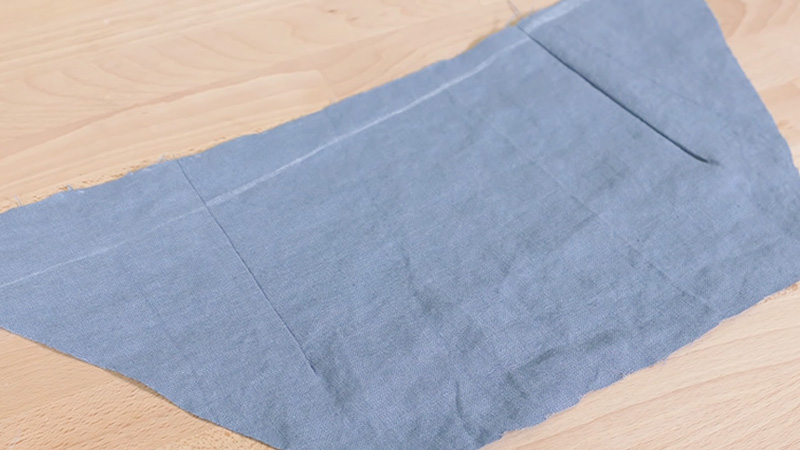
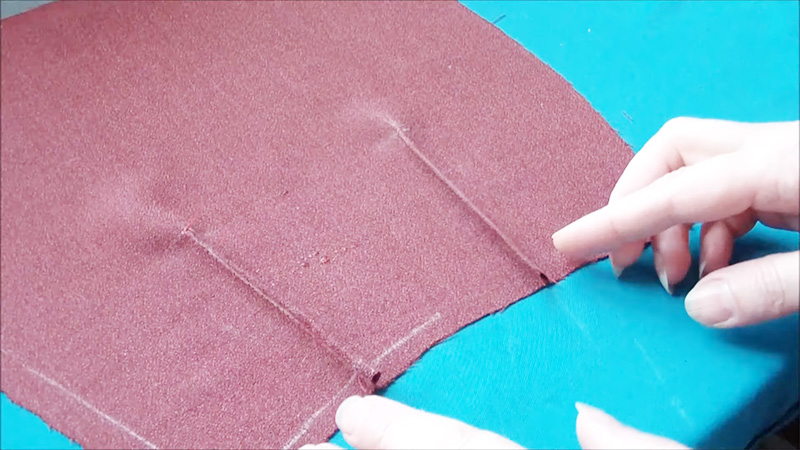
You should also mark the dart points and lines on the wrong side of the fabric pieces using a pencil, a tailor’s chalk, or a washable marker.
Pin Your Darts
You will need to pin your darts before sewing them. You can use pins or basting stitches to hold the dart folds in place.
You should fold the fabric along the dart line, with the right sides facing each other, and match the dart points and edges.
You should also pin the dart from the widest part to the tip, perpendicular to the dart line.
Sew Your Darts
You will need to sew your darts along the dart line using a straight stitch and a 1/4-inch seam allowance. You should start from the widest part of the dart and work your way to the tip, following the dart line.
You should also backstitch at the beginning of the dart to secure it, but not at the end of the dart to avoid puckering. You should also leave some thread tails at the end of the dart and tie them in a knot or a loop.
Trim And Press Your Darts
You will need to trim and press your darts after sewing them to make them neater and flatter. You can use scissors or a seam ripper to trim any excess fabric or threads from the dart seam allowance.
You can also use an iron to press the dart seam allowance flat or towards one side, depending on your preference and project.
Repeat For Other Darts
You will need to repeat the previous steps for any other darts that you have on your project, such as on the front, back, or sides of the garment.
You should make sure that all the darts are symmetrical and aligned on both sides of the garment and that they fit well with your body shape and size.
Finish Your Garment
You will need to finish your garment after sewing all the darts. You can sew the rest of the garment pieces together, following your project and your pattern or template.
You can also hem the edges of the garment using a straight stitch or a zigzag stitch. You can also add any embellishments or closures to your garment, such as buttons, zippers, or snaps.
Test Your Garment
You will need to test your garment after finishing it to make sure it fits well and looks good. You can try on your garment and check if the darts are comfortable, flattering, and secure.
You can also move around and see if the darts allow enough ease and flexibility. You can make any adjustments if needed by re-sewing, re-trimming, or re-pressing your darts.
Enjoy Your Garment
You will need to enjoy your garment after testing it. You can wear your garment and show off your sewing skills and style.
You can also compliment yourself on how well you sewed your darts easily and enjoyably!
What Stitch To Use For A Dart?
Darts are triangular or diamond-shaped folds of fabric that help to shape a garment. They are usually found at the bust, waist, or back of a garment.
Here are some common stitches for darts and how to sew them:
Straight Stitch
This is the most basic and common stitch for darts. It creates a straight line from the edge of the fabric to the tip of the dart.
To sew a straight stitch dart, you need to trace the dart on the wrong side of the fabric, fold the fabric along the center line of the dart, pin or baste the edges together, and sew along the marked line with a regular stitch length.
As you approach the point of the dart, shorten the stitch length and sew off the end of the fabric. Leave a long tail of thread and knot it by hand.
Curved Stitch
This is a variation of the straight stitch that creates a slight curve along the dart. It is useful for shaping garments that have curves, such as bust darts.
To sew a curved stitch dart, you need to trace the dart on the wrong side of the fabric, fold the fabric along the center line of the dart, pin or baste the edges together, and sew along the marked line with a regular stitch length.
As you approach the point of the dart, follow the curve of the dart and sew off the end of the fabric. Leave a long tail of thread and knot it by hand.
Double-Pointed Dart
This is a type of dart that has two points, one at each end of a diamond-shaped fold of fabric. It is often used for shaping garments that have fullness at both ends, such as waist darts.
To sew a double-pointed dart, you need to trace the dart on the wrong side of the fabric, fold the fabric along the center line of the dart, pin or baste the edges together, and sew from one point to another with a regular stitch length.
As you approach each point of the dart, shorten the stitch length and sew off the end of the fabric. Leave a long tail of thread and knot it by hand at each point.
Fish-Eye Dart
This is a type of double-pointed dart that has a curved shape instead of a straight one. It is often used for shaping garments that have curves at both ends, such as princess seams.
To sew a fish-eye dart, you need to trace the dart on the wrong side of the fabric, fold the fabric along the center line of the dart, pin or baste the edges together, and sew from one point to another with a regular stitch length.
As you approach each point of the dart, follow the curve of the dart and sew off the end of the fabric. Leave a long tail of thread and knot it by hand at each point.
French Dart
This is a type of curved dart that starts from the side seam and ends near or below the bust point. It is often used for shaping garments that have a loose fit or a low neckline.
To sew a French dart, you need to trace the dart on the wrong side of the fabric, fold the fabric along the center line of the dart, pin or baste the edges together, and sew along the marked line with a regular stitch length.
As you approach the point of the dart, follow the curve of the dart and sew off the end of the fabric. Leave a long tail of thread and knot it by hand.
Tuck Dart
This is a type of straight or curved dart that does not end at a point but extends beyond it to create a tuck or pleat in the fabric. It is often used for adding decorative details or extra fullness to a garment.
To sew a tuck dart, you need to trace the dart on the wrong side of the fabric, fold the fabric along the center line of the dart, pin or baste the edges together, and sew along the marked line with a regular stitch length.
Do not shorten the stitch length or knot the thread at the end of the dart. Instead, continue sewing beyond the point of the dart until you reach the desired length of the tuck.
Release Tuck
This is a type of tuck that starts from a point and releases into an open pleat. It is often used for adding shape or flare to a garment.
To sew a release tuck, you need to trace the dart and the tuck on the wrong side of the fabric, fold the fabric along the center line of the dart, pin or baste the edges together, and sew along the marked line with a regular stitch length.
Do not shorten the stitch length or knot the thread at the end of the dart. Instead, continue sewing beyond the point of the dart until you reach the end of the tuck.
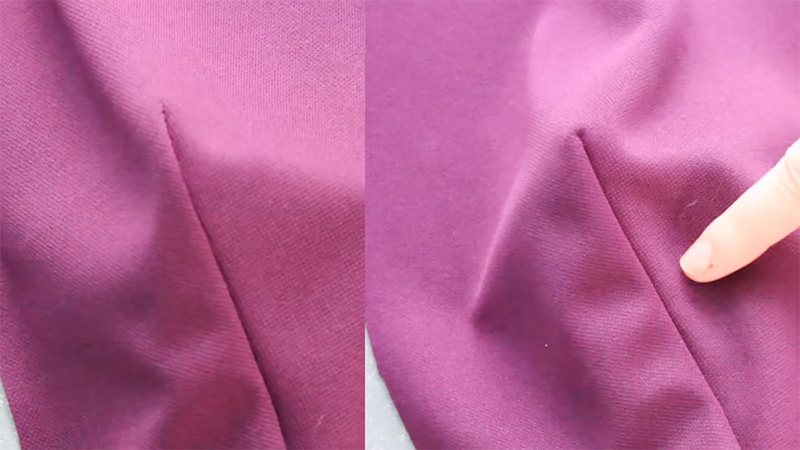
How To Clip After Sewing Darts?
Clipping after sewing darts is an essential step in creating a smooth and professional-looking finish on your sewing projects.
Here are some simple steps, to guide you through the process:
Complete Dart Stitching
Begin by sewing your dart according to your pattern’s guidelines. Stitch from the wider edge of the dart to the point, ensuring your stitches are neat and secure.
Prepare Your Scissors
Select a pair of sharp, fine-pointed scissors for precision. It’s important to have a pair of scissors that can easily cut through your fabric without causing snags or fraying.
Identify the Dart’s Point
Lay your fabric flat with the sewn dart facing up. Locate the point where the stitching lines meet at the tip of the dart. This is where you’ll be making your cuts.
Trim Excess Fabric
Carefully trim away the excess fabric from the point of the dart, making sure not to cut into the stitching.
Cut as close as possible to the stitching while maintaining a small seam allowance to prevent fraying.
Make Slanted Cuts
Starting at the point of the dart, make two slanted cuts toward each side of the dart. These cuts should form a V-shape and should be about 1/8 to 1/4 inch long, depending on your fabric’s weight.
Press the Dart
After clipping, press the dart flat using an iron. This helps the fabric lay smoothly and reduces bulk, resulting in a crisp and polished look.
Secure Loose Threads
Finally, check for any loose threads and trim them neatly. Your dart is now clipped and ready, providing a clean and professional finish to your garment.
Clipping after sewing darts is a crucial step in sewing that ensures your darts lay flat and create the desired shape in your garment.
By following these steps with care and precision, you’ll achieve clean and well-finished darts in your sewing projects.
FAQ
Darts are folded and stitched fabric tucks that help shape garments for a better fit. They’re essential for eliminating excess fabric and creating contours, such as waist and bust shaping.
You’ll need a sewing machine or needle and thread, fabric, pins, scissors, and an iron for pressing.
Use tailor’s chalk or a disappearing fabric marker to mark the dart’s starting and ending points on the fabric’s right side. Use pattern markings as a guide.
Start sewing from the wide end of the dart and gradually taper to the point. Make sure both dart legs are even to maintain symmetry.
It’s generally not necessary to backstitch at the end of a dart. Instead, leave long thread tails, tie them in a knot, and trim them to secure the dart without creating bulk.
Conclusion
As you conclude your exploration of sewing darts easily, you’ll find that mastering this skill greatly enhances your sewing capabilities.
Darts are the key to achieving a tailored and professional look in garments, ensuring a snug fit that flatters the body’s natural curves.
Whether you’re sewing clothing for yourself, loved ones, or clients, the ability to sew darts easily empowers you to create garments that exude style, comfort, and confidence.
By following the straightforward steps and practicing your dart-sewing techniques, you’ll become a more proficient and versatile sewist.
So, embrace the art of dart sewing as a fundamental building block in your sewing journey, and watch as your projects transform into beautifully contoured and expertly crafted creations that reflect your unique style and craftsmanship.
Leave a Reply