Embroidery is a beautiful and intricate art form that adds charm and personality to fabrics, whether it’s on a cherished piece of clothing, a decorative household item, or a personalized gift.
However, there are instances when you may find yourself wondering whether embroidery can be removed. Perhaps you’ve had a change of heart about a design, or you wish to repurpose a garment or fabric.
In this guide, we embark on a journey into the world of embroidery removal, exploring the techniques, challenges, and possibilities that come with it.
We’ll delve into the methods used to undo embroidery stitches, unveil the tools and skills required, and discuss the factors that can influence the success of your removal project.
Whether you’re a curious enthusiast, a seasoned embroiderer, or someone simply seeking answers, join us as we unravel the question: Can embroidery be removed? And if so, how?
Can Embroidery Be Removed?
Yes, embroidery can be removed, but the process can be challenging and time-consuming, depending on various factors.
The removal method you choose will depend on the type of fabric, the complexity of the embroidery, and your desired outcome. Here are some common methods to remove embroidery:
Picking Stitches
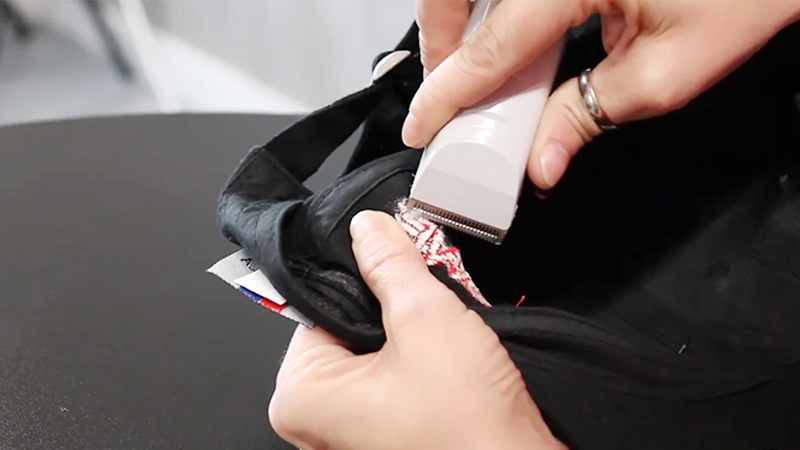
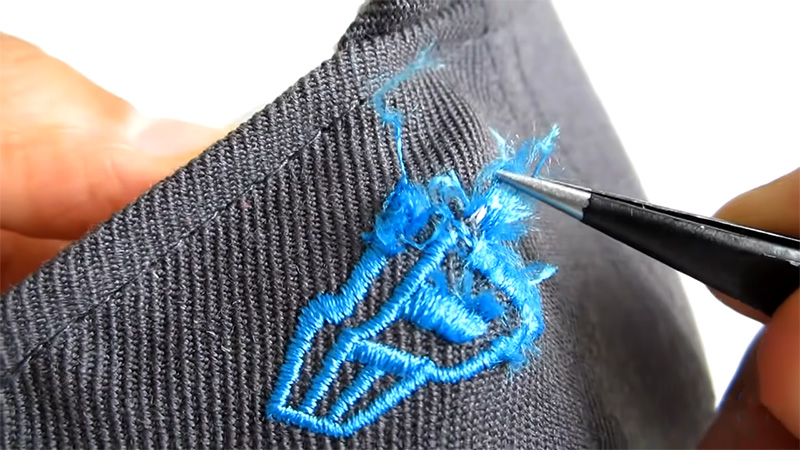
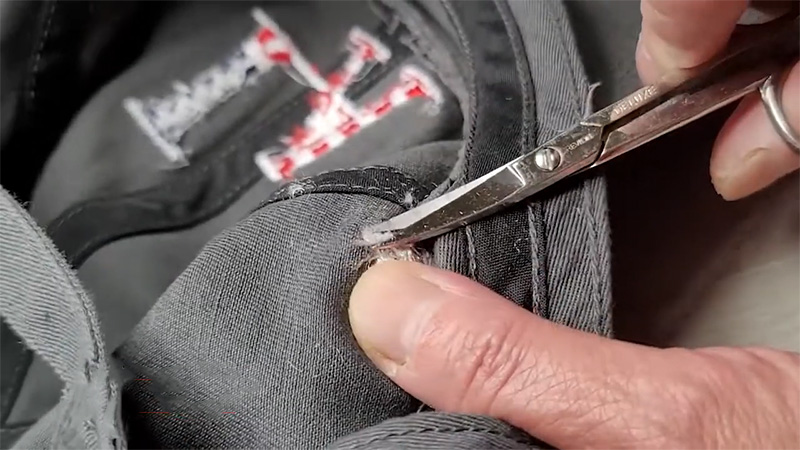
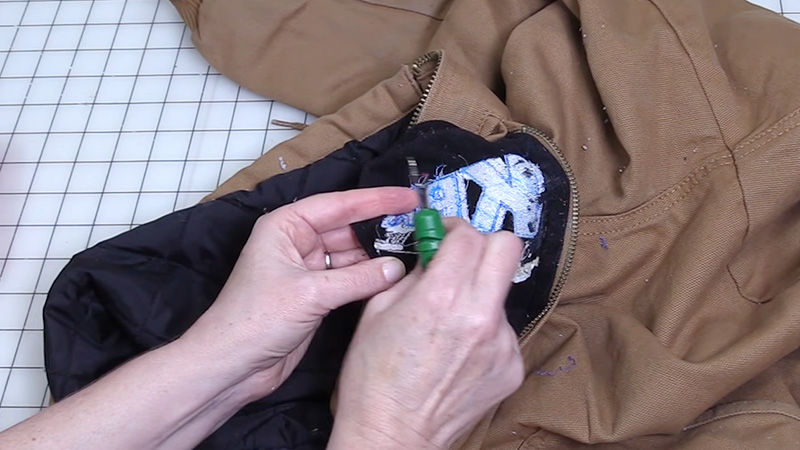
This involves carefully unpicking each stitch with a seam ripper, tweezers, or a small pair of embroidery scissors. It’s the most precise method but can be time-intensive, especially for intricate designs.
Cutting Threads
You can also cut the threads of the embroidery carefully, making sure not to damage the fabric beneath. After cutting, you may need to remove any remaining thread fragments with tweezers.
Steam or Heat
Applying steam or heat to the embroidered area can help loosen the threads, making it easier to remove them. Be cautious not to damage the fabric by overheating.
Chemical Solvents
Some solvents can dissolve or weaken embroidery thread. Test a small, inconspicuous area of the fabric first to ensure it won’t damage the material.
Covering or Redesigning
If the embroidery removal proves challenging, consider covering it with a patch, appliqué, or a new embroidery design to transform the item.
Professional Services
For valuable or delicate items, it’s often best to consult a professional embroiderer or textile conservator who can assess the best approach for removal and ensure the fabric’s integrity is maintained.
Keep in mind that embroidery removal requires patience and precision. It’s crucial to be gentle with the fabric to avoid damage.
Before attempting removal, assess the condition of the fabric and the embroidery to determine if it’s a feasible and worthwhile endeavor.
How Do I Remove Embroidery at Home?
Removing embroidery at home can be done with care and patience, but it requires attention to detail to avoid damaging the fabric. Here’s a step-by-step guide on how to remove embroidery at home:
Tools and Materials You’ll Need
- Seam ripper or small embroidery scissors
- Tweezers
- Steam iron (optional)
- Tracing paper or fabric marker (optional)
- Mild detergent (optional)
Assess the Embroidery
Before you begin, closely examine the embroidery you want to remove. Take note of the stitch type, density, and how it’s attached to the fabric. This will help you plan your removal strategy.
Prepare the Work Area
Place the fabric on a flat, clean surface with good lighting. If the embroidery is on a garment, make sure it’s inside out to access the back of the stitches.
Identify the Starting Point
Look for the beginning or end point of the embroidery. It’s often easier to start removing stitches from one of these points.
Use a Seam Ripper or Scissors
Gently insert the seam ripper or embroidery scissors under a single stitch at the starting point. Carefully cut the stitch, making sure not to cut the fabric beneath. Lift the thread end with the tweezers and pull it out.
Continue Removing Stitches
Repeat the process for each stitch. Be patient and work slowly to avoid damaging the fabric. If there are knots or securing stitches at the back, undo them as well.
Steam or Heat (Optional)
If you encounter resistance, lightly steam or apply heat to the stitches with an iron on a low setting. This can help loosen the thread, making it easier to remove.
Inspect the Fabric
Periodically inspect the fabric’s front and back to ensure you’re not causing any damage. Be extra cautious around delicate or thin fabrics.
Remove Residual Threads
After removing all the stitches, you may still have residual thread fragments. Use tweezers to carefully pick them off or lightly rub the area with your fingers.
Wash and Press (Optional)
If there are any visible marks or impressions from the removed embroidery, you can wash the fabric with mild detergent and press it to help smooth out the area. Be sure to follow the fabric’s care instructions.
Assess the Result
Check the fabric to ensure all traces of the embroidery have been removed. If needed, you can rework the area with a new design or patch.
Remember that embroidery removal requires a steady hand and patience. Take your time to avoid damaging the fabric, especially if it’s delicate or valuable.
If you’re uncertain or dealing with a complex embroidery design, consider seeking assistance from a professional embroiderer or textile conservator.
Will Removing Embroidery Leave Holes? – How to Avoid
Removing embroidery from fabric may leave small holes or impressions where the stitches were originally. These holes can be more noticeable on delicate or lightweight fabrics. To minimize or avoid leaving holes when removing embroidery, follow these tips:
Work Slowly and Carefully
Take your time when removing stitches. Use a sharp seam ripper or embroidery scissors to precisely cut the threads without tugging on the fabric. Avoid using excessive force, which can cause holes or damage.
Use Tweezers
After cutting the stitches, use tweezers to gently lift and remove the thread remnants. This reduces the chances of pulling or damaging the fabric fibers.
Inspect the Fabric
Periodically examine the fabric, both on the front and back, to check for any holes, weak spots, or damage. If you notice any issues, take corrective action immediately.
Steam or Heat
Applying gentle heat or steam to the area can sometimes help relax the fabric fibers and reduce the appearance of holes. Use a low heat setting on an iron or a handheld steamer. Be cautious not to overheat the fabric.
Test a Hidden Area
Before removing embroidery from a visible area, practice on a scrap piece of the same fabric or test a hidden section of the item. This will allow you to gauge how the fabric reacts to the removal process.
Use a Backing Fabric (Stabilizer)
Placing a backing fabric, such as a lightweight muslin or stabilizer, beneath the embroidery area while you work can provide extra support and minimize the risk of creating holes.
Patch or Repair
If you do encounter holes or impressions, consider patching or repairing the affected area. You can use a small fabric patch, appliqué, or even new embroidery to cover the damage.
Professional Help
If you’re dealing with a delicate or valuable fabric or if the embroidery removal proves challenging, consider seeking assistance from a professional embroiderer or textile conservator. They have the expertise to minimize damage and repair any holes effectively.
Remember that some fabrics are more forgiving than others when it comes to hole formation during embroidery removal. Delicate fabrics like silk or tulle are more prone to damage, while sturdier materials like denim may be less affected.
Always prioritize the careful and gradual removal of stitches to minimize the risk of leaving noticeable holes or impressions.
Should I Remove Embroidery from a Delicate Fabric?
The decision to remove embroidery from a delicate fabric should be carefully considered, as it involves potential risks to the fabric’s integrity. Here are some factors to weigh when deciding whether or not to remove embroidery from delicate fabric:
The Value of the Fabric
Consider the overall value of the fabric. Is it a cherished heirloom, an expensive piece of clothing, or a sentimental item? If the fabric holds significant value, you should think twice before attempting embroidery removal, as it can potentially damage the fabric.
The Complexity of the Embroidery
Evaluate how complex the embroidery is. If the design is simple and the stitches are not densely packed, removal may be more feasible without causing excessive damage.
The Fabric’s Condition
Assess the condition of the delicate fabric. If it’s already weakened, worn, or fraying, attempting to remove embroidery could exacerbate the fabric’s condition and lead to more significant damage.
Your Skill Level
Consider your experience and skill level in embroidery removal. If you’re confident in your ability to delicately remove stitches without harming the fabric, you may be more inclined to proceed. However, if you lack experience, it’s advisable to seek professional help.
Alternative Solutions
Think about whether there are alternative solutions to address your concerns without removing the embroidery. For example, if the embroidery is causing discomfort when worn, you might consider adding a lining to the garment.
Consult a Professional
When in doubt, consult a professional embroiderer or textile conservator. They have the expertise to assess the situation, advise you on the best course of action, and handle embroidery removal with minimal risk to delicate fabrics.
In many cases, the decision to remove embroidery from delicate fabric should not be taken lightly. Delicate fabrics are more prone to damage during the removal process, and the results can be unpredictable.
Seeking professional guidance is often the safest route, especially when dealing with valuable or sentimental items.
FAQs
While it is possible to remove embroidery without damaging the fabric, the success depends on various factors, including the fabric type, embroidery complexity, and removal technique used.
Delicate fabrics are more prone to damage during the removal process.
Tools commonly used for embroidery removal include a seam ripper, small embroidery scissors, tweezers, and, in some cases, an iron for steaming. The choice of tools may vary depending on the embroidery and fabric type.
Embroidery removal can be more challenging on delicate and thin fabrics, as they are more prone to damage. Sturdier fabrics like denim or canvas are generally more forgiving. Always proceed with caution and test on a hidden area if possible.
To minimize fabric damage when removing embroidery, work slowly and carefully, use sharp tools, and consider placing a backing fabric or stabilizer underneath.
Applying gentle heat or steam can also help relax the fabric and reduce the risk of holes or impressions.
The decision to remove embroidery on your own or seek professional help depends on factors such as your skill level, the fabric’s value, and the complexity of the embroidery.
If you have concerns about damaging the fabric or lack experience, consulting a professional embroiderer.
Conclusion
The answer to the question “Can embroidery be removed?” is a resounding “yes.” Through careful techniques and the right tools, embroidery can be successfully removed from various fabrics and items.
However, it’s important to approach the process with patience, as it can be time-consuming and may require some skill.
Throughout this exploration, we’ve discussed the methods of embroidery removal, which may involve techniques like picking, cutting, or using specialized tools such as seam rippers or embroidery scissors.
We’ve also highlighted the factors that can impact the ease and success of removal, including the type of fabric, the complexity of the design, and the quality of the original embroidery work.
Whether you’re looking to correct mistakes, repurpose fabrics, or update your embroidery designs, the knowledge and skills shared in this guide can empower you to tackle embroidery removal projects with confidence. Remember that practice and precision are key to achieving the best results.
Leave a Reply