Your trusty sewing machine is more than just a tool; it’s a partner in your creative journey. To keep it protected and looking its best, a sewing machine cover is a practical and stylish addition to your sewing space.
Instead of settling for a plain, store-bought cover, why not craft one that reflects your personal style and adds a touch of charm to your workspace?
So, how to make a sewing machine cover? In this comprehensive guide, we’ll walk you through the steps to create a custom sewing machine cover tailored to your preferences.
Whether you’re a sewing enthusiast looking for a fun project or a beginner eager to embark on a creative endeavor, this DIY sewing machine cover is both functional and visually pleasing.
Join us on this crafting adventure as we combine functionality with flair, ensuring that your sewing machine remains protected, your workspace organized, and your sewing journey even more enjoyable.
How to Make Sewing Machine Cover?
Creating a sewing machine cover is a practical and enjoyable sewing project. Here are step-by-step instructions on how to make your own sewing machine cover:
Measure Your Sewing Machine
Measure the dimensions of your sewing machine, including its length, width, and height. Add a few inches to each measurement for seam allowances and ease.
Cut Your Fabric
Cut two rectangular pieces of fabric based on the measurements you took. One piece will be for the outer cover, and the other for the lining.
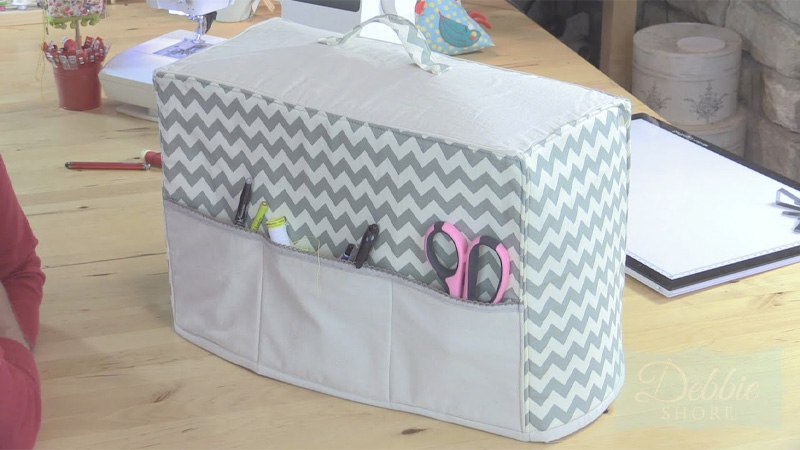
Optional: Add Pockets (if desired)
If you want pockets on the outside of your sewing machine cover for storing notions or tools, cut additional pieces of fabric to your desired size and sew them onto the outer cover fabric before moving to the next step.
Sew the Cover Panels
Place the two rectangular fabric pieces right sides together (if your fabric has a right side). Pin the edges in place. Leave the bottom edge (the one that will be the front of the cover) unpinned for now.
Stitch the Sides and Top
Using a straight stitch, sew along the sides and top of the fabric pieces, leaving the bottom open. Use a ½ inch seam allowance. Backstitch at the beginning and end to secure the seams.
Create Corners for a Fitted Cover
To make the cover fit your sewing machine more snugly, create corners at the bottom. With the cover inside out, fold the bottom corners so that the side seam aligns with the bottom seam, forming a triangular shape. Pin and stitch across the corner, about an inch or two from the point. Trim the excess fabric.
Turn the Cover Right-Side Out
Carefully turn the cover right-side out through the bottom opening. Push out the corners with a blunt object (like a chopstick) to make them neat and pointed.
Prepare the Lining
Repeat steps 4 to 7 with the lining fabric, but leave a small opening (about 4 inches) along one of the sides. This opening will be used later to turn the entire cover right-side out.
Insert the Lining into the Cover
Place the outer cover (right side out) inside the lining (wrong side out). Align the top edges and pin them together.
Stitch Around the Top Edge
Sew around the top edge of the cover and lining, about ¼ inch from the edge. This stitching will secure the two layers together.
Turn the Cover Right-Side Out
Reach inside the lining opening and carefully pull the entire cover through it. Push out the corners and edges to make the cover look tidy.
Hand-Stitch the Lining Opening
Fold the raw edges of the opening inside and hand-stitch it closed using a blind stitch or ladder stitch.
Press and Finish
Use an iron to press the cover, ensuring it looks crisp and neat. Pay special attention to the edges and corners.
Your DIY sewing machine cover is now complete! It will not only protect your sewing machine from dust but also add a personal touch to your sewing area. Enjoy your sewing adventures with your newly crafted cover!
What Are the Best Fabrics to Make a Sewing Machine Cover From?
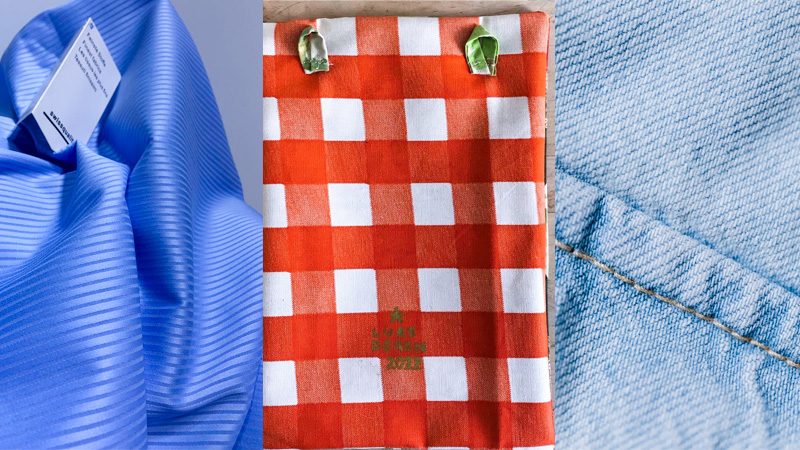
The best fabrics for making a sewing machine cover are those that provide protection, durability, and style. Consider these fabric options:
Cotton
Cotton fabric is a popular choice due to its durability and breathability. It’s available in a wide range of colors and patterns, making it easy to match your sewing room decor.
Canvas
Canvas is a heavy, sturdy fabric that offers excellent protection for your sewing machine. It’s often chosen for its durability and resistance to wear and tear.
Quilted Fabric
Quilted fabric combines multiple layers of fabric with a soft, padded interior. This provides extra protection and cushioning for your sewing machine.
Denim
Denim is rugged and durable, making it a great choice for a sewing machine cover. It’s also available in various shades and weights to suit your style.
Faux Leather or Vinyl
These materials are water-resistant and offer excellent protection from dust and spills. They provide a sleek and modern look to your sewing machine cover.
Laminated Cotton
Laminated cotton fabric has a water-resistant coating, making it easy to wipe clean. It’s a practical choice if you want extra protection against spills.
Decorative Fabrics
If you want a sewing machine cover that adds a pop of color or style to your sewing area, consider decorative fabrics like cotton prints, vintage-inspired patterns, or even personalized fabric with your own design.
Upcycled Fabrics
Consider repurposing old denim jeans, canvas bags, or other sturdy materials for a unique and eco-friendly sewing machine cover.
When choosing the best fabric for your sewing machine cover, consider your specific needs, style preferences, and the level of protection you want to provide for your valuable sewing machine.
DIY Sewing Machine Cover Pattern Details
Creating a DIY sewing machine cover is a fun and customizable project. Here are the pattern details and steps to get you started:
Pattern Details
- Fabric Requirements: Determine the size of your sewing machine, measure its dimensions (length, width, height), and add a few inches for seam allowances and ease. You’ll need fabric for the outer cover and the lining. For added stability, you may want to use interfacing or quilt batting.
- Design and Pockets: Decide whether you want a simple rectangular cover or a more fitted design. You can also choose to add pockets or storage compartments for sewing notions or tools. The pocket dimensions and placement are up to you.
- Closure: Think about how you want to close your sewing machine cover. Common options include a zipper, Velcro, buttons, or a tie closure. The choice depends on your design and sewing skills.
Steps to Create the Pattern
Measure Your Sewing Machine
Measure the length, width, and height of your sewing machine. Write down these measurements, as they will be the basis for your pattern.
Create a Rectangle for the Top
For the top of the cover, draw a rectangle on pattern paper or directly on your fabric. Its dimensions should match the length and width of your sewing machine plus seam allowances. This will be the part that lays flat on top of the machine.
Add Side Panels
To create the sides of the cover, cut two rectangles (one for each side) based on the height and width of your sewing machine plus seam allowances. These rectangles will wrap around the sides of your machine.
Design and Pockets
If you want to add pockets or any design elements, cut and attach those pieces to the top or side panels as desired. Remember to add seam allowances.
Closure
Determine where and how you want the closure to be positioned (e.g., at the back or front). Depending on the closure type, you may need to add a flap or a zipper panel. Ensure that your closure aligns with your chosen design.
Cut the Lining
Use the pattern pieces you’ve created to cut the corresponding pieces from your lining fabric. You should have a lining piece for the top and two for the sides.
Cut Interfacing or Batting (if using)
If you want added stability or padding, cut interfacing or batting pieces based on your pattern pieces. Attach them to the wrong side of your fabric pieces before sewing.
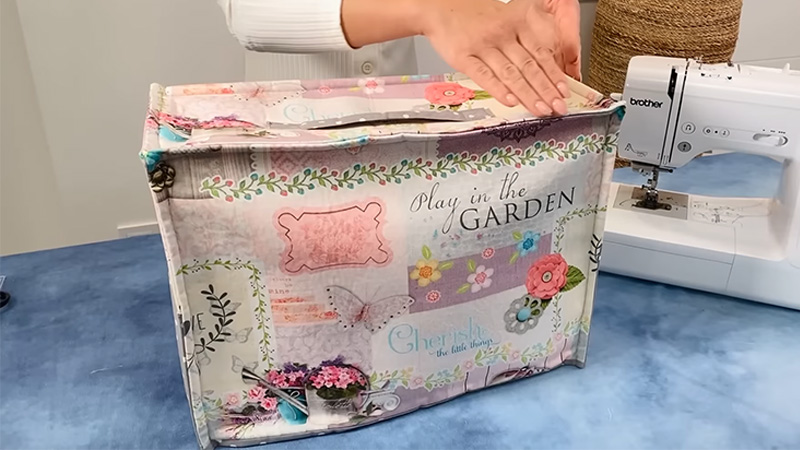
Assemble and Sew
Follow the assembly instructions outlined in the previous response to create your sewing machine cover, sewing the top and sides together. Pay attention to any pockets, closures, or design elements you’ve added.
Press and Finish
After sewing, press your cover to ensure crisp seams and corners. Trim any excess threads and tidy up any loose edges.
Place the Cover on Your Sewing Machine
Once your DIY sewing machine cover is complete, carefully place it over your sewing machine, ensuring a snug fit and that any closure or fastening method works as intended.
With these pattern details and steps, you can create a custom sewing machine cover that not only protects your machine but also reflects your personal style and preferences. Enjoy your sewing project!
FAQs
Yes, some sewing machine covers are designed to fit specific machine models or come in various sizes to accommodate different machines. Be sure to check the product description or label to ensure it fits your sewing machine.
Sewing machine covers are typically designed for sewing machines, but you can find covers or cases specifically made for sergers or other sewing equipment. These are tailored to the dimensions and features of those machines.
Cleaning instructions for sewing machine covers vary depending on the material. Most fabric covers can be machine-washed or spot-cleaned, while vinyl or plastic covers can be wiped down with a damp cloth.
If you can’t find a ready-made cover that fits your sewing machine, consider making a custom cover using your machine’s dimensions as a guide.
DIY sewing machine covers are a popular choice and can be tailored to your specific needs.
While a sewing machine cover can help protect your machine from dust and minor spills, it may not be sufficient to shield it from extreme humidity or temperature fluctuations.
For added protection in such conditions, consider storing your machine in a climate-controlled environment.
Conclusion
Crafting your own sewing machine cover is a rewarding endeavor that adds a personal touch to your sewing space while providing essential protection for your cherished machine.
By following the steps outlined in this guide, you’ve not only created a practical cover but also embarked on a creative project that allows you to express your unique style.
As you admire your newly crafted sewing machine cover, take pride in the skills you’ve honed and the creativity you’ve infused into this functional piece.
Your sewing machine now rests comfortably under a cover that’s not only a shield against dust and debris but also a reflection of your passion for sewing.
Remember that sewing is not just about the finished products; it’s about the joy of creating, and your handmade cover embodies this spirit. Continue to explore new sewing projects, experiment with different fabrics and designs, and let your creativity flourish.
Leave a Reply