You might want to remove the hoodie strings for a variety of reasons. Perhaps the strings are too long and get in the way, or maybe you just don’t like the look of them. Whatever the reason, removing the strings is a simple DIY project that you can do at home.
Before you start, it’s important to consider safety. Make sure you have a pair of sharp scissors and be careful when using them to avoid cutting yourself or damaging the hoodie.
If you are using a needle and thread, be mindful of the sharp end and handle with care. It’s also a good idea to work in a well-lit area so you can see what you are doing. Overall, take your time and be careful to avoid any mishaps.
Gather Your Tools
To remove the hoodie strings, you will need a pair of scissors and possibly a needle and thread. The scissors will be used to cut the strings, while the needle and thread will be used to reattach the strings if desired.
Make sure the scissors you use are sharp enough to easily cut through the strings. If you are using a needle and thread, choose a thread that is a similar color to the hoodie to make the repair less noticeable. It’s a good idea to have a few different colors of thread on hand in case you need to match the exact shade of your hoodie.
Before you start, gather all of your tools and place them within easy reach. This will make the process of removing the hoodie strings quicker and easier.
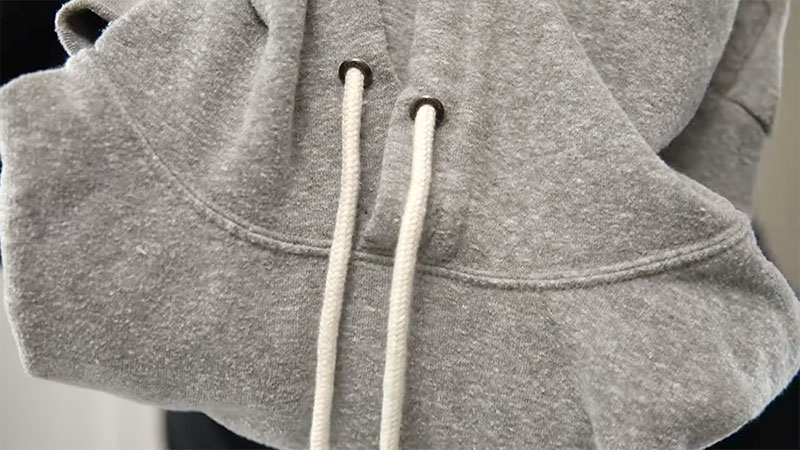
Locate the Strings
To locate the strings on your hoodie, start by looking for the holes in the hood. The strings should be running through these holes and be visible on both the inside and outside of the hood.
Once you have located the strings, take a moment to identify where they are attached to the sweatshirt. The strings may be attached to the hoodie with a knot, or they may be sewn into place. Knowing how the strings are attached will help you determine the best way to remove them.
It’s a good idea to take a few minutes to familiarize yourself with the location and attachment of the strings before you start cutting. This will make the process of removing the strings easier and more efficient.
Cut the Strings
Now that you have located the strings and identified where they are attached to the hoodie, it’s time to cut them.
To start, carefully position the scissors so that the blade is as close to the attachment point as possible. You want to cut as much of the string as possible without damaging the fabric of the hoodie.
Once you have positioned the scissors, carefully cut the strings. Take your time and make sure to avoid cutting the fabric of the hood or sweatshirt. If you are using a needle and thread to reattach the strings, you may want to leave a small length of string attached to the hoodie for ease of reattachment.
If you are having trouble cutting the strings close to the attachment point, you can try gently pulling on the strings to loosen them. This may make it easier to cut the strings without damaging the hoodie.
Once you have cut the strings, move on to the next step: removing the strings from the holes in the hood.
Remove the Strings
Now that you have cut the strings, it’s time to remove them from the holes in the hood. To do this, simply grasp the end of the string that is sticking out of the hole and gently pull it through.
If the strings are attached to the sweatshirt with knots, you may need to gently tug on the strings until the knots come undone. Be patient and take your time to avoid damaging the hoodie.
Once you have successfully removed the strings from the holes in the hood, you can proceed to the next step: finishing the job.
If you want to remove the strings completely, simply discard them. If you want to keep the strings, you can either leave them as they are or reattach them to the hoodie using a needle and thread.
Finish the Job
Now that you have removed the strings from the hoodie, it’s time to finish the job.
If you want to remove the strings completely, simply discard them. If you want to keep the strings, you will need to reattach them to the hoodie. To do this, thread a needle with a length of thread and tie the strings securely to the hood or sweatshirt. Make sure the knots are tight to ensure that the strings won’t come undone.
Once you have reattached the strings, trim any excess thread or string. You can use the scissors to do this.
With the strings reattached or removed, your hoodie is now ready to wear. Congratulations on a job well done.
Comparison of Methods for Removing Hoodie Strings
Here is a table comparing the different methods for removing hoodie strings:
| Method | Pros | Cons |
|---|---|---|
| Using wire or a coat hanger | Quick and easy | May be difficult to thread the string through the hole |
| Using a safety pin | Quick and easy | May be difficult to guide the string through the hole |
| Using your fingers | Can be done without additional tools | May be time-consuming |
| Cutting the loop open and sewing the string back in | Ensures a secure attachment | Time-consuming and may require sewing skills |
| Using a needle and thread | Ensures a secure attachment | May require sewing skills |
FAQs
Can I remove the strings from a hoodie without cutting them?
It is possible to remove the strings from a hoodie without cutting them, but it may be more difficult. If the strings are attached to the hoodie with knots, you can try gently tugging on the strings until the knots come undone. If the strings are sewn into place, you may need to carefully snip the threads to release them.
Can I reattach the strings to a hoodie after I remove them?
Yes, you can reattach the strings to a hoodie after removing them. To do this, you will need a needle and thread. Thread the needle with a length of thread and tie the strings securely to the hood or sweatshirt. Make sure the knots are tight to ensure that the strings won’t come undone.
Can I remove the strings from a hoodie without damaging it?
It is possible to remove the strings from a hoodie without damaging it, but you will need to be careful. Take your time when cutting the strings and be sure to position the scissors as close to the attachment point as possible to minimize the risk of cutting the fabric. If you are using a needle and thread to reattach the strings, be careful not to poke holes in the hoodie.
Can I remove the strings from a hoodie without a needle and thread?
Yes, you can remove the strings from a hoodie without a needle and thread. To do this, simply cut the strings and discard them. If you want to keep the strings, you can tie them together with a knot or use a small piece of tape to hold them in place.
Can I remove the strings from a hoodie without scissors?
It is possible to remove the strings from a hoodie without scissors, but it may be more difficult. You could try using a sharp knife or a pair of sharp-edged tools, such as pliers or wire cutters, to cut the strings. However, be sure to exercise caution when using these tools, as they can be sharp and potentially harmful. If you are not comfortable using these tools, it may be best to use a pair of scissors.
Conclusion
Removing the strings from a hoodie is a simple DIY project that can give your sweatshirt a new and updated look.
With just a pair of scissors and possibly a needle and thread, you can easily remove the strings by cutting them close to the attachment point and gently pulling them out of the holes in the hood.
Whether you choose to discard the strings or reattach them with a needle and thread, remember to be careful to avoid damaging the fabric of the hoodie. So why not give it a try and give your old hoodie a fresh new look?
Leave a Reply